background image

www.heinner.com 


            19 


By  pressing  On/Off  button  (4),  energise  the  machine.  On/Off  lamp  lights  as  long  as  the 
machine is on. Select the suitable program by pressing Program button (5). 
Press Start/Pause button (3) to start the program. Start/ Pause lamp becomes off and Wash 
lamp turns on. If you open the door of your machine while program is continuing, Start/Pause 
lamp will blink and related washing step lamp is on. 
Program  flow  can  be  monitored  via  Wash,  Rinse  Dry  and  End  lamps  (7)  on  control  panel. 
Machine remains silent for about 40-50 minutes when the drying lamp is on. 

NOTE

: Pressing Delay and Half load button(2) for 3 seconds activates half load option which 

shortens  the  durations  of  the  programs  that  you  have  selected  and  reduce  the  energy  and 
water consumption. 
If you have used an extra feature(delay or half load) (2) on the latest washing program, this 
feature will remain active also on the next washing program. If you want to cancel this feature 
on  the  newly  selected  washing  program,  press  Delay  and  Half  load  button  (2)  until  related 
lamps are off or turn the machine off with On/Off button (4). If you would like to use extra 
feature with newly selected program, select the desired functions. 

NOTE

: You can delay start time of  the program for 3-6-9 hours  by pressing delay button (2) 

before  program  starts.  If  you  want  to change  delay  time,first  press  Start/  Pause  button  and 
then  Delay  button  to  select  new  delay  time.  To  activate  new  delay  time,  press  Start/Pause 
button. To cancel the delay, you need to press Delay button until all delay lamps are off. 

NOTE

: If user switches off the machine after selecting the delay time and the programme has 

started, delayed time is cancelled. 

NOTE

:  When  softening  salt  is  not  enough,  salt  lack  warning  indicator  (6)  turns  on  and  you 

need to fill in the salt chamber.   

NOTE

:  When  rinse  aid  is  not  enough,  rinse  aid  lack  warning  indicator  (6)  turns  on  and  you 

need to fill in rinse aid chamber. 


IX.


CONTROL PANEL 


Summary of Contents for HDW-FS6006WE++

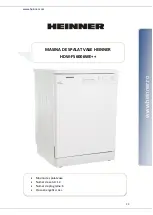
Page 1: ...DISHWASHER HDW FS6006WE Model HG 150SS www heinner ro Dishwasher Number of place settings 12 Number of programs 6 Energy class A ...

Page 2: ...for future reference This instruction manual is designed to provide you with all required instructions related to the installation use and maintenance of the appliance In order to operate the unit correctly and safety please read this instruction manual carefully before installation and usage II CONTENT OF YOUR PACKAGE Dishwasher User manual Warranty card ...

Page 3: ...e aid dispensers of your machine anything other than those detergents and rinse aids which are produced specifically for dishwashers Our company will not be responsible for any damage that might occur in your machine otherwise The water in the machine s washing section is no drinking water do not drink it Due to danger of explosion do not put into the machine s washing section any chemical dissolv...

Page 4: ... or unplug the machine Do not pull by the cable when unplugging Make sure to turn off the water tap Recommendations For energy and water saving remove coarse residues on your dishes before placing the dishes into the machine Start your machine after having fully loaded it Use the pre wash programme only whenever necessary Place such hollow items as bowls glasses and pots into the machine in such a...

Page 5: ... 3 Upper spray arm 4 Lower basket 5 Lower spray arm 6 Filters 7 Rating plate 8 Control panel 9 Detergent and rinse aid dispenser 10 Cutlery basket 11 Salt dispenser 12 Upper basket track latch 13 Active drying unit This system provides better drying performance for your dishes ...

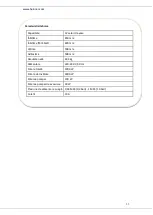
Page 6: ...gs Height 850 mm Height without worktop 820 mm Width 598 mm Depth 598 mm Net Weight 42 4 kg Electricity input 220 240 V 50 Hz Total Power 1900 W Heating Power 1800 W Pump Power 100 W Drain Pump Power 30 W Water supply pressure 0 03 MPa 0 3 bar 1 MPa 10 bar Current 10 A ...

Page 7: ...indoor plumbing is suitable for installing a dishwasher Also we recommend that you fit a filter at the entrance of your place or apartment so as to avoid any damage to your machine because of any contamination sand clay rust etc that might be occasionally carried in through the mains water supply or the indoor plumbing and to forestall such complaints as yellowing and formation of deposits after w...

Page 8: ...d our company will not be responsible for any loss of usage that might occur The indoor fuse current value should be 10 16 A Your machine is set according to 220 240 V If the mains voltage in your location is 110 V connect a transformer of 110 220 V and 3000 W inbetween The machine should not be plugged in during positioning Always use the coated plug supplied with your machine Running in low volt...

Page 9: ...as shown in the illustration 2 Warning The stand part which we will settle our machine under it by removing its worktop has to be stable in such a way not to allow balance disorder To remove the worktop remove the screws that hold the worktop which are located at the rear of the machine then push the front panel 1 cm from the front side towards the rear and lift it Adjust the machine feet accprdin...

Page 10: ...shing it undercounter without letting the hoses get crushed or bent 4 Warning after removal of worktop the machine should be placed in such a closed place of which dimensions are shown at fig Product Without insulation With insulation All product For 2nd basket For 3rd basket Height 820 mm 830 mm 835 mm ...

Page 11: ... use in dishwashers To put softener salt first remove the lower basket and then open the salt compartment cap by turning it counter clockwise 1 2 At first fill the compartment with 1 kg salt and water 3 at overflowing level Using a funnel will make filling easier The funnel is not delivered with the product Refit the cap and close it When salt absent indicator is lighten on app between 20th 30th c...

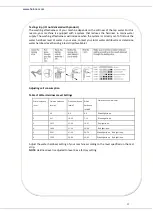
Page 12: ...dness level by using a test strip if available Adjusting salt consumption Table of Water Hardness Level Settings Water hardness level German hardness level dH French hardness level dF British hardness level dE Hardness Level Indicator 1 0 5 0 9 0 6 Wash light is on 2 6 11 10 20 7 14 Rinse light is on 3 12 17 21 30 15 21 Dry light is on 4 18 22 31 40 22 28 End light is on 5 23 31 41 55 29 39 Wash l...

Page 13: ... be put into the compartment prior to starting the machine Keep your detergents in cool dry places out of reach of your children Do not fill detergent into the detergent compartment more than required otherwise it may cause scratches on your glasses as well as lead to a poorly dissolved detergent Should you need more information concerning the detergent you will use contact detergent manufacturers...

Page 14: ...wet after having used 2 in 1 or 3 in 1 detergents The scope of warranty for your machine does not cover any complaints caused by the use of these types of detergents Recommended usage If you want to obtain better results while using combined detergents add salt and rinse aid into your machine and adjust the water hardness setting and the rinse aid setting to the lowest position Solubility of the t...

Page 15: ...l If blue stains form on your dishes decrease the level Level Brightener Dose Indicator 1 Rinse aid not dispensed Wash LED is on 2 1 dose is dispensed Rinse LED is on 3 2 doses are dispensed Dry LED is on 4 3 doses are dispensed End LED is on 5 4 doses are dispensed Wash and End LEDs are on ...

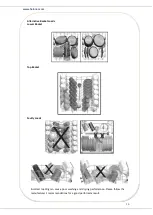
Page 16: ...h long handle and sharp pointed dishes as serving fork bread knife etc with their sharp points facing down or horizontally on the baskets Warning Place your dishes into your machine in a way that they will not prevent the upper and lower spray arms from spinning Dish rack There are dish racks on the upper basket of your machine a b You can use these dish racks in open or closed position When they ...

Page 17: ...r com 16 Alternative Basket Loads Lower Basket Top Basket Faulty Loads Incorrect loading can cause poor washing and drying performance Please follow the manufacturer s recommendations for a good performans result ...

Page 18: ... Suitable for heavily soiled dishes Level of Soil Light Light Light Medium Medium Heavy Amount of Detergent A 25 cm3 B 15 cm3 A A A A A Program Duration h min 0 15 0 30 1 14 3 25 0 50 1 57 Electricity consumption kWh cycle 0 02 0 74 0 88 0 923 1 1 1 7 Water consumption l cycle 4 5 12 4 16 12 12 17 2 Warning Short programs do not include a drying step The values declared above are the values obtain...

Page 19: ...esign legislation Washing tableware in a household dishwasher usually consumes less energy and water in the use phase than hand dishwashing when the household dishwasher is used according to the manufacturer s instructions Only use powder detergent for short programs Short programs do not include drying To assist drying we recommend slightly opening the door after a cycle is complete You can acces...

Page 20: ...remain active also on the next washing program If you want to cancel this feature on the newly selected washing program press Delay and Half load button 2 until related lamps are off or turn the machine off with On Off button 4 If you would like to use extra feature with newly selected program select the desired functions NOTE You can delay start time of the program for 3 6 9 hours by pressing del...

Page 21: ...ike to cancel a program while washing is continuing NOTE Do not open the door before the program ends NOTE At the end of washing program you can leave the door of your machine open to fasten the drying NOTE If the door of machine is opened or power is cut off during washing program will continue when the door is closed or the power is back ...

Page 22: ...larly on each month Wipe the door seals regularly with a damp cloth to remove any accumulated residue or foreign objects Filters Clean the filters and spray arms at least once a week If any food waste remains or foreign objects on the coarse and fine filters remove them and clean them thoroughly with water a Micro Filter b Coarse Filter c Metal Filter To remove and clean the filter combination tur...

Page 23: ... refitting the upper spary arm Drain Pump Large food residues or foreign objects which were not captured by the filters may block the waste water pump The rinsing water will then be above the filter Warning Risk of cuts When cleaning the waste water pump ensure that you do not injure yourself on pieces of broken glass or pointed implements In this case 1 First always disconnect the appliance from ...

Page 24: ...rror resumes Error of continuous water input Close the tap Contact the service The waste water in the machine cannot be discharged Water discharge hose is clogged The filters of your machine might be clogged Power off on your machine and activate the program cancellation command If the error continues contact the service Intended water temperature could not be reached Contact the service Faulty he...

Page 25: ...ectly Spray arm hitting the dishes If there are partial food wastes left on the dishes Dishes placed incorrectly into the machine sprayed water did not reach related places Basket overly loaded Dishes leaning against one another Very small amount of detergent added An unsuitable rather weak wash programme selected Spray arm clogged with food wastes Filters clogged Filters incorrectly fitted Water ...

Page 26: ...t in the best way in terms of energy consumption washing and drying performance 4 Clean all rough waste before you place dirty dishes to the machine 5 Operate the machine after it is completely full 6 Use pre washing program only when necessary 7 Observe program information and average consumption values table when selecting a program 8 Since the machine will reach high temperatures it should not ...

Page 27: ...to the information related to the performance of the appliance in the EU EPREL database Keep the energy label for reference together with the user manual and all other documents provided with this appliance It is also possible to find the same information in EPREL using the link https eprel ec europa eu and the model name and product number that you find on the rating plate of the appliance To acc...

Page 28: ...of their respective holders No part of the specifications may be reproduced in any form or by any means or used to make any derivative such as translation transformation or adaptation without permission from NETWORK ONE DISTRIBUTION Copyright 2013 Network One Distibution All rights reserved www heinner com http www nod ro http www heinner com http www nod ro Importer Network One Distribution Marce...

Page 29: ...www heinner com 28 MASINA DE SPALAT VASE HEINNER HDW FS6006WE Model HG 150SS www heinner ro Masina de spalat vase Numar de seturi 12 Numar de programe 6 Clasa energetica A ...

Page 30: ...are Acest manual este conceput pentru a vă oferi toate instrucţiunile necesare referitoare la instalarea utilizarea şi întreţinerea aparatului Pentru utilizarea corectă şi în siguranţă a aparatului vă rugam să citiţi cu atenţie acest manual de instrucţiuni înainte de instalare şi utilizare II CONȚINUTUL PACHETULUI DUMNEAVOASTRĂ Maşina de spălat vase Manual de utilizare Certificat de garanție ...

Page 31: ...isă a mașinii de spălat Utilizați numai detergenți și agenți de clătire special concepuți pentru mașini de spălat vase Compania noastră nu poartă răspunderea pentru nicio deteriorare care poate interveni ca urmare a utilizării necorespunzătoare Apa din compartimentul de spălare al mașinii nu este potabilă Pentru evitarea pericolului de explozie nu puneți agenți de dizolvare în compartimentul de sp...

Page 32: ...alimentare cu energie electrică Deconectați siguranța electrică a circuitului de alimentare sau scoateți din priză ștecărul mașinii Atunci când deconectați ștecărul de la sursa de alimentare nu trageți de cablu Asigurați vă că robinetul de apă este închis Recomandări Pentru economisi energie și apă îndepărtați resturile de mâncare de pe vase înainte de a le introduce în mașină Porniți mașina după ...

Page 33: ...rior 4 Coș inferior 5 Braț de pulverizare inferior 6 Filtre 7 Plăcuță cu date tehnice 8 Panou de comandă 9 Dozator pentru detergent și agent de clătire 10 Coș pentru tacâmuri 11 Compartiment pentru sare 12 Șină coș superior 13 Sistem de uscare activă Acest sistem permite o uscare mai eficientă a vaselor ...

Page 34: ...0 mm Înălțime fără blat 820 mm Lățime 598 mm Adâncime 598 mm Greutate netă 42 4 kg Alimentare 220 240 V 50 Hz Putere totală 1900 W Putere de încălzire 1800 W Puterea pompei 100 W Puterea pompei de evacuare 30 W Presiune de alimentare cu apă 0 03 MPa 0 3 bari 1 MPa 10 bari Curent 10 A ...

Page 35: ...area unei mașini de spălat vase Vă recomandăm să instalați un filtru între sursa de alimentare cu apă și mașină pentru a evita deteriorarea mașinii din cauza impurităților nisip rugină etc provenite din țevile instalației De asemenea instalarea unui filtru previne îngălbenirea și formarea depunerilor de calcar după spălare Furtunul de alimentare cu apă Nu utilizați un furtun vechi Utilizați furtun...

Page 36: ...ilizării fără împământare nu ne asumăm răspunderea pentru pierderile suferite Valoarea curentului siguranței electrice trebuie să fie de 10 16 A Mașina dumneavoastră este concepută să funcționeze la 220 240 V Dacă tensiunea din locul de instalare este de 110 V este necesară conectarea unui transformator de la 110 V la 220 V 3000 W În timpul poziționării mașinii ștecărul trebuie să fie deconectat d...

Page 37: ...e este potrivit pentru instalarea mașinii scoateți blatul cu care este prevăzută mașina așa cum este indicat în ilustrația 2 Avertisment Secțiunea sub care mașina va fi montată după îndepărtarea blatului acesteia trebuie să fie stabilă astfel încât să nu permită dezechilibrarea mașinii Pentru a demonta blatul cu care este prevăzută mașina scoateți șuruburile care îl fixează în partea din spate a m...

Page 38: ...tărie asigurându vă că furtunurile nu sunt strivite sau îndoite 4 Avertisment După îndepărtarea blatului cu care este prevăzută mașina aceasta trebuie poziționată într un spațiu care să aibă dimensiunile indicate în ilustrație Produs Fără izolație Cu izolație Toate produsele Pentru al 2 lea coș Pentru al 3 lea coș Înălțime 820 mm 830 mm 835 mm ...

Page 39: ...une sare de dedurizare scoateți mai întâi coșul inferior apoi desfaceți capacul compartimentului pentru sare prin rotire în sens contrar acelor de ceasornic 1 2 La prima utilizare umpleți complet compartimentul cu 1 kg de sare și apă 3 Utilizarea unei pâlnii ușurează umplerea compartimentului Pâlnia nu este livrată împreună cu produsul Puneți capacul la loc și închideți l Atunci când indicatorul d...

Page 40: ...n dH Nivel de duritate francez dF Nivel de duritate britanic dE Indicație nivel duritate 1 0 5 0 9 0 6 Indicatorul luminos pentru spălare este aprins 2 6 11 10 20 7 14 Indicatorul luminos pentru clătire este aprins 3 12 17 21 30 15 21 Indicatorul luminos pentru uscare este aprins 4 18 22 31 40 22 28 Indicatorul luminos pentru finalizarea programului este aprins 5 23 31 41 55 29 39 Indicatorul lumi...

Page 41: ...rț detergenți sub forma de pudră gel și tablete pentru mașini de spălat vase Detergentul trebuie pus în compartiment înainte de a porni mașina Păstrați detergenții într un loc răcoros și uscat la care copiii să nu aibă acces Nu puneți în compartiment mai mult detergent decât este necesar în caz contrar paharele pot fi zgâriate iar detergentul nu se va dizolva corespunzător Pentru informații suplim...

Page 42: ...ră nu este aplicabilă reclamațiilor apărute în urma utilizării acestor tipuri de detergenți Recomandări privind utilizarea Dacă doriți să obțineți rezultate mai bune atunci când utilizați detergenți combinați puneți sare și agent de clătire în compartimentele corespunzătoare ale mașinii și setați nivelul de duritate a apei și nivelul agentului de clătire la cele mai scăzute valori Solubilitatea de...

Page 43: ...ent de clătire Indicatorul luminos pentru spălare este aprins 2 Se eliberează 1 doză Indicatorul luminos pentru clătire este aprins 3 Se eliberează 2 doze Indicatorul luminos pentru uscare este aprins 4 Se eliberează 3 doze Indicatorul luminos pentru finalizarea programului este aprins 5 Se eliberează 4 doze Indicatorul luminos pentru spălare și cel pentru finalizarea programului sunt aprinse ...

Page 44: ...posibile răniri puneți întotdeauna obiectele cu mâner lung și vârfuri ascuțite cum ar fi o furculițele de servire sau cuțitele de pâine etc cu vârfurile sau muchiile ascuțite orientate în jos sau orizontal pe coșuri Avertisment Puneți vasele în mașină astfel încât acestea să nu blocheze rotirea brațului de pulverizare superior și a celui inferior Rafturile Coșul superior al mașinii dumneavoastră e...

Page 45: ...elor în coșuri Coșul inferior Coșul superior Exemple de așezare incorectă Încărcarea incorectă poate cauza performanțe slabe de spălare și uscare Vă rugăm să urmați recomandările producătorului pentru un rezultat bun al performanței ...

Page 46: ...rte murdare Nivel de murdărire Ușoară Ușoară Ușoară Medie Medie Intensă Cantitate de detergent A 25 cm3 B 15 cm3 A A A A A Durată program h min 0 15 0 30 1 14 3 25 0 50 1 57 Consum de energie kWh ciclu 0 02 0 74 0 88 0 923 1 1 1 7 Consum de apă l ciclu 4 5 12 4 16 12 12 17 2 Avertisment Programele scurte nu includ o etapă de uscare Valorile declarate mai sus sunt valori obținute în condiții de lab...

Page 47: ...de spălat vase de uz casnic de regulă consumă mai puțină energie și mai puțină apă în faza de spălare decât spălarea manuală atunci când mașina de spălat vase de uz casnic este utilizată conform indicațiilor producătorului Utilizați numai detergent pulbere pentru programele scurte Programele scurte nu includ uscarea Pentru a grăbi uscarea vă recomandăm să deschideți puțin ușa după finalizarea unui...

Page 48: ...va rămâne activă pentru următorul program de spălare Dacă doriți să anulați această funcție în cadrul noului program selectat apăsați pe butoanele Temporizare și Încărcare la jumătate 2 până când indicatoarele luminoase aferente se sting sau opriți mașina cu ajutorul butonului de pornire oprire 4 Dacă doriți să utilizați o funcție suplimentară pentru noul programul selectat selectați funcția dorit...

Page 49: ...ășurării acestuia NOTĂ Nu deschideți ușa înainte de finalizarea programului NOTĂ Pentru a grăbi uscarea vaselor lăsați ușa mașinii întredeschisă după finalizarea programului de spălare NOTĂ Dacă ușa mașinii este deschisă sau alimentarea cu energie electrică este întreruptă în timpul desfășurării unui program acesta va continua după închiderea ușii sau la restabilirea alimentării cu energie electri...

Page 50: ...e acumulate si obiectele straine Filtrele Curățați filtrele și brațele de pulverizare cel puțin o dată pe săptămână Dacă au rămas resturi de alimente pe filtrele grosiere sau fine scoateți filtrele și curățați le bine cu apă a Microfiltru b Filtru grosier c Filtru de metal Pentru a îndepărta și curăța setul de filtre rotiți l în sens antiorar și ridicați l în sus 1 Trageți filtrul grosier din micr...

Page 51: ...e Risc de tăiere La curățarea pompei de apă uzată aveți grijă să nu vă răniți cu sticlă spartă sau obiecte ascuțite În acest caz 1 În primul rând deconectați întotdeauna aparatul de la rețeaua de alimentare 2 Scoateți coșurile 3 Scoateți filtrele 4 Scoateți apa folosind un burete dacă este necesar 5 Verificați zona și îndepărtați orice obiecte străine 6 Instalați filtrele 7 Reintroduceți coșurile ...

Page 52: ...acă eroarea reapare Eroare de alimentare continuă cu apă Închideți robinetul Solicitați asistență tehnică Apa din mașină nu poate fi evacuată Furtunul de evacuare a apei este înfundat Filtrele mașinii ar putea fi înfundate Opriți și porniți mașina apoi anulați programul curent Dacă eroarea persistă contactați serviciul de asistență tehnică Apa nu a atins temperatura necesară Solicitați asistență t...

Page 53: ...are lovesc vasele Dacă rămân pe vase resturi parțiale de alimente Vasele sunt așezate incorect în mașină iar apa pulverizată nu a ajuns în locurile respective Coșul este supraîncărcat Vasele se sprijină unele de celelalte Nu se utilizează detergent suficient Este selectat un program de spălare nepotrivit Brațele de pulverizare sunt înfundate cu resturi de alimente Filtrele sunt înfundate Filtrele ...

Page 54: ... eficientizarea spălării și uscării 4 Înainte de a pune vasele în mașină îndepărtați toate resturile mari de alimente de pe acestea 5 Porniți mașina numai după ce ați umplut coșurile 6 Utilizați programul de prespălare numai atunci când este necesar 7 Atunci când selectați un program de spălare citiți cu atenție tabelul cu informații privind programul și valorile medii de consum 8 Nu poziționați m...

Page 55: ... date EPREL cu privire la performanțele aparatului Păstrați eticheta energetică pentru consultări ulterioare împreună cu manualul de utilizare și cu toate celelalte documente furnizate împreună cu acest aparat De asemenea puteți găsiți aceleași informații în baza de date EPREL folosind link ul https eprel ec europa eu și denumirea modelului o găsiți pe plăcuța cu date tehnice a aparatului Pentru a...

Page 56: ...ar sistemul unul la unu sau la punctul de colectare organizat de Primaria Sectorului localitatii Dvs Simbolul marcajul aplicat produselor care indica faptul ca deseurile DEEE bateriile si acumulatorii fac obiectul unei colectari separate il reprezinta o pubela barata cu o cruce Aceste masuri vor ajuta la protejarea mediului Societatea Network One Distribution S R L este inscrisa in Registrul de pu...

Page 57: ...niciun mijloc nici utilizată pentru obținerea unor derivate precum traduceri transformări sau adaptări fără consimțământul prealabil al companiei NETWORK ONE DISTRIBUTION Copyright 2013 Network One Distribution Toate drepturile rezervate www heinner com http www nod ro Acest produs este proiectat și realizat în conformitate cu standardele și normele Comunității Europene Importator Network One Dist...

Page 58: ...www heinner com 57 ...
Reviews: