background image

www.heinner.com                                                                8/6kg, 220-240V~50Hz, 1400rpm 


            8 


SETTING UP YOUR MACHINE 
 

Your machine must only be installed by an authorised service company. 

1.


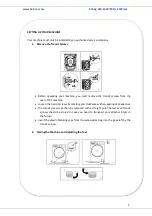
Remove the Transit Screws 


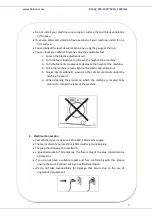
Before  operating  your  machine,  you  must  remove  the  transit  screws  from  the 

rear of the machine. 


Loosen the transit screws by rotating anti-clockwise with an appropriate spanner. 


The transit screws can then be removed with a straight pull. The removed transit 

screws should be  stored in case  you  need to transport your  Washer  Dryer in 
the future. 


Insert the plastic blanking caps from the accessories bag into the gaps left by the 

transit screws. 


2.


Placing the Machine and Adjusting the Feet 


Summary of Contents for HWDM-V8614D

Page 1: ...WASHER DRYER Model HWDM V8614D www heinner ro Washer dryer Washing capacity Drying capacity 8 6 kg Spin capacity 1400 rpm Energy class D ...

Page 2: ... and keep it for future reference This instruction manual is designed to provide you with all required instructions related to the installation use and maintenance of the appliance In order to operate the unit correctly and safety please read this instruction manual carefully before installation and usage II CONTENT OF YOUR PACKAGE Washer dryer User manual Warranty card ...

Page 3: ...er at the beginning of each wash Unplug your Washer Dryer and switch off the water supply if the Washer Dryer is left unused for a long time We also recommend that you leave the door open to prevent build up of humidity inside the Washer Dryer Some water may be left in your Washer Dryer as a result of quality checks during production This will not affect the operation of your Washer Dryer Keep the...

Page 4: ...nd a lockable door a sliding door or a door with a hinge on the opposite side to that of the washer dryer in such a way that a full opening of the washer dryer door is restricted Install your Washer Dryer in a location that can be ventilated and has constant air circulation You must read these warnings You can thus protect yourself and your beloved ones against fatal injuries and risks DANGER OF G...

Page 5: ... are wet 6 Call the nearest authorised service company for assistance if the power cord malfunctions EXPLOSION RISK Thoroughly rinse off any chemicals such as stain remover from your garments before beginning a washing and drying programme Failure to do so may cause a risk of explosion when the drying function is used DANGER OF FIRE 1 Do not keep flammable or explosive liquids near your machine 2 ...

Page 6: ... loaded into your Washer Dryer are free from foreign objects such as nails needles lighters matches and coins FALL AND INJURY HAZARD 1 Do not climb on your Washer Dryer 2 Make sure hoses and cables do not cause a trip hazard 3 Do not turn your Washer Dryer upside down or on its side 4 Do not lift your Washer Dryer using the door or detergent drawer 5 Make sure hoses and cables do not cause a trip ...

Page 7: ...Do not use your Washer Dryer for any purpose not expressly specified in this user guide 4 This appliance can be used by children aged from 8 years and above and by persons with reduced physical sensory or mental capabilities or lack of experience and knowledge if they have been given supervision or instruction concerning use of the appliance in a safe way and understand the hazards involved Childr...

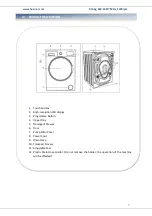
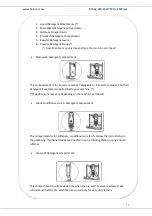
Page 8: ... Touch buttons 2 High resolution LCD display 3 Programme Button 4 Upper Tray 5 Detergent Drawer 6 Door 7 Pump Filter Cover 8 Power Cord 9 Drain Hose 10 Transport Screws 11 Adjustable Feet 12 Plastic Drain Hose Holder Do not remove the holder the operation of the machine will be affected ...

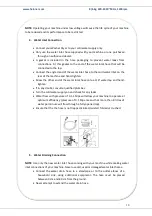
Page 9: ...screws from the rear of the machine Loosen the transit screws by rotating anti clockwise with an appropriate spanner The transit screws can then be removed with a straight pull The removed transit screws should be stored in case you need to transport your Washer Dryer in the future Insert the plastic blanking caps from the accessories bag into the gaps left by the transit screws 2 Placing the Mach...

Page 10: ...e machine is level tighten the plastic adjustment nut 5 Never insert cardboard wood or other similar materials under the machine to level it 6 When cleaning the ground on which the machine is located take care not to disturb the level of the machine 3 Electrical Connection Your Washer Dryer requires a 220 240V 50Hz mains supply The mains cord of your machine is fitted with a grounded plug The plug...

Page 11: ...he other end of the water inlet hose onto a 3 4 water tap and hand tighten If in any doubt consult a qualified plumber Turn the cold water supply on and check for any leaks Water flow with pressure of 0 1 1 Mpa will allow your machine to operate at optimum efficiency pressure of 0 1 Mpa means that more than 8 litres of water per minute will flow through a fully opened tap Ensure that the the hose ...

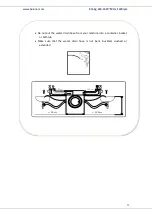
Page 12: ... 220 240V 50Hz 1400rpm 11 Do not put the water drain hose from your machine into a container bucket or bathtub Make sure that the water drain hose is not bent buckled crushed or extended 95 cm 145 cm 140 cm 95 cm 95cm 150cm ...

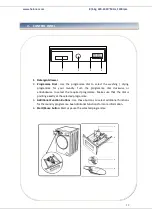
Page 13: ...undry Turn the programme dial clockwise or anticlockwise to select the required programme Make sure that the dial is pointing exactly at the selected programme 3 Additional Function Buttons Use these buttons to select additional functions for the laundry programme See Additional Functions for more information 4 Start Pause button Start or pause the selected programme 1 2 3 4 5 6 ...

Page 14: ...ents or limescale remover The fluid detergent level plate is supplied inside your machine Specifications may vary depending on the machine purchased Fabric conditioner starch detergent compartment This compartment is for softeners conditioners or starch Follow the instructions on the packaging If softeners leave residue after use try diluting them or using a liquid softener Pre wash detergent comp...

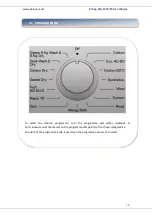
Page 15: ...select the desired programme turn the programme dial either clockwise or anti clockwise until the marker on the programme dial points to the chosen programme Ensure that the programme knob is exactly on the programme you want to select VI PROGRAM KNOB ...

Page 16: ...e level of dirtiness less dirty dirty very dirty Never wash coloured and white laundry together Dark textiles may contain excess dye and should be washed separately several times before being included in a mixed load Ensure that there are no metallic materials on your laundry or in the pockets if so remove them Close zips and fasten any hooks and eyes Remove the metallic or plastic hooks of curtai...

Page 17: ...e Open the loading door of your machine Check inside the drum There may be laundry left inside from previous washes If there is empty your machine before selecting a programme Load your laundry into the drum ensuring it is loosely packed Fold large objects like quilts and blankets into the drum as shown below ...

Page 18: ...detergent drawer and the rest in compartment II Use detergents produced for automatic washing machines in your machine Follow the instructions on the detergent packaging when determining the amount of detergent to use for your laundry The higher the degree of hardness of the water the more detergent you will need The amount of the detergent you will use will increase as the amount of your laundry ...

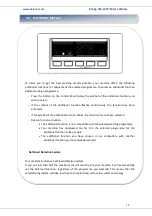
Page 19: ...blinks the function has not been selected Reason for non activation The additional function is not compatible with the selected washing programme Your machine has progressed too far into the selected programme for the additional function to be possible The additional function you have chosen is not compatible with another additional function you have already selected Half Load Detection System You...

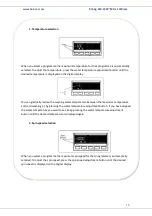
Page 20: ... washing water temperature between the maximum temperature and cold washing by pressing the water temperature adjustment button If you have skipped the water temperature you want to set keep pressing the water temperature adjustment button until the desired temperature is displayed again 2 Spin speed selection When you select a programme the maximum spin speed for that programme is automatically s...

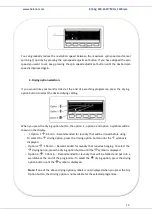
Page 21: ...he option 1 option 2 and option 3 symbols will be shown on the display Option 1 95 min Recommended for laundry that will be ironed before using To select the drying option press the drying option button until the symbol is displayed Option 2 156 min Recommended for laundry that requires hanging To select the drying option press the drying option button until the symbol is displayed Option 3 305 mi...

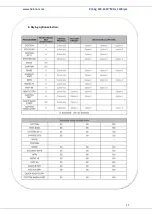
Page 22: ...he drying option button to select the desired drying duration When you press the drying option button the option 1 option 2 and option 3 symbols will be shown on the display If you continue pressing duration options 0 30 0 60 120 minutes will be displayed You can select the drying duration you want Recommended drying durations for load amounts ...

Page 23: ...www heinner com 8 6kg 220 240V 50Hz 1400rpm 22 4 Drying option selection ...

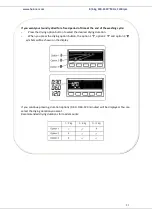
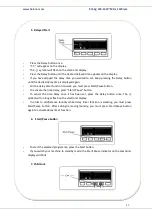
Page 24: ...you must press Start Pause button To activate the time delay press Start Pause button To cancel the time delay once it has been set press the Delay button once The symbol will no longer flash on the electronic display In order to add remove laundry while delay timer function is working you must press Start Pause button After adding removing laundry you must press Start Pause button again to activa...

Page 25: ...t was left To deactivate the child lock press and hold button 3 and 4 simultaneously for at least 3 seconds until the CL symbol on the electronic display disappears Cancelling Programme To cancel a running programme at anytime 1 Turn the programme dial to the CANCEL position 2 Your machine will stop the washing operation and the programme will be cancelled 3 Turn the programme dial to any other pr...

Page 26: ...ion Min 219 Laundry type Descriptions Heat resistant cotton and linen textiles Underwear bed sheets tablecloths towels max 4 0 kg COTTON 20 Washing temperature C 20 Maximum washing drying capacity kg 4 0 4 0 Detergent compartment 2 Programme duration Min 103 Laundry type Descriptions Lightly soiled cottons and linen textiles underwear bed sheets tablecloth towel max 2 kg Bedding etc SYNTHETICS Was...

Page 27: ...gent compartment 2 Programme duration Min 112 Laundry type Descriptions Use this programme to wash curtains only RINSE Washing temperature C Maximum washing drying capacity kg 8 0 6 0 Detergent compartment Programme duration Min 46 Laundry type Descriptions Provides an additional rinse to any type of laundry after the washing cycle ALLERGY SAFE Washing temperature C 60 Maximum washing drying capac...

Page 28: ...otton colored and linen textiles Due to the short washing time of this programme we recommend that less detergent is used than with other programmes The programme may last longer than 15 minutes if your Washing Machine detects an uneven load FAST 60 min Washing temperature C 60 Maximum washing drying capacity kg 4 0 4 0 Detergent compartment 2 Programme duration Min 60 Laundry type Descriptions So...

Page 29: ...nderwear bed sheets tablecloth towel max 3 0 kg NOTE PROGRAMME DURATION MAY VARY DEPENDING ON THE AMOUNT OF LAUNDRY TAP WATER AMBIENT TEMPERATURE AND SELECTED ADDITIONAL FUNCTIONS If you select more than one additional function the functions you select may be incompatible Do not dry towels cotton and linen textiles synthetic and synthetic blended laundry together To dry your laundry select the mos...

Page 30: ...es will contribute to energy and water savings Program duration energy consumption and water consumption values may vary according to wash load weight and type selected extra functions tap water and ambient temperature It s recommended to use liquid detergent for the washing programmes at low temperature The amount of detergent to be used may vary depending on the amount of laundry and the level o...

Page 31: ... required use limescale removers manufactured specifically for washing machines only Never force the door open when your Washing Machine is running You can open the door of your machine 2 minutes after the completion of a washing operation Never force the door open when your Washing Machine is running The door will open immediately after the washing cycle has ended The installation and repairing p...

Page 32: ...th on the side of faucet and on the ends of water valves along the water inlet hose of your machine If your machine cannot intake sufficient amount of water despite water faucet being open these filters should be cleaned It is recommended that you clean you pump filter one in 2 months Water inlet filters prevent dirt and foreign materials from entering your machine We recommend that these filters ...

Page 33: ...er over time We recommend that you remove the drawer every 2 months to clean the accumulated residue To remove the detergent drawer Pull the drawer forwards until it is fully extended Gently press down on the detergent drawer as shown above and pull the drawer from its housing Clean the drawer with water and a soft brush If there is any residue in the drawer housing remove with a soft brush Take c...

Page 34: ...ose forward and detach it from its clamp place a container under it and remove the plug from the hose 4 Collect the water drained from your machine in a container 5 Loosen the filter cover by turning it anticlockwise and remove by pulling 6 Remove any foreign materials from the filter with a soft brush 7 After cleaning the filter replace the filter cover and tighten by turning clockwise 8 Please n...

Page 35: ...ted properly 2 Body Use a mild non abrasive cleaning agent or soap and water to clean the external casing Wipe dry with a soft cloth 3 Drum Do not leave metallic objects such as needles paper clips coins etc in your machine This objects lead to formation of rust stains in the drum To clean such rust stains use a non chlorine cleaning agent and follow the instructions of manufacturers of the cleani...

Page 36: ...NG All repairing operations required for your machine should be carried out by our authorised service If your machine requires a repair or if you cannot remove the fault by the help of the information provided as follows Unplug your machine Turn the water faucet off ...

Page 37: ...www heinner com 8 6kg 220 240V 50Hz 1400rpm 36 ...

Page 38: ...iately E02 The water pressure or the water level inside the machine is low Check that the cold water tap is fully turned on and that mains water is not cut off If the fault persists your machine will stop automatically Unplug the machine turn off the cold water tap and contact thenearest authorised service E03 The pump is faulty or pump filter is clogged or electrical connection of the pump is fau...

Page 39: ...wash with diluted bleacher Grease and oil stains Firstly wie the residues Scrub the spot with detergent and wash it with warm soapy water Mustard Apply glycerine on spotted area Scrub with detergent and wash If the spot cannot be removed wipe with alcohol For synthetic and colour fabrics a mixture of 1 scale of alcohol and 2 scales of water should be used Fruit Stretch the spotted area of your lau...

Page 40: ...e for your laundries Do not use bleacher for colour laundries Mould Mould stains should be cleaned as soon as possible Stain should be washed with detergent water nevertheless if it cannot be removed it should be wipped with oxiygen water 3 Ink Subject the spotted area to running water and wait until the flow of inked water ends Then wipe it with lemon added water and detergent and wash it after a...

Page 41: ...e ofthe household washer dryer using the eco 40 60 programme at a combination of fulland partial loads Actual energy consumption will depend on how the appliance is used 0 727 Energy consumption in kWh per cycle for the wash and dry cycle of the household washer dryer at a combination of full and half loads Actual energy consumption will depend on howthe appliance is used 3 767 Water consumption i...

Page 42: ...g efficiency class B Half 2 48 Quarter 2 48 Airborne acoustical noise emissions during the spinning phase for the eco 40 60 washing cycle at rated washing capacity dB A re 1pW 77 Wash and dry cycle duration h min Rated capacity 9 00 Half 5 00 Type Free standing Airborne acoustical noise emission class for the spinning phase for the eco 40 60 programme at rated washing capacity C Off mode W 0 50 St...

Page 43: ...ed trademarks of their respective holders No part of the specifications may be reproduced in any form or by any means or used to make any derivative such as translation transformation or adaptation without permission from NETWORK ONE DISTRIBUTION Copyright 2013 Network One Distibution All rights reserved www heinner com http www nod ro http www heinner com http www nod ro Importer Network One Dist...

Page 44: ...www heinner com 8 6kg 220 240V 50Hz 1400rpm 43 www heinner ro ...

Page 45: ...g 220 240V 50Hz 1400rpm 44 MAȘINĂ DE SPĂLAT CU USCĂTOR Model HWDM V8614D Model HG 150SS www heinner ro Mașină de spălat cu uscător Capacitate masină Capacitate uscător 8 6 kg Viteză centrifugare 1400 rpm Clasa energetică D ...

Page 46: ...ări ulterioare Acest manual este conceput pentru a vă oferi toate instrucţiunile necesare referitoare la instalarea utilizarea şi întreţinerea aparatului Pentru utilizarea corectă şi în siguranţă a aparatului vă rugam să citiţi cu atenţie acest manual de instrucţiuni înainte de instalare şi utilizare II CONȚINUTUL PACHETULUI DUMNEAVOASTRĂ Mașină de spălat cu uscător Manual de utilizare Certificat ...

Page 47: ...uscător nu există niciun obiect străin precum cuie ace brichete și monede Scamele nu trebuie să se acumuleze în jurul mașinii de spălat cu uscător Reziduurile se pot acumula pe detergentul și pe balsamurile expuse la aer o perioadă lungă de timp Puneți balsam sau detergent în sertar numai la începutul fiecărei spălări Deconectați vă mașina de spălat cu uscător și opriți alimentarea cu apă dacă usc...

Page 48: ...e o suprafață corespunzătoare pentru a le lăsa să se răcească Aparatul nu trebuie alimentat printr un dispozitiv extern de comutare cum ar fi un cronometru sau conectat la un circuit care este pornit și oprit în mod regulat de un serviciu public Aparatul nu trebuie instalat în spatele unei uși care poate fi încuiată unei uși glisante sau unei uși cu balamale pe partea opusă a mașinii de spălat cu ...

Page 49: ...LOZIE Clătiți bine orice substanțe chimice precum substanțele de îndepărtare a petelor de pe haine înainte de a începe un program de spălare și uscare Nerespectarea acestei cerințe poate genera un risc de explozie la utilizarea funcției de uscare RISC DE INCENDIU Nu mențineți lichide inflamabile sau explozive lângămașina dumneavoastră Articolele care au fost murdărite cu substanțe cum ar fi ulei d...

Page 50: ... de spălat cu uscător nu există niciun obiect străin precum cuie ace brichete chibrituri și monede PERICOL DE CĂDERE ŞI VĂTĂMARE Nu vă urcați pe mașina de spălat cu uscător Asigurați vă că furtunurile și cablurile nu provoacă niciun pericol de împiedicare Nu răsuciți mașina de spălat cu uscător cu susul în jos sau pe o parte Nu ridicați mașina de spălat cu uscător de ușă sau de sertarul de deterge...

Page 51: ...ală de mână sau materiale cu amestec de lână precum și satin dantelă mătase și alte obiecte de îmbrăcăminte care se spală de mână Nu vă utilizați mașina de spălat rufe cu uscător pentru niciun alt scop care nu este specificat în mod expres în acest ghid de utilizare Acest produs poate fi folosit de copii cu vârsta de peste 8 ani și de persoane cu capacități fizice senzoriale sau mentale reduse sau...

Page 52: ...LCD de înaltă rezoluție 3 Buton de program 4 Tavă superioară 5 Sertar de detergent 6 Ușă 7 Capac filtru pompă 8 Cablu de alimentare 9 Furtun de evacuare 10 Șuruburi de transport 11 Picioare ajustabile 12 Suport furtun de evacuare din plastic Nu îndepărtați suportul funcționarea mașinii va fi afectată ...

Page 53: ...n spatele mașinii 2 Slăbiți șuruburile de transport rotind le cu o cheie corespunzătoare în sens antiorar 3 Șuruburile de transport pot fi apoi îndepărtate prin tragere Șuruburile de transport trebuie păstrate în caz că veți avea nevoie de acestea pentru transportarea mașinii de spălat cu uscător 4 Introduceți capacele de acoperire din plastic furnizate în punga de accesorii în golurile lăsate de ...

Page 54: ...zontale a mașinii strângeți piulița de reglare din plastic 5 Nu introduceți niciodată carton lemn sau alte materiale asemănătoare sub mașină pentru a regla poziția orizontală 6 Când curățați suprafața pe care se află mașina aveți grijă să nu perturbați poziția mașinii pe orizontală 3 Conexiune electrică Mașina dumneavoastră de spălat necesită o alimentare de la rețea de 220 240V 50 Cablul de alime...

Page 55: ...lălalt capăt al furtunului de alimentare pe un robinet de apă de 3 4 și strângeți cu mâna Dacă aveți vreo îndoială consultați un instalator calificat Porniți alimentarea cu apă și verificați să nu existe scurgeri Debitul de apă la o presiune de 0 1 1 MPa va permite mașinii dumneavoastră să funcționeze la eficiență optimă P presiunea de 0 1 Mpa înseamnă că printr un robinet complet deschis vor curg...

Page 56: ...0Hz 1400rpm 55 Nu puneți furtunul de evacuare a apei din mașină într un recipient într o găleată sau într o cadă Asigurați vă că furtunul de evacuare a apei nu este îndoit curbat strivit sau extins 95 cm 145 cm 140 cm 95 cm 95cm 150cm ...

Page 57: ...butonul de programe în sens orar sau în sens anti orar pentru a selecta programul necesar Asigurați vă că programul selectat este indicat exact de buton 3 Butoane pentru funcții suplimentare Utilizați aceste butoane pentru a selecta funcții suplimentare pentru programul de lenjerie Consultați Funcții suplimentare pentru mai multe informații 4 Buton Pornire Pauză Pornește sau întrerupe programul se...

Page 58: ...re a calcarului Placa de nivel pentru detergentul lichid va fi livrată în interiorul mașinii Specificațiile pot varia în funcție de mașina achiziționată Balsam de material amidon compartiment de detergent Acest compartiment este destinat pentru dedurizatoare balsamuri sau amidon Urmați instrucțiunile de pe ambalaj Dacă balsamurile lasă reziduuri după utilizare încercați să le diluați sau să utiliz...

Page 59: ...tiți cadranul de programe fie în sensul acelor de ceasornic fie în sens invers acelor de ceasornic până când marcatorul de pe cadranul de programe indică programul ales Asiguraţi vă că butonul de program se află exact pe programul pe care l doriţi să l selectaţi VI BUTONUL DE PROGRAM ...

Page 60: ...spălați niciodată rufe colorate împreună cu rufe albe Textilele închise la culoare pot conține colorant în exces și trebuie spălate separat de mai multe ori înainte de a fi incluse într un lot mixt Asigurați vă că nu există materiale metalice pe rufele dumneavoastră sau în buzunare dacă sunt îndepărtați le Închideți fermoarele și copcile Scoateți cârligele din metal sau din plastic ale perdelelor ...

Page 61: ...schideți ușa de încărcare a mașinii Verificați interiorul tamburului Pot exista rufe rămase de la spălările anterioare Dacă există goliți mașina înainte de selectarea programului Încărcați rufele în tambur având grijă să fie răsfirate Pliați obiectele mari cum ar fi pilotele și păturile așa cum este indicat mai jos ...

Page 62: ... restul în compartimentul II Utilizați detergenți produși pentru mașini de spălat automate Urmați instrucțiunile de pe ambalajul detergentului atunci când determinați cantitatea de detergent folosită la spălat Cu cât gradul de duritate a apei este mai mare cu atât mai mult detergent va fi necesar Cantitatea de detergent pe care o veți folosi va crește odată cu cantitatea de rufe Introduceți balsam...

Page 63: ...ntru neactivare Funcția suplimentară nu este compatibilă cu programul de spălare selectat Mașina dvs a ajuns prea departe în programul selectat ca să mai fie posibilă funcția suplimentară Funcția suplimentară pe care ați ales o nu este compatibilă cu o altă funcție suplimentară pe care ați selectat o Sistemul de detectare a încărcării la jumătate Mașina dumneavoastră este prevăzută cu un sistem de...

Page 64: ... trecut de temperatura apei de spălare pe care o doreați continuați să apăsați pe butonul de reglare a temperaturii apei de spălare până se afișează din nou temperatura dorită Selectarea vitezei de centrifugare Când selectați un program este selectată automat turația maximă pentru acel program Pentru a regla turația apăsați pe butonul de reglare a turației până este afișată turația dorită Puteți r...

Page 65: ... Dacă doriți să selectați opțiunea de uscare apăsați butonul opțiunii de uscare până ce se afișează simbolul Opțiunea 3 305 min Recomandat pentru rufele care vor fi împăturite și puse în șifonier după finalizarea programului Dacă doriți să selectați opțiunea de uscare apăsați butonul opțiunii de uscare până ce se afișează simbolul Rețineți Dacă unul dintre simbolurile opțiunii de uscare de mai sus...

Page 66: ... 0 30 0 60 120 de minute Puteți selecta durata de uscare pe care o doriți Dacă una dintre opțiunile de durată de uscare de mai sus nu se afișează atunci când apăsați butonul Opțiune de uscare aceasta nu este disponibilă pentru programul selectat Duratele de uscare recomandate pentru cantitățile de încărcare ...

Page 67: ...Opțiunea 1 Opțiunea 2 Opțiunea 3 WOOL NS CURTAIN NS RINSE S Uscare bumbac Opțiunea 1 Opțiunea 2 Opțiunea 3 ALLERGY SAFE S Uscare bumbac Opțiunea 1 Opțiunea 2 SPIN S Uscare bumbac Opțiunea 1 Opțiunea 2 Opțiunea 3 RAPID 15 S Uscare bumbac Opțiunea 1 FAST 60 MIN S Uscare bumbac Opțiunea 1 Opțiunea 2 GENTLE DRY S Uscare delicate Opțiunea 2 Opțiunea 1 Opțiunea 3 COTTON DRY S Uscare bumbac Opțiunea 2 Op...

Page 68: ... apărea 1 h Simbolul va lumina intermitent pe afișajul electronic Apăsați butonul Temporizare până când pe afișaj apare durata de temporizare dorită Dacă ați trecut de perioada de temporizare pe care doreați să o setați continuați să apăsați butonul de temporizare până când se afișează din nou perioada de temporizare dorită Pentru ca funcția Cronometru de temporizare să funcționeze trebuie să apăs...

Page 69: ...tru a activa blocarea accesului copiilor apăsați și mențineți apăsate butoanele 3 și 4 simultan timp de cel puțin 3 secunde CL va apărea intermitent pe afișajul electronic timp de 2 secunde atunci când este activată blocarea pentru copii Dacă este apăsat orice buton sau dacă programul selectat este schimbat prin butonul de programe în timp ce este activă Blocarea pentru copii simbolul CL va lumina...

Page 70: ...va efectua operațiunea de drenare necesară și va anula programul Acum puteți selecta și rula un program nou Finalizarea programului Mașina se va opri de la sine imediat ce programul pe care l ați selectat se va finaliza 1 FINALIZARE va lumina intermitent pe afișajul electronic 2 Puteți deschide ușa mașinii și puteți scoate rufele 3 Lăsați ușa mașinii deschisă pentru a permite uscarea componentelor...

Page 71: ...scrieri Materiale textile din bumbac și din in rezistente la căldură lenjerie de corp lenjerie de pat fețe de masă și prosoape max 4 0 kg COTTON 20 Temperatură de spălare C 20 Capacitate maximă de spălare uscare kg 4 0 4 0 Compartiment de detergent 2 Durata programului min 103 Tip de rufe Descrieri Cu grad redus de murdărire articole din bumbac și in lenjerie intimă cearșaf de pat față de masă pro...

Page 72: ... de detergent 2 Durata programului min 112 Tip de rufe Descrieri Folosiți acest program numai pentru a spăla perdele RINSE Temperatură de spălare C Capacitate maximă de spălare uscare kg 8 0 6 0 Compartiment de detergent Durata programului min 46 Tip de rufe Descrieri Oferă o clătire suplimentară la orice tip de rufe după ciclul de spălare ALLERGY SAFE Temperatură de spălare C 60 Capacitate maximă...

Page 73: ...re Datorită timpului redus de spălare al acestui program vă recomandăm să utilizați mai puțin detergent decât la alte programe Programul poate dura mai mult de 15 minute dacă mașina dumneavoastră detectează o încărcare neuniformă FAST 60 min Temperatură de spălare C 60 Capacitate maximă de spălare uscare kg 4 0 4 0 Compartiment de detergent 2 Durata programului min 60 Tip de rufe Descrieri Grad no...

Page 74: ...pacitate maximă de spălare uscare kg 6 0 6 0 Compartiment de detergent 2 Durata programului min 540 Tip de rufe Descrieri Materiale textile din bumbac și din in lenjerie de corp cearșafuri de pat față de masă prosop max 3 0 kg Rețineți DURATA PROGRAMULUI POATE VARIA ÎN FUNCȚIE DE CANTITATEA DE RUFE APĂ TEMPERATURA AMBIANTĂ ȘI FUNCȚIILE AUXILIARE SELECTATE Dacă selectați mai mult de o funcție auxil...

Page 75: ...zute și durate mai mari Încărcarea mașinii de spălat de uz casnic cu uscător până la capacitatea indicată de producător pentru programele respective va contribui la economii de energie și apă Durata programului consumul de energie și consumul de apă pot varia în funcție de greutatea și tipul încărcăturii de rufe de funcțiile suplimentare selectate de temperatura apei de la robinet și cea ambiental...

Page 76: ... mari de detergent s a produs spumă în exces și s a activat sistemul automat de absorbție a spumei Recomandăm curățarea periodică a mașinii de spălat o dată la 2 luni Pentru curățarea periodică folosiți programul Curățare Tambur Dacă mașina dvs nu are programul Curățare Tambur folosiți programul Bumbac 90 Când este necesar folosiți agenți de îndepărtare a calcarului fabricați special și exclusiv p...

Page 77: ... aceste filtre atunci când mașina dumneavoastră nu poate primi suficientă apă deși alimentarea cu apă este pornită și robinetul este deschis Vă recomandăm să vă curățați filtrele de admisie a apei la fiecare 2 luni Deșurubați furtunul furtunurile de alimentare cu apă de la mașina de spălat Pentru a scoate filtrul de admisie a apei de la valva de admisie a apei folosiți un clește cu elemente lungi ...

Page 78: ...n față până când este complet extins Apăsați ușor în jos sertarul cum se arată mai sus și trageți sertarul din carcasa sa Curățați sertarul cu apă și o perie moale Dacă există resturi în carcasa sertarului îndepărtați le cu o perie moale Aveți grijă să preveniți căderea oricăror resturi în mașină Uscați bine sertarul și glisați l la loc în carcasă Nu spălați sertarul pentru detergent în mașina de ...

Page 79: ...detergentului lichid în deschiderea capacului și apăsați ușor spre înapoi Capacul se va deschide 3 Trageți spre înainte furtunul negru de cauciuc și detașați l din colierul său așezați dedesubt un recipient și scoateți dopul din furtun 4 Colectați într un recipient apa drenată din mașină de colectare a apei 5 Slăbiți filtrul rotind în sens antiorar și îndepărtați l prin tragere 6 Îndepărtați cu o ...

Page 80: ...Corp Folosiți un agent de curățare delicat neabraziv sau săpun și apă pentru a curăța carcasa exterioară Uscați prin ștergere cu o lavetă moale 2 3 3 Tambur Nu lăsați în mașină obiecte metalice cum ar fi ace agrafe de hârtie monezi etc Aceste obiecte conduc la formarea de pete de rugină pe tambur Pentru curățarea unor astfel de pete de rugină utilizați un agent de curățare fără clor și urmați inst...

Page 81: ...e o companie de service autorizată Dacă mașina necesită reparații sau dacă nu puteți rezolva o problemă cu informațiile furnizate mai jos atunci trebuie să procedați astfel Deconectați mașina de la alimentarea cu energie de la rețea Opriți alimentarea cu apă Contactați cel mai apropiat centru autorizat de service ...

Page 82: ...www heinner com 8 6kg 220 240V 50Hz 1400rpm 81 ...

Page 83: ...opiat agent autorizat de service Er 02 Presiunea apei sau nivelul apei din interiorul mașinii pot fi scăzute Verificați ca robinetul să fie pornit complet Apa de la rețea poate fi decuplată Dacă problema persistă mașina dumneavoastră se va opri automat după un timp Deconectați mașina opriți robinetul și contactați cel mai apropiat agent autorizat de service Er 03 Pompa este defectă sau filtrul pom...

Page 84: ...rece Frecaţi cu detergent spălaţi cu înălbitor diluat Pete de vaselină şi ulei Mai întâi cântăriţi reziduurile Frecaţi pata cu detergent şi spălaţi cu apă caldă cu săpun Muştar Aplicaţi glicerină pe zona pătată Frecaţi cu detergent şi spălaţi Dacă pata nu a ieşit ştergeţi cu alcool Pentru materiale sintetice şi colorate un amestec de o cantitate de alcool la două cantităţi de apă trebuie să fie ut...

Page 85: ...s Nu utilizaţi înălbitor pentru rufele colorate Mucegai Petele de mucegai trebuie să fie eliminate cât mai repede posibil Pata trebuie să fie spălată cu apă cu detergent totuşi dacă nu poate fi scoasă aceasta trebuie ştearsă cu apă oxigenată 3 Cerneala Supuneţi zona pătată la apă curentă şi aşteptaţi până când debitul de apă murdară se opreşte Apoi ştergeţi cu apă cu lămâie şi detergent şi spălaţi...

Page 86: ...de uz casnic utilizând programul eco 40 60 la o combinație de încărcături complete și parțiale Consumul real de energie va depinde de modul de utilizare a aparatului 0 727 Consumul de energie în kWh per kg per ciclu pentru ciclul de spălare și uscare al mașinii de spălat și uscat rufe de uz casnic la o combinație de încărcături complete și de jumătăți de încărcătură Consumul real de energie va dep...

Page 87: ...9 Clasa de eficiență a stoarcerii prin centrifugare B Jumătate 02 48 Un sfert 02 48 Emisiile acustice în aer în etapa de centrifugare a ciclului de spălare al programului eco 40 60 la capacitatea nominală de spălare dB re 1 pW 77 Durata ciclului de spălare și uscare hh min Capacitatea nominală 09 00 Jumătate 05 00 Tip Standard Clasa de emisii acustice în aer în etapa de centrifugare a programului ...

Page 88: ...hipament similar sistemul unul la unu sau la punctul de colectare organizat de Primaria Sectorului localitatii Dvs Simbolul marcajul aplicat produselor care indica faptul ca deseurile DEEE bateriile si acumulatorii fac obiectul unei colectari separate il reprezinta o pubela barata cu o cruce Aceste masuri vor ajuta la protejarea mediului Societatea Network One Distribution S R L este inscrisa in R...

Page 89: ...formă și prin niciun mijloc nici utilizată pentru obținerea unor derivate precum traduceri transformări sau adaptări fără consimțământul prealabil al companiei NETWORK ONE DISTRIBUTION Copyright 2013 Network One Distribution Toate drepturile rezervate www heinner com http www nod ro Acest produs este proiectat și realizat în conformitate cu standardele și normele Comunității Europene Importator Ne...

Page 90: ...www heinner com 8 6kg 220 240V 50Hz 1400rpm 89 www heinner ro ...

Reviews: