background image

www.heinner.com                                                                      700W, 220-240V, ~ 50/60Hz


            4 


V.  USING INSTRUCTIONS 

BEFORE FIRST USE 
Read all instructions carefully and keep them for future reference. 
• Remove all packaging 
• Clean the Cooking Plates by wiping a sponge or cloth dampened in warm water.   
DO  NOT IMMERSE THE  UNIT AND  DO NOT  RUN WATER  DIRECTLY  ON  THE  COOKING 
SURFACES. 
• Dry with a cloth or paper towel. 
•  For  best  results,  lightly  coat  the  cooking  plates  with  a  little  cooking  oil  or  cooking 
spray. 
Notice: When your Grill Toaster is heated for the first time, it may emit slight smoke or 
odor.  This  is  normal  with  many  heating  appliances.  This  does  not  affect  the  safety  of 
your appliance. 
 
HOW TO USE 
• Close the Grill Toaster and plug it into the wall outlet, you will notice that the power 
and the ready light will go on, indicating that the Grill Toaster has begun preheating.   
• It will take approximately 5 minutes to reach baking temperature, the ready light will 
goes off. 
• Open the lid, put the sandwich, meat or other foods on the bottom cooking plate. 
• Close the lid. The ready light will go on again. 
• Cook for about 3 to 6 minutes, the ready light goes off again, or until golden brown, 
adjusting the time to suit your own individual taste. 
• When the foods is cooked use the handle to open the lid. Remove the food with the 
help of a plastic spatula. Never use metal tongs or a knife as these can cause damage 
to the non-stick coating of the cook plates.
 
• Once you are finished cooking, disconnect the plug from the wall outlet and leave unit 
open to cool. 
 
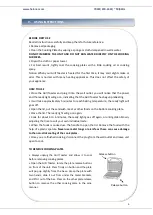
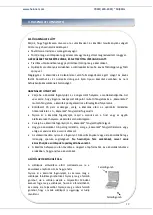
TO REMOVE COOKING PLATES 


•  Always  unplug  the  Grill  Toaster  and  allow  it  to  cool 
before removing cooking plates. 
• Open the Grill Toaster, locate the plate release buttons 
on front of the unit. Press firmly on button and the plate 
will  pop  up  slightly  from  the  base.  Grasp  the  plate  with 
two  hands,  slide  it  out  from  under  the  metal  brackets, 
and lift it out of the bas. Press on the other plate release 
button  to  remove  the  other  cooking  plate  in  the  sane 
manner. 

Release button 

Release button 

Summary of Contents for SM-2H700WH

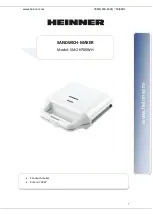
Page 1: ...SANDWICH MAKER Model SM 2H700WH www heinner ro Sandwich maker Power 700W...

Page 2: ...and keep it for future reference This instruction manual is designed to provide you with all required instructions related to the installation use and maintenance of the appliance In order to operate...

Page 3: ...lfunctioned or has been damaged in any manner In order to avoid the risk of an electric shock never try to repair the Grill Toaster yourself Take it to an authorized service station for examination an...

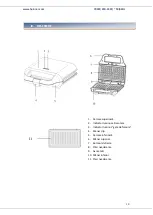
Page 4: ...700W 220 240V 50 60Hz 3 IV DESCRIPTION 1 Upper housing 2 Power light 3 Ready light 4 Handle clip 5 Bottom housing 6 Upper handle cover 7 Dial button 8 Non stick plate 9 Shaft 10 Bottom handle cover 11...

Page 5: ...the ready light will goes off Open the lid put the sandwich meat or other foods on the bottom cooking plate Close the lid The ready light will go on again Cook for about 3 to 6 minutes the ready light...

Page 6: ...use anything abrasive that can scratch or damage the non stick coating Do not use metal utensils to remove your foods they can damage the non stick surface Wipe the outside of the grill toaster with...

Page 7: ...marks of their respective holders No part of the specifications may be reproduced in any form or by any means or used to make any derivative such as translation transformation or adaptation without pe...

Page 8: ...www heinner com 700W 220 240V 50 60Hz 7 SANDWICH MAKER Model SM 2H700WH www heinner ro Sandwich maker Putere 700W...

Page 9: ...ntru consult ri ulterioare Acest manual este conceput pentru a v oferi toate instruc iunile necesare referitoare la instalarea utilizarea i ntre inerea aparatului Pentru utilizarea corect i n siguran...

Page 10: ...deteriorat dac prezint defec iuni sau dac a fost avariat Pentru evitarea riscului de electrocutare nu ncerca i s repara i aparatul pe cont propriu Apela i la centru de repara ii specializat n vederea...

Page 11: ...IV DESCRIERE 1 Carcasa superioar 2 Indicator luminos alimentare 3 Indicator luminos gata de folosire 4 Maner clip 5 Carcasa inferioar 6 M ner superior 7 Butonul de fixare 8 Pl ci neaderente 9 Ax metal...

Page 12: ...ionare Indicatorul luminos preg tit se va stinge Deschide i m nerul aparatului apoi pune i sandvi ul carnea sau alte alimente pe plita inferioar a aparatului nchide i m nerul aparatului Indicatorul l...

Page 13: ...patul neabraziv sau pune i pe resturi un erve el umed pentru a le nmuia Nu utiliza i obiecte abrazive care s poat zg ria sau deteriora nveli ul neaderent Nu utiliza i ustensile metalice pentru a scoat...

Page 14: ...pament Electric si Electronic EEE pe care il pune pe piata Acest cost asigura tratarea ulterioara a echipamentelor uzate colectate Din acest motiv odata ce devine deseu produsul EEE poate fi predat gr...

Page 15: ...60Hz 14 Acest produs este proiectat i realizat n conformitate cu standardele i normele Comunit ii Europene Importator Network One Distribution Str Marcel Iancu nr 3 5 Bucure ti Rom nia Tel 40 21 211...

Page 16: ...www heinner com 700W 220 240V 50 60Hz 15 SZENDVICSS T Modell SM 2H700WH www heinner ro Szendvicss t Teljes tm ny 700W...

Page 17: ...anulm nyoz s c lj b l k rj k rizze meg a haszn lati k zik nyvet A le r s c lja hogy megadja az sszes sz ks ges utas t st a g p telep t s re haszn lat ra s karbantart s ra A k sz l k helyes s biztons g...

Page 18: ...lja a k sz l ket hib s vagy megrong l dott t pvezet kkel Az ram t s vesz ly nek elker l se rdek ben ne jav tsa saj t felel ss g re a k sz l ket A k sz l k ellen rz se s a hibaelh r t s rdek ben fordul...

Page 19: ...700W 220 240V 50 60Hz 18 IV LE R S 1 Fels h z 2 Teljes tm nyf ny 3 K sz f ny 4 Fogja meg a klipet 5 Als h z 6 Fels foganty fedele 7 T rcs z s gomb 8 Nem tapad lemez 9 Tengely 10 Als foganty fed l 11...

Page 20: ...c sz ks ges am g a k sz l k el ri az optim lis m k d si h m rs kletet A k szenl t f nyjelz ki fog aludni Nyissa ki a k sz l k foganty j t majd a szendvicset a h st vagy az egy b lelmiszereket helyezze...

Page 21: ...vel t vol tsa el vagy a marad kok fel ztat sa rdek ben helyezzen azokra nedves szalv t t Ne haszn ljon d rzshat s t rgyakat melyek megkarcolhatj k vagy megk ros thatj k a nem tapad bevonatot Ne haszn...

Page 22: ...ereskedelmi vagy az illet birtokl k ltal bejegyzett m rkanevek A le rtak egyetlen r sze sem haszn lhat fel semmilyen form ban m g leford tott talak tott v ltozatban sem a NETWORK ONE DISTRIBUTION el z...

Page 23: ...www heinner com 700W 220 240V 50 60Hz 22 SM 2H700WH www heinner ro 700 W...

Page 24: ...www heinner com 700W 220 240V 50 60Hz 23 I II...

Page 25: ...www heinner com 700W 220 240V 50 60Hz 24 III...

Page 26: ...www heinner com 700W 220 240V 50 60Hz 25 IV 1 2 3 4 5 6 7 8 9 10 11...

Page 27: ...www heinner com 700W 220 240V 50 60Hz 26 V 3 5 3 6...

Page 28: ...www heinner com 700W 220 240V 50 60Hz 27 700 W 220 240V 50 60 Hz VI VII...

Page 29: ...EINNER Network One Distribution SRL NETWORK ONE DISTRIBUTION Copyright 2013 Network One Distribution www heinner com http www nod ro http www heinner com http www nod ro Network One Distribution 3 5 4...

Reviews: