5
GASOLINE CHAINSAW
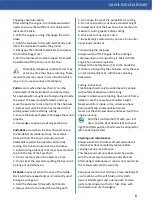
Note: A new saw chain will expand when first used.
Check and readjust chain tension frequently to
avoid premature wear, damage and kickback.
Preparing 2-stroke mix
This chainsaw is powered by a 2-stroke engine that
requires a petrol/oil mixture as fuel.
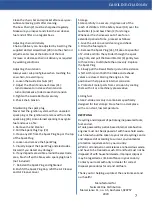
Always use dedicated 2-stroke oil. Measure the
required amount of oil and pour the required
amount of unleaded petrol into the Fuel Mixing
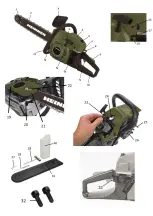
Bottle (30), close and shake until thoroughly mixed.
Never fill with fuel whilst the engine is running.
Only refuel your chainsaw outdoors, in well-
ventilated areas.
Fuels containing more than 10% ethanol must not
be used under any circumstances.
Be careful not to spill any fuel. Spilled fuel may
ignite and cause fires or explosions.
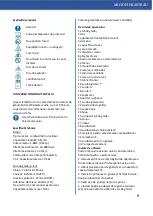
1. Clean the area around the cap of the Fuel Tank
2. Fill the Fuel Tank with fresh 2-stroke mix. Do not
overfill
3. Immediately refit the cap to the tank, and close
Move at least 3m from the fuelling spot before
attempting to start the engine.
Filling with chain oil
Be careful not to spill any oil. Be aware of slipping
hazards!
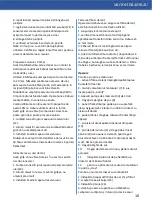
1. Clean the area around the cap of the Chain Oil
Reservoir (14)
2. Fill with special chain oil. Do not overfill
3. Immediately refit the Chain Oil Reservoir cap
Testing the chain brake
The operator must ensure the correct operation of
chain brake before every use.
1. Make sure the engine has stopped
2. Check manual chain brake operation by pushing
the Front Hand Guard (3) forward. The Saw Chain
must not turn
3. Release the chain brake by pulling the Front
Hand Guard towards to Front Handle (15), until a
‘click’ sound is heard.
4. Hold the chainsaw horizontally, release your
hand from the Front Handle and let the tip of the
Guide Bar hit a tree stump or other piece of wood
on the floor. The chain brake must engage, and the
Saw Chain must not move.
Operation
Starting and stopping the engine
1.
Activate the chain brake by pushing the Front
Hand Guard (3) forward
2.
Toggle the Engine Switch (7) upward into the
‘On’ position
3. Press the pump (primer) (33) ten times
4.
Pull out the Choke Lever (8)
5.
Put the chainsaw on the floor on to a flat
surface. Ensure that the Saw Chain (2) is not in
contact with the ground or any object
6.
Place your left hand on the Front Handle (15)
and push down
7.
Push your right toe cap into the Rear Handle
(10), to hold the chainsaw in place
8.
Grab hold of the Recoil Starter (4) handle and
slowly pull the Recoil Starter outward, until you
feel resistance, then pull sharply a few times, until
the engine fires briefly, but dies again immediately
9.
Push in the Choke Lever
10.
Pull the Recoil Starter again, until the
engine starts
11.
Slowly remove your foot from the Rear
Handle and pick the tool up on the Front Handle
12.
To switch off the engine, toggle the Engine
Switch downward, into the ‘STOP’ position
Starting an engine flooded with fuel
1. Remove the Air Cleaner Cover (5) and Air
Cleaner
2. Pull the Spark Plug Cap (23) off the Spark Plug
3. Remove the Spark Plug (24)
4. If the spark plug is fouled, encrusted or soaked
with fuel, clean and adjust it. Replace if required
5. Clean excess fuel from the combustion chamber
by slowly pulling the Recoil Starter (4)
6. Reinstall the Spark Plug
7. Repeat the starting procedure


