background image

52 


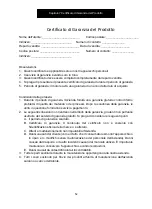
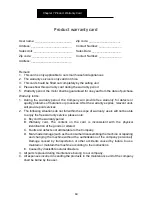
Certificato di Garanzia del Prodotto


Nome dell'utente: _______________________  

Codice postale: ____________________ 

Indirizzo: _________________________   Numero di contatto: ______________ 
Reparto vendite: ________________________ Data di vendita: __________________ 
Codice postale: _________________________  

Numero di contatto: ______________ 

Indirizzo: _________________________ 


Osservazioni: 
1.  Questo certificato è applicabile solo ai nostri apparecchi personali 
2.  Il servizio di garanzia è valido solo in Cina 
3.  Questo certificato deve essere compilato completamente dal reparto vendite 
4.  Si prega di presentare il presente certificato di garanzia durante il periodo di garanzia 
5.  Periodo di garanzia: il motore avrà una garanzia di un anno dalla data di acquisto 


Condizioni della garanzia: 
1.  Durante il periodo di garanzia, l'Azienda fornirà una garanzia gratuita contro difetti o 

problemi di qualità dei materiali o dei processi. Dopo la scadenza della garanzia, le 
unità in questione forniranno servizi a pagamento. 

2.  Le seguenti situazioni non rientrano nell'ambito della garanzia, gli utenti non potranno 

usufruire del servizio di garanzia gratuito. Si prega di considerare i seguenti punti: 
A.  Il periodo di garanzia è scaduto. 
B.  Certificato  di  garanzia.  Il  contenuto  del  certificato  non  è  coerente  con 

l'identificazione fisica della merce o è alterato. 

C.  Difetti e malfunzionamenti non imputabili all'Azienda. 
D.  Danni causati dal cliente (come il fatto che il consumatore smonti l'apparecchio o 

lo ripari  e lo modifichi senza l'autorizzazione del  personale dell'azienda). Danni 
causati dal trasporto o da altri incidenti causati dal mancato utilizzo. È importante 
mantenere o conservare l'apparecchio secondo le istruzioni. 

E.  Danni causati da catastrofi naturali incontrollabili. 

3.  Tutte le parti sostituite durante la manutenzione appartengono alla nostra azienda. 
4.  Tutti  i  costi  sostenuti  per  l'invio  dei  prodotti  all'unità  di  manutenzione  dell'azienda 

saranno a carico dell'utente.


Capitolo 7 Certificato di Garanzia del Prodotto 

Summary of Contents for HMZ 8672

Page 1: ...inerer MULTIZERKLEINERER MULTI SHREDDER MULTI SHREDDER MULTI BROYEUR TRITURATORE MULTIP LO TRITURADORA M LTIPLE BEDIENUNGSANLEITUNG GARANTIE MULTI SHREDDER MULTI SHREDDER MULTI BROYEUR TRITURATORE MUL...

Page 2: ...SCH Gebruiksaanwijzing Pagina 13 21 NEDERLANDS mode d emploi page 22 32 FRANCAIS instrucciones de servicio p gina 33 42 ESPANOL istruzioni per I uso pagina 43 52 ITIALIANO instruction manual page 53 6...

Page 3: ...haben Damit Sie das Produkt richtig benutzen lesen Sie bitte vor dem Gebrauch dieses Handbuch sorgf ltig durch Dieses Produkt hat die 3C Zertifizierung des China Quality Certification Center erhalten...

Page 4: ...Deckeldichtring einzulegen 3 Der Kunstoffbeh lter enth lter keinen Dichtring f r den Deckel und keine sto d mpfenden Untersetzer Kapitel 1 Komponenten und Funktionen Hauptschalter Motor Zerkleinerer...

Page 5: ...hnell W hlen Sie die richtige Stufe je nachdem welches Lebensmittel Sie zerkleinern F r Fleisch sollten Sie die hohe Stufe w hlen und f r Kochen Gem se und Obst die langsame Stufe 7 Schalten Sie den S...

Page 6: ...Sie die Zutaten gleichm ig im Beh lter und ffnen Sie dann das Ger t 12 Wenn die gew nschte Wirkung nicht innerhalb von 15 Sekunden erreicht wird nehmen Sie den Finger vom Schalter und verarbeiten Sie...

Page 7: ...n Erdnuss Gebraten Walnussfleisch 200g Schale entfernen 3 Mal CIT 5 10Sekunden N sse 200g Schale entfernen 2 Mal CIT 5 10Sekunden Brotkrumen 2 Scheiben Fladenbrot verwenden 1 Mal CIT 3 5Sekunden Schin...

Page 8: ...ekunden nicht berschreiten 8 Nach Abschluss der Verarbeitung nehmen Sie bitte den Motor ab nachdem dieser und das Messer aufgeh rt haben sich zu drehen und stellen Sie sicher das die Stromzufuhr gekap...

Page 9: ...nd verletzen Sie sich bei der Verwendung nicht die H nde 2 Nur wenn das Messer in den Deckel gesteckt und abgedeckt wird kann es mit dem Maschinenkopf verbunden werden Kein Eintauchen in Wasser kein S...

Page 10: ...n wischen Achtung Die Klinge ist sehr scharf 4 Die Au enseite des Motors kann mit einem feuchten Tuch abgewischt werden Legen Sie den Hauptk rper nicht in Wasser oder andere Fl ssigkeiten ein und wasc...

Page 11: ...nd des Gebrauchs 1 Die Spannung ist zu niedrig 2 Der berhitzungsschutz des Motors hat eingegriffen 1 Pr fen Sie ob die Spannung zu niedrig ist 2 Das Ger t 20 30 Minuten lang nicht verwenden Anormale V...

Page 12: ...Prozessen Nach Ablauf der Garantie wird das Beheben von Fehlern kostenpflichtig sein 2 Bitte beachten Sie dass Benutzer den kostenlosen Garantieservice in den folgenden Situationen nicht in Anspruch n...

Page 13: ...rking van het product te bevorderen verzoeken wij u deze handleiding aandachtig te lezen voordat u het product gaat gebruiken Dit product heeft een 3C certificering van China Quality Certification Cen...

Page 14: ...2 Vergeet niet de afsluitring van het deksel te plaatsen 3 De kunststof beker bevat geen dekseldichtingsring en schokabsorberende onderzetters Hoofdstuk 1 Onderdelen en functies Aan uit schakelaar De...

Page 15: ...iseerd om de langzame snelheid te gebruiken 7 Schakel de stroom in en druk op de schakelaar om de werking te starten tik gedurende 3 seconden om te stoppen voor 2 seconden Herhaal dit ten minste 3 kee...

Page 16: ...en ongeveer 2 cm 2 keer CIT 3 5seconde ei four 1 keer CIT 3 5seconde Pinda s Walnoten 200g 3 keer CIT 5 10seconde noten 200g 3 keer CIT 5 10seconde Brood 2 plaken Gebruik plat brood 2 keer CIT 3 5seco...

Page 17: ...De ononderbroken werktijd mag niet meer dan 15 seconden bedragen 8 Na het be indigen van de procedure dient u de motor te verwijderen nadat de motor en het blad stoppen met draaien en ervoor te zorgen...

Page 18: ...lleen als het bestek in de behuizing van de beker wordt geplaatst en afgedekt kan het met de kop van de machine worden verbonden 3 In geen geval mogen de snijder en de neus afzonderlijk worden aangesl...

Page 19: ...ccessoires af met water en veeg ze droog Het mes is zeer scherp 4 De buitenkant van de motor kan worden afgeveegd met een vochtige doek Doe het hoofdgedeelte niet in de vloeistof en was het niet in wa...

Page 20: ...tor wordt in eerste instantie normaal gebruikt Hij stop ermee 1 De spanning is te laag 2 Bescherming van de motortemperatuurregeling 1 Controleer of de spanning te laag is 2 Stop het gebruik voor 20 3...

Page 21: ...derdelen tegen betaling worden geleverd 2 De volgende situaties vallen niet onder de garantie gebruikers zullen niet kunnen genieten van de gratis garantieservice let wel A Na afloop van de garantiepe...

Page 22: ...on lectrique hachoir viande brochette Afin de faciliter le bon fonctionnement du produit veuillez lire attentivement ce manuel avant de l utiliser Ce produit a pass la certification 3C du China Qualit...

Page 23: ...23 Chapitre 1 Composantes et fonctions Interrupteur cl Le nez Hachis couvercle Bague d tanch it du couvercle de la tasse Hachis couteau Hachis tasse amortisseur...

Page 24: ...rer la photo du produit dans l emballage 2 N omettez pas de remplir la bague d tanch it du couvercle 3 Le corps du gobelet en plastique ne contient pas de bague d tanch it du couvercle ni de sous verr...

Page 25: ...es fruits sont sugg r s pour utiliser la vitesse lente 7 Mettez l appareil sous tension et appuyez sur l interrupteur pour lancer l op ration Tapez pendant 3 secondes pour arr ter pendant 2 secondes R...

Page 26: ...condes fruits 250g Tranche de 2 cm environ 2 heuresCIT 3 5secondes oeuf quatre 1 heuresCIT 3 5secondes Viande d arachide frite et de noix 200g Aller dans la coquille 3 heuresCIT 5 10secondes Noisettes...

Page 27: ...i nique facile nettoyer 3 Pi ces d tachables faciles nettoyer 4 Structure de la bo te de vitesses plan taire vitesse variable fonctionnement stable faible bruit fort enchev trement 5 Distribuer des gr...

Page 28: ...respecter strictement le temps de travail nominal Le temps de travail continu ne doit pas d passer 15 secondes 8 Apr s avoir termin le traitement veuillez retirer le moteur apr s que le moteur et la l...

Page 29: ...st que lorsque les couverts sont mis dans le corps de la tasse et recouverts qu ils peuvent tre reli s la t te de la machine 3 En aucun cas le cutter et le nez ne doivent tre connect s s par ment Pas...

Page 30: ...la tasse et les accessoires avec de l eau et les essuyer La lame est tr s tranchante 4 L ext rieur du moteur peut tre essuy avec un chiffon humide Ne mettez pas le corps principal dans le liquide et n...

Page 31: ...n est pas install 2 Le placement de produits n est pas stable 3 La tension est trop lev e 4 Manger l exc s 1 Sortez les ingr dients et installez le support de couteau cheveaux 2 Placement stable des...

Page 32: ...proc d s Apr s l expiration de la garantie les unit s concern es fourniront des services payants 2 Les situations suivantes n entrent pas dans le champ de la garantie les utilisateurs ne pourront pas...

Page 33: ...ra de carne asador Para facilitar el correcto funcionamiento del producto por favor lea este manual cuidadosamente antes de utilizarlo Este producto ha aprobado la certificaci n 3C del Centro de Certi...

Page 34: ...tapa 3 El cuerpo del recipiente de pl stico no cuenta con el anillo de cierre de la tapa ni con posavasos amortiguadores Cap tulo 1 Componentes y funciones Interruptor Principal Parte superior Tritur...

Page 35: ...ntos cocinados las verduras y las frutas se recomienda utilizar una velocidad baja 7 Conecte la corriente y pulse el interruptor para iniciar la operaci n La m quina funciona a trav s de un m todo de...

Page 36: ...no obtiene el resultado deseado en 15 segundos suelte el interruptor de encendido y espere un intervalo de 10 a 20 segundos para continuar con el proceso Este m todo permite prolongar la vida til del...

Page 37: ...iminar la c scara 3 veces CIT 5 10 segundos Nueces 200g Eliminar la c scara 3 veces CIT 5 10 segundos Migajas de pan 2 rebanadas Usar pan plano 2 veces CIT 3 5 segundos Salchicha de jam n 200g Cortar...

Page 38: ...acuerdo con el tiempo de trabajo nominal El tiempo de trabajo continuo no debe exceder los 15 segundos 8 Despu s de terminar el proceso por favor retire el motor despu s de que el motor y la cuchilla...

Page 39: ...colocado dentro del recipiente y haya sido cubierta se puede conectar con la parte superior de la m quina Del caso contrario no puede conectarse 3 Bajo ninguna circunstancia se debe conectar la cuchi...

Page 40: ...ccesorios con agua y s quelos inmediatamente Tome precauciones la cuchilla es muy afilada 4 El exterior del motor puede limpiarse con un pa o h medo No ponga la parte principal de la m quina en contac...

Page 41: ...vo motor se usa normalmente al principio La m quina se detiene durante el proceso 1 El voltaje es demasiado bajo 2 Protecci n del control de la temperatura del motor 1 Compruebe si el voltaje es demas...

Page 42: ...procesos Despu s de que la garant a expire las unidades pertinentes proporcionar n servicios pagados 2 Las siguientes situaciones no entran en el mbito de la garant a los usuarios no podr n disfrutar...

Page 43: ...litare il corretto funzionamento del prodotto vi preghiamo di leggere attentamente il presente manuale prima dell uso Questo prodotto ha superato la certificazione 3C del Centro di Certificazione di Q...

Page 44: ...l coperchio 3 Il corpo del contenitore di plastica non ha l anello di chiusura del coperchio o gli ammortizzatori Capitolo 1 Componenti e Funzionalit Interruttore Principale Parte superiore Tritatutto...

Page 45: ...ti verdure e frutta si consiglia una velocit bassa 7 Accendere l alimentazione e premere l interruttore per avviare il funzionamento La macchina funziona con un metodo a pulsazione premere per 3 secon...

Page 46: ...i ottiene il risultato desiderato entro 15 secondi rilasciare l interruttore di alimentazione e attendere un intervallo di 10 20 secondi per continuare il processo Questo metodo prolungher la durata d...

Page 47: ...fritto 200g Rimuovere il guscio 3 volte CIT 5 10 secondi Noccioline 200g Rimuovere il guscio 3 volte CIT 5 10 secondi Briciole di pane 2 fettine Usare pane piatto 2 volte CIT 3 5 secondi Salsiccia di...

Page 48: ...ondo il tempo di lavoro nominale Il tempo di lavoro continuo non dovrebbe superare i 15 secondi 8 Dopo aver terminato il processo rimuovere il motore dopo che il motore e la lama abbiano smesso di ruo...

Page 49: ...state posizionate all interno del contenitore e coperte possibile collegarle alla parte superiore dell apparecchio altrimenti non sar possibile collegarle 3 In nessun caso le lame e la parte superiore...

Page 50: ...e asciugarli immediatamente Si prega di prendere precauzioni le lame sono molto affilate 4 La parte esterna del motore pu essere pulita con un panno umido Non mettere la parte principale della macchi...

Page 51: ...ormalmente utilizzato all inizio La macchina si ferma durante il processo 1 La tensione troppo bassa 2 Protezione del controllo della temperatura del motore 1 Controllare se la tensione troppo bassa 2...

Page 52: ...li o dei processi Dopo la scadenza della garanzia le unit in questione forniranno servizi a pagamento 2 Le seguenti situazioni non rientrano nell ambito della garanzia gli utenti non potranno usufruir...

Page 53: ...inder skewer In order to facilitate your correct operation of the product please read this manual carefully before using This product has passed the 3C certification of China Quality Certification Cen...

Page 54: ...ckage 2 Do not omit to fill the lid sealing ring 3 The plastic cup body does not contain lid sealing ring and shock absorbing coasters Chapter 1 Components and functions Key Switch The nose Mince lid...

Page 55: ...ts are suggested to use the slow gear 7 Switch on the power and press the switch to start the operation Inching operation Tap for 3 seconds to stop for 2 seconds Repeat Inching operation At least 3 ti...

Page 56: ...cm 2 times CIT 3 5seconds egg four 1 times CIT 3 5seconds Peanut Fried walnut meat 200g Go to the shell 3 times CIT 5 10seconds nuts 200g Go to the shell 3 times CIT 5 10seconds Bread crumbs 2 slices...

Page 57: ...rate strictly according to the rated working time The continuous working time shall not exceed 15 seconds 8 After finishing the processing please remove the motor after the motor and blade stop rotati...

Page 58: ...Only when the cutlery is put into the cup body and covered can it be connected with the machine head 3 Under no circumstances should the cutter and the nose be connected separately No water immersion...

Page 59: ...Maintenance Chapter 6 Fault Analysis The fault phenomenon Cause analysis troubleshooting During the first few USES of the product the motor gave off an unpleasant smell If the product still emits thi...

Page 60: ...terials or processes After the warranty expires relevant units will provide paid services 2 The following situations do not fall within the scope of warranty users will not be able to enjoy the free w...

Page 61: ...61 3C...

Page 62: ...62 1 2 3 1...

Page 63: ...63 1 2 3 4 1 2 5 6 7 3 2 3 8 9 10 11 2...

Page 64: ...64 12 15 10 20...

Page 65: ...3 CIT 3 5 200 4 CIT 3 5 200 4 CIT 3 5 200 4 4 CIT 3 5 250 2 4 CIT 3 5 250 2 CIT 3 5 1000 3 4 CIT 3 5 250 4 CIT 3 5 250 2 2 CIT 3 5 1 CIT 3 5 200 3 CIT 5 10 200 3 CIT 5 10 2 2 CIT 3 5 200 3 4 1 CIT 5...

Page 66: ...66 1 2 3 4 5 50 6 7 15 8 9 20 30 10 11 12 13 14 4...

Page 67: ...67 1 2 3...

Page 68: ...68 1 2 3 4 5 6 5...

Page 69: ...69 6 1 2 1 2 20 30 1 2 3 4 1 2 3 4...

Page 70: ...____________ ____________________ _________________________ ______________ ________________________ __________________ _________________________ ______________ _________________________ 1 2 3 4 5 1 2...

Page 71: ...71 3 C...

Page 72: ...72 1 2 3 1...

Page 73: ...73 1 2 3 4 1 2 5 6 7 3 3 8 9 10 11 12 15 10 20 2...

Page 74: ...74 3 5 3 250 3 5 3 250 3 5 4 200 3 5 4 200 3 5 4 4 200 3 5 4 2 250 3 5 250 3 5 4 3 100 3 5 4 250 3 5 2 250 3 5 5 10 3 200 5 10 3 200 3 5 2 5 10 3 4 200 3 5 1 2 3 4 5 3...

Page 75: ...75 1 2 3 4 5 50 6 7 15 8 9 20 30 10 11 12 13 14 4...

Page 76: ...76 1 2 3...

Page 77: ...77 1 2 3 4 5 6 5...

Page 78: ...78 6 1 2 20 30 1 2 1 2 3 4 1 2 3 4...

Page 79: ..._______________ __________________________ _______________________________ ___________________________ _____________________________ ___________________________ ___________________________ _____ _____...

Page 80: ......

Reviews: