background image

28

Installation

Connection of HELIX V EIGHT DSP MK2 to the 

head unit / car radio:

Caution: 

Carrying out the following steps will re-

quire special tools and technical knowledge. In or-

der to avoid connection mistakes and / or damage, 

ask your dealer for assistance if you have any ques-

tions and follow all instructions in this manual (see 

page 15). It is recommended that this unit will be 

installed by an authorized HELIX dealer.

1.   Connecting the pre-amplifier inputs

  Use the correct cable (RCA / cinch cable) to 

connect  these  inputs  to  the  pre-amplifier  / 

lowlev el / cinch outputs of your head unit / car 

radio. Each input can be assigned to any output 

using the DSP PC-Tool software. The automat-

ic turn-on circuit does not work when using the 

pre-amplifier inputs. In this case the remote in

-

put has to be connected to activate the  HELIX 

V EIGHT DSP MK2. 

 Important:

 It is strictly forbidden to use the 

Highlevel

 and lowlevel 

Line Input

 of an indi-

vidual channel at the same time as this may 

cause severe damage to the lowlevel line out-

puts of your head unit / car radio. Nevertheless 

it is possible to use the 

Highlevel Input

 of one 

channel and the lowlevel 

Line Input

 of another 

channel simultaneously.

2.   Connecting the highlevel speaker inputs


The highlevel loudspeaker inputs can be con-

nected directly to the loudspeaker outputs of an 

OEM or aftermarket radio using appropriate ca-

bles (loudspeaker cables with 1 mm² / AWG 18 

max.). 

We recommend the following channel assign-

ment if a common car radio will be connected to 

the signal processor:

Channel A = Front left

Channel B = Front right

Channel C = Rear left

Channel D = Rear right

Actually it is not mandatory to use all high level 

speaker inputs. If only two channels will be con-

nected we recommend to use the channels A 

and B. Make sure that the polarity is correct. If 

one or more connections have reversed polarity 

it may affect the performance of the amplifier. 

If this input is used the remote input does not 

need to be connected as the amplifier will au

-

tomatically turn on once a loudspeaker signal 

is received.

3.  Connecting a digital signal source


If you have a signal source with an optical digi-

tal  output  you  can  connect  it  to  the  amplifier 

using the appropriate input. In standard con-

figuration the manual activation via an optional 

remote control is configured. 

Alternatively you can activate the automatic 

turn-on feature in the DCM menu of the DSP 

PC-Tool software. The feature activates the 

digital input as soon as a digital audio signal is 

detected. 

The automatic turn-on circuit does not work 

when a digital input is used. Therefore it is man-

datory to connect the remote input (

REM

). 

Important: 

The signal of a digital audio source 

normally does not contain any information 

about the volume level. Keep in mind that 

this will lead to full level on the outputs of the 

 HELIX V EIGHT DSP MK2 and your connected 

 amplifiers. This may cause severe damage to 

your  speakers. We strongly recommend to use 

an optional remote control for adjusting the vol-

ume level of the digital signal input!

 Information:

  The  HELIX  V EIGHT DSP MK2 

can only handle uncompressed digital stereo 

 signals in PCM format with a sample rate be-

tween 12 kHz and 96 kHz and no MP3- or Dol-

by-coded digital  audio stream! 

4.  Signal configuration


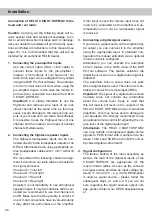
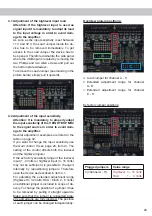
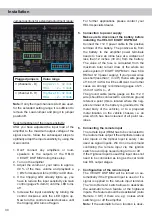
The factory setting of the input sensitivity as 

well as the load of the highlevel inputs of the 

V EIGHT DSP MK2 are appropriate for the 

most common radios. As soon as the connect-

ed  signal source provides an input voltage be-

tween 11 V and 32 V – e.g. if an OEM amplifier 

is used as signal source – please follow the 

subsequent steps 4.1 and 4.2. If you are not 

sure regarding the signal sources output volt-

age, please contact your HELIX specialist deal-

er.

Summary of Contents for V EIGHT DSP MK2

Page 1: ...V EIGHT DSP MK2 8 Kanal Verstärker mit integriertem DSP 8 channel amplifier with integrated DSP deutsch english ...

Page 2: ...icherheit muss der Verstärker professionell befestigt werden Dieses geschieht über Schrauben die in eine Montagefläche ein geschraubt werden die wiederum genügend Halt bieten muss Bevor Sie die Schrauben im Montagefeld befesti gen vergewissern Sie sich dass keine elektrischen Kabel und Komponenten hydraulische Bremslei tungen der Benzintank etc dahinter verborgen sind Diese könnten sonst beschädig...

Page 3: ...Anschlüsse sind intern parallel geschaltet 10 11 12 13 14 15 10 1 4 3 2 5 6 8 1 USB Eingang Dient zum Anschluss an den Computer 2 Control Input Multifunktionsanschluss dient zum An schluss einer Fernbedienung und weiterem HELIX Zubehör 3 Control Taster Dient zum Umschalten der Sound Setups oder zum Resetten des Gerätes 4 Status LED Die Status LED zeigt den Betriebszustand an 5 Optical Input Optisc...

Page 4: ...Nach dem Resetten des Gerätes kann die HELIX V EIGHT DSP MK2 keine Audiosignale mehr wiedergeben bis ein neues Sound Setup eingespielt wurde 4 Status LED Die Status LED zeigt den Betriebszustand des Verstärkers und dessen DSP Speichers an Grün Verstärker eingeschaltet und betriebsbereit Orange Power Save Modus aktiv Rot Protection Mode aktiv Dieser kann unter schiedliche Ursachen haben Der Verstär...

Page 5: ...ist aber zuläs sig an einem Kanal den Highlevel und an einem anderen Kanal den Vorverstärkersignaleingang zu verwenden 7 Line Input 6 Kanal Vorverstärkereingang zum Anschluss von Signalquellen z B Radios Die Eingangsempfind lichkeit ist für alle Kanäle ab Werk auf ca 3 Volt eingestellt Es ist jedoch möglich die Eingangsempfindlichkeit mit dem Regler 9 Gain und durch das Umstecken von Steckbrücken ...

Page 6: ...gang Antennenanschluss des Steuergerätes Radio verbunden Dieser ist nur aktiviert wenn das Steuergerät eingeschaltet ist Somit wird der Verstärker mit dem Steuergerät ein und ausgeschaltet Dieser Eingang muss nicht belegt werden wenn der Hochpegel Lautsprecher eingang Highlevel Input benutzt wird Wie Sie die automatische Einschaltung über den Hochpegel Lautsprechereingang der V EIGHT DSP MK2 de ak...

Page 7: ...rere Anschlüsse ver polen kann dadurch die Funktion des Verstär kers beeinträchtigt werden Bei Verwendung dieses Eingangs muss der Remote Eingang REM nicht belegt werden da sich der Verstär ker automatisch einschaltet sobald ein Laut sprechersignal anliegt 3 Anschluss einer digitalen Signalquelle Sofern Sie über eine Signalquelle mit optischem Digitalausgang verfügen kann diese an den Verstärker a...

Page 8: ...gsbeispiele für die Ein gangsempfindlichkeit sind in der Tabelle auf Seite 11 aufgeführt Um die Eingangsempfindlichkeit zu verändern verwenden Sie den Gain Drehregler Seite 5 Punkt 9 Die Einstellung dieses Drehreglers be einflusst sowohl die Vorverstärkereingänge als auch die Hochpegel Eingänge Sollte der werk seitig eingestellte Wertebereich von 1 4 Volt für die Lowlevel Eingänge bzw 4 16 Volt fü...

Page 9: ...ain Dreh regler gegen den Uhrzeigersinn bis die Clip ping LED wieder erlischt Für weitere Anwendungsfälle kontaktieren Sie bitte Ihren HELIX Fachhändler 5 Anschluss der Stromversorgung Vor dem Anschluss des 12 V Versorgungs kabels an das Bordnetz muss die Autobatte rie abgeklemmt werden Das 12 V Stromkabel ist am Pluspol der Bat terie anzuschließen Die Plusleitung sollte in einem Abstand von max 3...

Page 10: ...hereingang deaktiviert 8 Konfiguration des internen DSPs Es wird dringend empfohlen vor der er sten Inbetriebnahme die grundlegenden Einstellungen im Verstärker mit Hilfe der DSP PC Tool Software vorzunehmen Eine Missachtung kann zur Zerstörung der an geschlossenen Lautsprecher Verstärker füh ren Speziell bei Verwendung der V EIGHT DSP in vollaktiven Systemen besteht sonst Zerstö rungsgefahr für d...

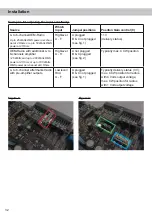
Page 11: ...M Radio mit Zusatzverstärker 4 bis 8 kanalig Größer 25 Watt bis 200 Watt Sinuslei stung pro Kanal an 4 Ohm bzw bis 100 Watt Sinusleistung pro Kanal an 8 Ohm Hochpegel A H A nicht gesteckt B C gesteckt siehe Abb 2 Typischerweise Linksanschlag Nachrüstradio 4 bis 6 kanalig mit Vorverstärkerausgang Lowlevel Cinch A F A gesteckt B C nicht gesteckt siehe Abb 1 Typischerweise Auslieferungs zustand 3 V b...

Page 12: ...hnitt lesen Sie die wichtigsten Schritte zum Anschluss und der ersten Inbetrieb nahme 1 Laden Sie die DSP PC Tool Software unter www audiotec fischer com herunter und in stallieren diese auf ihrem Computer 2 Schließen Sie danach die V EIGHT DSP MK2 mit dem beiliegenden USB Kabel an den Com puter an Wenn Sie längere Distanzen zu über brücken haben verwenden Sie bitte eine aktive USB Verlängerung mi...

Page 13: ...tert den bisherigen Umfang des Gerätes um eine neue Ebene an prozessierten Kanälen welche sich zwischen den Ein und Ausgängen befindet Insgesamt stehen acht zusätzliche prozessierte virtuelle Kanäle und zehn prozessierte Ausgangskanäle zur Verfügung Diese virtuelle Kanalebene bietet diverse Vorteile gerade in komplexen Systemkonfigurationen Die Hauptvorteile dieses Konzeptes sind folgende Ausgangs...

Page 14: ...rlautsprecher Nach Aktivierung des Virtual Channel Processing sind auch die DSP Soundeffekte wie das RealCenter Management oder das Augmented Bass Processing aktiviert Diese sind nicht mehr fest mit den Ausgängen verknüpft sondern an bestimmte virtuelle Kanäle gebunden Dadurch ist es möglich die DSP Soundeffekte auf beliebig viele Ausgänge zu routen um beispielsweise 2 oder gar 3 Wege Centerlautsp...

Page 15: ...d h die Eingangssignale auf der linken Sei te werden per Drag Drop auf die jeweilige Summierungsmatrix gelegt Der Unterschied zum normalen Modus ist dass die Namen und Signaleigenschaften der virtuellen Kanäle an dieser Stelle festgelegt sind Front L Full Front R Full Rear L Full Rear R Full Front Center Full etc a Zunächst müssen alle Eingangssignale auf die entsprechenden festgelegten Signaltype...

Page 16: ...e virtuellen Kanäle den jeweiligen Ausgangskanälen zuzuweisen werden im Ausgangsrouting Virtual to Output Routing die jeweiligen virtuellen Signale per Drag Drop auf die Ausgangskanäle gezogen An dieser Stelle müssen die Signale in der Regel nicht mehr summiert werden so dass je dem Ausgangs signal nur ein virtuelles Signal zugeordnet wird beispielsweise wird dem vorderen linken Hochtöner das Sign...

Page 17: ...s Processing den RealCenter und mehr Um in den Genuss der DSP Soundeffekte zu kommen müssen bei der Hard und Softwarekonfiguration bestimmte Einstellungen vorgenommen werden Hinweis Die DSP Soundeffekte stehen bei der V EIGHT DSP MK2 nur im Virtual Channel Processing zur Verfügung Dieses kann im DCM Menü der DSP PC Tool Software aktiviert werden Hinweise für das Center Processing mit seiner RealCe...

Page 18: ...tellungen vorgenommen werden um dessen Soundeffekte anwenden zu können 1 Mindestens einer der virtuellen Subwoofer Kanäle Subwoofer 1 oder Subwoofer 2 muss mit einem Eingangssignal belegt sein siehe Workflow Schritt 1 2 Wechseln Sie in die Virtual to Output Routing Matrix und routen den Kanal die Kanäle Virtual G Subwoofer 1 und oder Virtual H Subwoofer 2 auf den oder die gewünschten Ausgangskanäl...

Page 19: ...onfiguration Der ACO bietet Speicherplatz für zehn anstelle der üblichen zwei Sound Setups Mit Hilfe einer optional erhältlichen URC Fernbedie nung oder des Control Tasters lässt sich zwischen zwei der zehn Sound Setup Speicherplätze um schalten Diese zwei Speicherplätze können in der URC Setup Switch Configuration festgelegt wer den Werkseitig sind die Speicherbereiche eins und zwei ausgewählt Um...

Page 20: ...vier Schrauben zwei Inbus und zwei Kreuzschlitzschrauben des Seitenblechs der Geräteseite mit dem USB Eingang und ent fernen dieses 3 Ziehen Sie nun das Bodenblech zur Seite he raus 4 Bereiten Sie das Modul für den Einbau in das Gerät vor Informationen dazu entnehmen Sie bitte der Bedienungsanleitung des jeweiligen HEC Moduls 5 Stecken Sie das HEC Modul in den im Gerät vorgesehenen Sockel siehe Ma...

Page 21: ...ellen zu er weitern Darüber hinaus bietet der ACO dank des neuen Flashspeichers Platz für 10 Sound Setups anstelle der üblichen zwei Intelligenter Highlevel Eingang ADEP 3 Moderne ab Werk verbaute Autoradios werden bezüglich der Diagnose der angeschlossenen Laut sprecher immer intelligenter Speziell die neueste Generation ist mit zusätzlichen Überwachungsfunk tionen ausgestattet sodass bei Anschlu...

Page 22: ... A LP Mini Stecksicherung Zusätzliche Features HEC Slot ADEP 3 Schaltkreis Control Input 32 Bit CoProcessor Auto Remote Schalter Abmessungen H x B x T 44 x 220 x 180 mm In typischen Mehrkanal Anwendungen 2 3 Wege System Rear Subwoofer Technische Daten Die Garantieleistung entspricht der gesetzlichen Regelung Von der Garantieleistung ausgeschlos sen sind Defekte und Schäden die durch Über ung oder ...

Page 23: ...d behind the proposed instal lation location to insure that there are no electrical cables or components hydraulic brake lines or any part of the fuel tank located behind the mounting surface Failure to do so may result in unpredictable damage to these components and possible costly repairs to the vehicle General instruction for connecting the HELIX V EIGHT DSP MK2 amplifier The HELIX V EIGHT DSP ...

Page 24: ...arallel 10 11 12 13 14 15 10 1 4 3 2 5 6 8 1 USB Input Connects the HELIX V EIGHT DSP MK2 to your PC 2 Control Input Multifunction interface for e g an optional remote control or other HELIX accessory 3 Control pushbutton Use this button to either switch between the setups or initiate a reset of the device 4 Status LED This LED indicates the operating mode of the amplifier and of its memory 5 Opti...

Page 25: ...eady for operation Orange Power Save Mode is active Red Protection Mode is active This may have dif ferent root causes The HELIX V EIGHT DSP MK2 is equipped with protection circuits against over and undervoltage as well as overheating Please check for connecting failures such as short circuits or other wrong connections If the amplifier is overheated the internal tempera ture protection switches o...

Page 26: ...ights up red if one of the six Line Inputs or eight Highlevel Inputs is overdriven The LED has no function if the device is fed with digital input sig nals If this LED lights up reduce the input sensitivity by using the control 9 Gain until the LED goes out 9 Gain This control is used to adapt the input sensitivity of the low and highlevel inputs to the output voltage of the connected signal sourc...

Page 27: ... need n t to be assigned if the Highlevel Input is used To deactivate the automatic turn on function read the description on page 30 item 7 Configuration of the remote input 13 12 V Connect the 12 V power cable to the positive ter minal of the battery Recommended cross section min 16 mm AWG 6 14 Line Output Processed 2 channel pre amplifier output with a maximum output voltage of 3 Volts RMS for c...

Page 28: ... A and B Make sure that the polarity is correct If one or more connections have reversed polarity it may affect the performance of the amplifier If this input is used the remote input does not need to be connected as the amplifier will au tomatically turn on once a loudspeaker signal is received 3 Connecting a digital signal source If you have a signal source with an optical digi tal output you ca...

Page 29: ...are listed in the table on page 32 If you want to change the input sensitivity use the Gain control 9 see page 26 item 9 The setting of the control affects both the lowlevel and the highlevel inputs If the ex factory sensitivity range of the lowlevel input 1 4 Volts or highlevel input 4 16 Volts may not be sufficient it is possible to change it internally by repositioning jumpers Therefore open th...

Page 30: ...the amplifier power terminals needs to have an inline fuse at a distance of less than 12 inches 30 cm from the battery The value of the fuse is calculated from the maximum total current draw of the whole car audio system V EIGHT DSP MK2 max 60 A RMS at 12 V power supply If your power wires are short less than 1 m 40 then a wire gauge of 16 mm AWG 6 will be sufficient In all other cases we strongly...

Page 31: ...sing the amplifier for the first time Ignoring this advice may result in damaging the connected amplifiers loudspeakers Informa tion about connecting the V EIGHT DSP MK2 to a computer can be found on page 33 9 Connecting the loudspeaker outputs The loudspeaker outputs can be connected di rectly to the wires of the loudspeakers Never connect any of the loudspeaker cables with the chassis ground as ...

Page 32: ...s OEM Radio with additional 4 to 8 channels amplifier 25 Watts and up to 200 Watts RMS power at 4 Ohms or up to 100 Watts RMS power per channel at 8 Ohms Highlevel A H A not plugged B C plugged see fig 2 Typically max CCW position 4 to 6 channel aftermarket radio with pre amplifier outputs Lowlevel RCA A F A plugged B C not plugged see fig 1 Typically delivery status 3 V max CCW position for radio...

Page 33: ...Tool software available on our website www audiotec fischer com and install it on your computer 2 Connect the amplifier to your computer us ing the USB cable that is included in delivery If you have to bridge longer distances please use an active USB extension cable with in tegrated repeater or the optionally available WIFI CONTROL interface 3 First turn on the amplifier and then start the softwar...

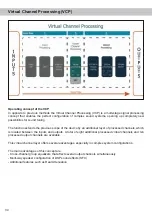
Page 34: ...pe of the device by an additional layer of processed channels which is located between the inputs and outputs A total of eight additional processed virtual channels and ten processed output channels are available This virtual channel layer offers several advantages especially in complex system configurations The main advantages of this concept are Cross channel group equalizers that affect several...

Page 35: ...ample application 2 or even 3 way center speaker After activating Virtual Channel Processing the DSP sound effects such as RealCenter management or Augmented Bass Processing are also available These are no longer linked to the outputs but tied to specific virtual channels This makes it possible to route the DSP sound effects to any number of outputs for example to realize 2 or even 3 way center sp...

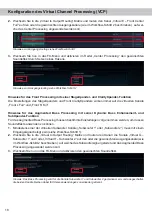
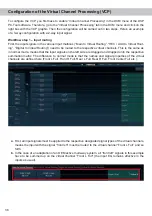
Page 36: ...me as in normal mode means that the input signals on the left side are dragged and dropped onto the respective summation matrix The difference to normal mode is that the names and signal properties of the virtual channels are defined here Front L Full Front R Full Rear L Full Rear R Full Front Center Full etc a First all input signals must be applied to the respective designated signal types of th...

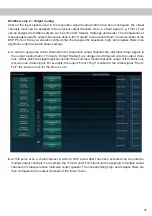
Page 37: ... assign the virtual channels to the respective output channels the individual virtual signals in the output routing matrix Virtual to Output Routing are dragged and dropped onto the output chan nels At this point the signals typically needn t to be summed means that each output of this matrix only receives one virtual signal For example the output Front L High is linked to the virtual signal Front...

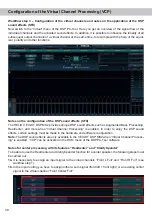
Page 38: ...al Channel Processing is enabled In order to enjoy the DSP sound effects certain settings must be made in the hardware and software configuration Note The DSP sound effects are only available in the V EIGHT DSP MK2 when Virtual Channel Process ing is enabled VCP can be activated in the DCM menu of the DSP PC Tool software Notes for center processing with its features RealCenter and ClarityXpander ...

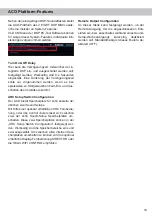
Page 39: ...ss Processing certain settings have to be made in order to use it 1 An input signal has to be assigned to at least one of the virtual subwoofer channels Subwoofer 1 or Subwoofer 2 see workflow step 1 2 Change to the Virtual to Output Routing matrix and route the channel s Virtual G Subwoofer 1 and or Virtual H Subwoofer 2 to the desired output channel or channels as described in workflow step 2 to...

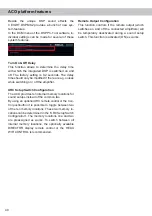
Page 40: ...ACO provides ten internal memory locations for sound setups instead of the common two By using an optional URC remote control or the Con trol pushbutton it is possible to toggle between two of the ten memory locations These two memory lo cations can be determined in the URC Setup Switch Configuration The memory locations one and two are preassigned ex works To switch between all internal memory lo...

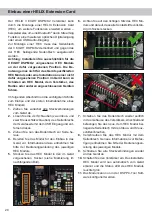
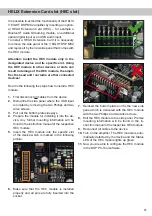
Page 41: ...panel where the USB input is located by removing the two Phillips and two Allen screws 3 Pull out the bottom plate sideways 4 Prepare the module for installing it into the de vice Any further mounting information will be found in the instruction manual of the respective HEC module 5 Insert the HEC module into the specific slot of the device which is marked in the following picture 6 Make sure that...

Page 42: ... setups instead of the common two Smart highlevel input ADEP 3 Modern factory installed car radios incorporate so phisticated possibilities of diagnosing the connect ed speakers In particular the latest generation of car radios are equipped with additional monitoring functions so that failure messages and loss of spe cific features e g fader function quite often appear if an amplifier will be hook...

Page 43: ...channel Up to 160 Watts RMS 2 Ohms Amplifier technology Pure Class GD Inputs 6 x RCA Cinch 8 x Highlevel speaker input 1 x Optical SPDIF 12 96 kHz 1 x Remote In Input sensitivity RCA Cinch max 4 V or max 8 V Highlevel max 16 V or max 32 V Input impedance RCA Cinch 12 kOhms Input impedance highlevel 9 33 Ohms oder 20 kOhms Outputs 8 x Speaker output 2 x RCA Cinch 2 x Remote Out Output voltage RCA C...

Page 44: ...Audiotec Fischer GmbH Hünegräben 26 57392 Schmallenberg Germany Tel 49 2972 9788 0 Fax 49 2972 9788 88 E mail helix audiotec fischer com Internet www audiotec fischer com ...

Reviews: