background image

2.


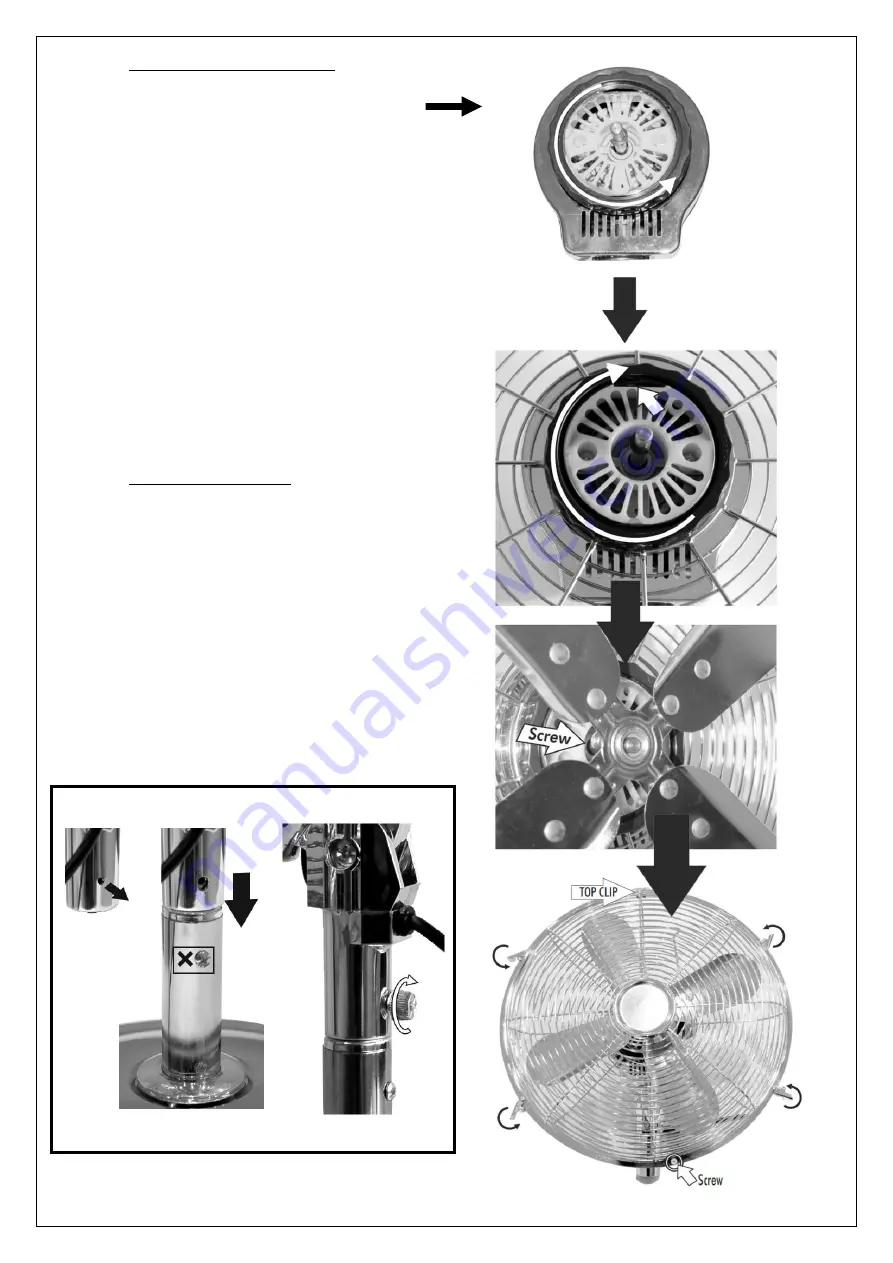
ASSEMBLING THE FAN HEAD: 


a.


Unscrew the guard nut from the motor 

head by rotating it anticlockwise. 

b.


Set the Rear Guard in the proper position 

(handle uppermost) and screw on the 

Guard retaining nut until tight. 

c.


Install the blade onto the shaft and screw 

on the Blade retaining nut until tight. 

d.


Open clips on the front guard and place 

front guard onto rear guard (align locking 

screw holes) and close clips. 

e.


Secure both guards firmly by fitting and 

tightening the locking screw and nut. 


3.


ASSEMBLING THE FAN: 

 
a.


Place the fan head on a flat level steady 
surface. 

b.


Remove the screw from the bottom of the 
fan head on the lower column. 
 
Place the fan head on the lower column. 
Replace the screw and tighten it very 
firmly to securely attach the head to the 
base column. After tightening the screw 
finger tight, use a screwdriver to add one 
quarter turn. 
 
DO NOT disturb the lower screw on the 
column base. (Refer to Figure A image 
below): 


FIGURE A.


Summary of Contents for MDF30

Page 1: ...READ AND SAVE THESE INSTRUCTIONS Instruction Manual 30cm Metal Desk Fan Model MDF30 ...

Page 2: ... the place of purchase for inspection repair or replacement Before unplugging the power cord be sure to turn the power off When touching the unit be sure your hands are dry to prevent electrical shock Never install the unit where it is exposed to direct sunlight excessive moisture rain dust and lack of ventilation near any heat sources Avoid making contact with moving parts Never insert fingers pe...

Page 3: ... provide additional safety protection when using electrical appliances It is advisable that a safety switch with a rated residual operating current not exceeding 30mA be installed in the electrical circuit supplying the appliance See your electrician for professional advice Children should be supervised to ensure that they do not play with the appliance Do not leave the fan running unattended WARN...

Page 4: ...S 1 Base Fixing Screw 2 Base 3 Column 4 Motor Housing 5 Speed Control knob 6 Oscillating Knob 7 Front Guard 8 Blade Retaining Nut 9 Fan Blade 10 Guard Retaining Nut 11 Rear Guard 12 Clips 13 Guard Locking Screw Nut ...

Page 5: ...age please take the unit back to place of purchase for a replacement ASSEMBLY INSTRUCTIONS 1 ATTACHNG THE COLOUMN BASE a Remove the screw from the base of the column b Place the column in the base c Hold the base and the column Turn upside down the assembly Secure the assembly by firmly attaching the screw to the column ...

Page 6: ...lign locking screw holes and close clips e Secure both guards firmly by fitting and tightening the locking screw and nut 3 ASSEMBLING THE FAN a Place the fan head on a flat level steady surface b Remove the screw from the bottom of the fan head on the lower column Place the fan head on the lower column Replace the screw and tighten it very firmly to securely attach the head to the base column Afte...

Page 7: ...he tilt of the fan head to the desired angle by pushing gently up or down on the fan guard CAUTION The fan should always be switched off when making any adjustments to the fan head angle CARE CLEANING Your appliance must be switched OFF via the main power supply and unplugged and allow it to cool down before proceeding with any cleaning assembling or disassembling Clean the housing with a damp clo...

Page 8: ...220 240V 50Hz 45W CUSTOMER SERVICE Australian Customer Service GAF Control Sales Pty Ltd P O Box 19 Altona North Victoria 3025 Phone 1300 659 489 Hours 9am 5pm EST Mon Fri www gafcontrol com au This product may vary slightly to the product illustrated due to ongoing product development ...

Reviews: