background image


OPERATING INSTRUCTIONS 

POWER REQUIREMENTS 

This  unit  operates on a  120V  AC adapter.  Plug the AC adapter  (included)  into a 
household outlet AC source. This unit is equipped with a battery back-up system, 
requiring  two DC 1.5V  “AAA”  type  batteries  (not included). Insert the battery  in the 
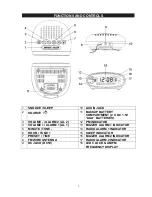
BATTERY COMPARTMENT

, making certain that the positive and negative (+ and -) 

sides are properly aligned. 
 

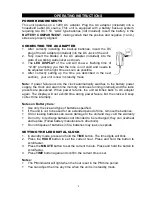
CONNECTING THE AC ADAPTER 

1.  After correctly installing the backup batteries, insert the DC 

plug of the AC adapter (included) into the DC Jack of the unit. 

2.  Fully insert the blades of the AC adapter (included) into the 

slots of a working wall socket as shown. 

3.  The 

LED DISPLAY

  of the unit will show a flashing  time of 

“12:00” prompting you that the time is not valid and needs  to 
be adjusted to the right time as soon as possible. 

4.  After  correctly  setting up the time (as described in the next 

section),  your unit is now in standby mode. 


Note: 

If power failure occurs, the clock automatically switches to the battery power 

supply, the clock and alarm time memory continues running internally and the radio 
presets are preserved. When power returns, the unit  switches back to AC adapter 
again.  The display will not exhibit time during power failure but the clock will keep 
correct time internally.


Notes on Battery Care: 

  Use only the size and type of batteries specified. 

  If the unit is not to be used for an extended period of time, remove the batteries. 

  Old or leaking batteries can cause damage to the unit and may void the warranty. 

  Do not try to recharge batteries not intended to be recharged; they can overheat 

and rupture (Follow battery manufacturer’s directions). 

  Do not dispose of batteries in fire, batteries may leak or explode. 


SETTING THE LED DIGITAL CLOCK  

1.  In standby mode, press and hold the 

TIME

 button. The time digits will blink. . 

2.  Press the 

HOUR 

button to set the current hour. Press and hold the button to 

scroll faster. 

3.  Press the 

MINUTE 

button to set the current minute. Press and hold the button to 

scroll faster.  

4.  Press 

TIME

 button again and confirm the current time is set. 

 
Notes: 

  The PM indicator will light when the hour is set in the PM time period.


  You can adjust the time any time when the unit is in standby mode.


Summary of Contents for KT2051MBY

Page 1: ...AM FM DUAL ALARM CLOCK RADIO WITH DIGITAL TUNING USER MANUAL KT2051MBY THIS IS NOT A TOY CAUTION Electrically Operated Product Please use care when plugging AC adapter into AC outlet ...

Page 2: ...y with a cart stand tripod bracket or table specified by the manufacturer or sold with the apparatus When a cart is used use caution when moving the cart apparatus combination to avoid injury from tip over 11 Unplug this apparatus during lightning storms or when unused for long periods of time 12 Refer all servicing to qualified service personnel Servicing is required when the apparatus has been d...

Page 3: ...erence to radio communications However there is no guarantee that interference will not occur in a particular installation If this equipment does cause harmful interference to radio or television reception which can be determined by turning the equipment off and on the user is encouraged to try to correct the interference by one or more of the following measures Reorient or relocate the receiving ...

Page 4: ...A BATTERIES 3 VOLUME ALARM 2 AL 2 12 PM INDICATOR 4 VOLUME ALARM 1 AL 1 13 BUZZER ALARM 1 INDICATOR 5 MINUTE TUNE 14 RADIO ALARM 1 INDICATOR 6 HOUR TUNE 15 SLEEP INDICATOR 7 PRESET TIME 16 BUZZER ALARM 2 INDICATOR 8 FM WIRE ANTENNA 17 RADIO ALARM 2 INDICATOR 9 DC JACK DC5V 18 LED CLOCK AM FM FREQUENCY DISPLAY ...

Page 5: ... the clock and alarm time memory continues running internally and the radio presets are preserved When power returns the unit switches back to AC adapter again The display will not exhibit time during power failure but the clock will keep correct time internally Notes on Battery Care Use only the size and type of batteries specified If the unit is not to be used for an extended period of time remo...

Page 6: ...zer or Radio sounds for 60 minutes and then turn off automatically if the snooze button is not pressed 8 To stop the Buzzer or Radio sound immediately tap the button to turn off Notes You should tune to your desired radio station first before starting to set the alarm time and selecting wake up mode Alarm will ring again at the same time each day unless disabled To stop alarm from automatically so...

Page 7: ...l flash on the LED display for initial setup Otherwise the next available preset memory number will then flash in the LED display You may change to another preset memory number by tapping the TUNE or TUNE button Note If you select an existing preset memory the new radio station frequency will replace the existing one 5 Repeat above steps 3 thru 4 to preset up to 10 stations for each of the AM and ...

Page 8: ...isconnect the AC adapter and remove the system back up batteries wait for at least 3 minutes and then setup the unit as if you were using it for the very first time CARE AND MAINTENANCE 1 Clean the unit with a soft damp never wet cloth Solvent or detergent should never be used 2 Avoid operating your unit under direct sunlight or in hot humid or dusty places to reduce the risk of fire or electric s...

Page 9: ...n the user manual or non SPECTRA approved modifications c Claims are made within the warranty period 2 This warranty does not cover damage or equipment failure caused by electrical wiring not in compliance with electrical codes or SPECTRA user manual specifications or failure to provide reasonable care and necessary maintenance as outlined in the user manual 3 Warranty of all SPECTRA products appl...

Page 10: ...right to offer alternative options for repair or replacement SPECTRA MERCHANDISING INTERNATIONAL INC 4230 North Normandy Avenue Chicago IL 60634 USA 1 800 777 5331 To register your product visit the link below to enter your information http www spectraintl com wform htm Licensed by Marino Andriani LLC Distributed by Spectra Merchandising International Inc 4230 North Normandy Avenue Chicago IL 6063...

Reviews: