Helmer Scientific i.Series
®
and Horizon Series
™
Freezer - Undercounter
Service and Maintenance Manual
360417/A
60
11.2 Test and Replace Back-up Batteries
Check Monitoring System Battery
The monitoring system does not indicate the charge level of the battery. Regularly test the battery and replace the battery if the test
fails or if the battery has been in use for one year.
Note
Use only a battery which meets manufacturer’s specifications.
Test the Battery:
1. Switch the AC power switch OFF.
2. The display should continue to display information.
3. If the display is blank, replace the battery.
4. Switch the AC power switch ON.
Check Optional Access Control System Battery
During an AC power failure, the Access Control back-up battery provides back-up power to the magnetic Access Control lock.
Test the Access Control back-up battery to ensure it is working properly.
Test the Battery:
1. Ensure the Access Control back-up battery key switch is switched ON.
2. Switch the AC power switch OFF.
3. Verify the “PoFF” (power failure) message is displayed.
4. Attempt to open the cabinet door, if the door remains locked, the battery is functional. If the door does not remain
locked, replace the battery.
5. Switch the AC power switch ON.
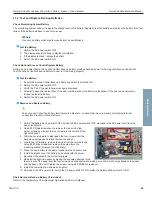
Remove and Replace Battery
Take care not to short the battery terminals to the bracket or to each other when removing or attaching terminal
connectors, bracket or bracket screws.
1. Switch the battery back-up switch OFF; switch the AC power switch OFF; disconnect the AC power cord from the
power receptacle.
2. Use a #2 Phillips screwdriver to remove the top and bottom
center screws and loosen the four screws in the corners of the
right-side panel.
3. Slide the cover upward to disengage the four screws from the
keyhole openings and carefully remove the panel.
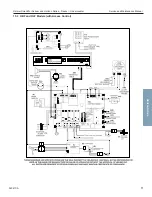
4. Locate the 12V Battery, remove the wires from the terminals and
using #2 Phillips screwdriver remove the screw from the
mounting bracket. Remove the old battery.
5. Place the new battery in the same location as the one removed.
6. Install the bracket over the battery and secure with the screw.
7. Reconnect the wires to the correct terminals.
8. Reinstall the right-side panel by placing the keyhole openings in the
four corners of the panel over the four screws and slide downward making sure not to pinch wires between the panel
and the base of the unit. Tighten the screws using a #2 Phillips screwdriver.
9. Install the remaining two screws and tighten.
10. Reconnect the AC power cord; switch the AC power switch to ON; switch the battery back-up switch to ON.
Chart Recorder Back-up Battery (if included)
Refer to the Temperature Chart Recorder Operation and Service Manual.
Horizon Series

