Helmer Scientific i.Series
®
and Horizon Series
™
Refrigerator - Pass-Thru
Service and Maintenance Manual
360429/A
27
4.4 Display Board Battery
NOTICE
The display board is sensitive to static electricity and can be damaged by electrostatic discharge. Use proper ESD
precautions when handling the display board.
Replace Display Board Battery
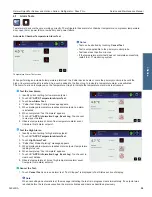
1. Switch main power switch OFF; switch battery backup switch OFF;
disconnect AC power cord from power receptacle.
2. Use #2 Phillips screwdriver to remove two (2) screws from bottom of
i.C³ bezel.
3. Gently lift bezel to disconnect it from mounting bracket on front of unit.
4.
Locate CR2032 battery and use a small flat head screwdriver to push old
battery out of slot.
5. Install new CR2032 battery into slot.
6. Mount bezel to cabinet and secure using two (2) screws.
7. Reconnect AC power cord; switch main power switch ON; switch battery
backup switch ON.
8. Allow temperature to stabilize at setpoint before moving inventory back into unit.
4.5
Upgrade System Firmware
Helmer may occasionally issue updates for the i.C³ firmware. Follow upgrade instructions included with the firmware update.
4.6
Re-apply Silver Conductive Grease to Upper Door Hinge
NOTICE
• Conductive grease reapplication is only necessary on the upper door hinge of i.Series models, and only for the door
that has the i.C
3
display.
• Use only conductive grease.
1. Switch main power switch OFF; switch battery backup switch OFF; switch i.Lock key switch OFF (if installed); disconnect
AC power cord from power receptacle.
2. Using a #2 Phillips screwdriver, remove screws securing ventilated cover over ante-room (control) side and remove cover.
3. Using a #2 screwdriver, loosen the four (4) screws securing bezel and slide upward to disengage and remove.
4. Use a 5/32” Allen tool to remove two (2) bolts securing upper hinge of door.
5. Slightly tilt door away from refrigerator and lift on upper hinge. Apply small amount of conductive grease to bottom of
upper hinge.
6. Insert top hinge back into door and use 5/32” Allen tool to install and secure two (2) bolts into upper hinge.
Note
Verify door is level once upper hinge is secured. If door is not level, loosen upper hinge screws and adjust accordingly.
7. Install bezel and secure with four (4) screws using a #2 Phillips screwdriver.
8. Reinstall ventilated cover and secure with screws using a #2 Phillips screwdriver.
9. Reconnect AC power cord; switch main power switch ON; switch battery backup switch ON; switch i.Lock key switch ON
(if installed).
10. Allow temperature to stabilize at setpoint before moving inventory back into unit.
i.Series

