6
Horizon Series
™
Operation
6.1
Initial Power Up
1.
Plug the power cord into a grounded outlet that meets the electrical requirements on the product specification label.
2. Turn the AC power switch ON.
3. Install 9 V back-up battery provided (undercounter battery located in literature box; upright battery located on top of unit).
4. Press
Down Arrow
(Mute) if high temperature alarm sounds.
Notes
• For models equipped with optional Access Control, the back-up battery is turned ON with a key switch.
• If an alarm condition other than High Temperature occurs, refer to the service manual for troubleshooting.
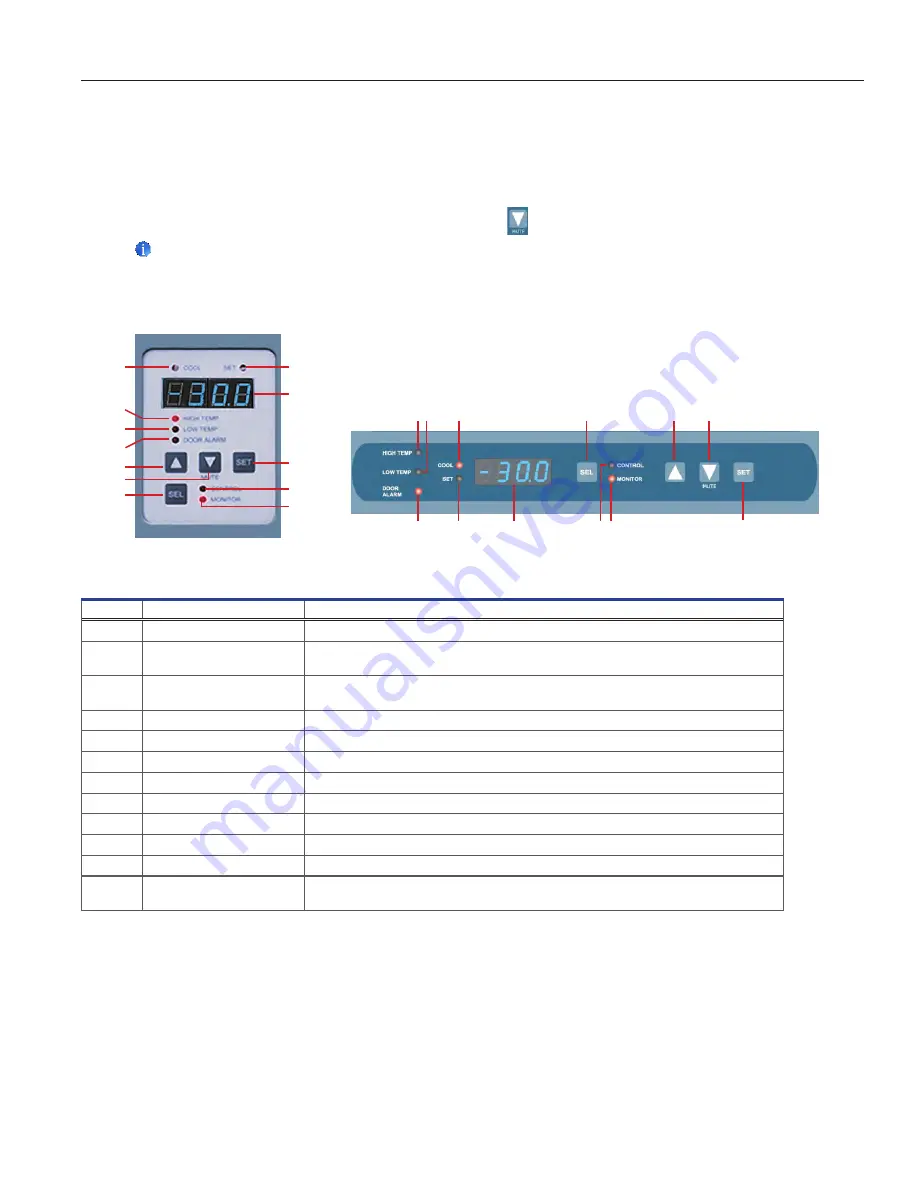
Upright
Interface
Undercounter
Interface
Table 3. Access Control Interface Functions
Label
Description
Function
A
COOL lamp
Indicates the compressor is running.
B
HIGH TEMP lamp
Indicates when the freezer is in a high temperature alarm condition. Also indicates the
high alarm temperature setpoint is being changed.
C
LOW TEMP lamp
Indicates when the freezer is in a low temperature alarm condition. Also indicates the
low alarm temperature setpoint is being changed.
D
DOOR ALARM lamp
Indicates when the door is open.
E
UP ARROW button
Increases a temperature setting.
F
DOWN ARROW button
Decreases a temperature setting. Also mutes the audible alarm for five minutes.
G
SEL button
Toggles between alarm monitor and control modes.
H
SET lamp
Indicates when temperature setpoint or alarm setpoint is being changed.
I
LED Display
Displays real-time temperature information, setpoints, and alarms.
J
SET button
Allows settings to be selected, prior to changing settings.
K
CONTROL lamp
Indicates when the reading from the control probe is displayed.
L
MONITOR lamp
Indicates when the display is showing temperature readings from the monitor probe.
Also indicates when alarm setpoints are being changed.
A
B
C
D
E
F
G
H
I
J
K
L
BC A G E F
D H I KL J
Helmer Scientific i.Series
™
-
Horizon Series
™
Freezer
Instructions for Use
360380-ENG/B
14


