background image


8


Hot Start-open the valve under the gas tank all the way if it has been shut off. Open the 
throttle  approximately  half  way.  Do  not  apply  the  choke.  Pull  the  starter  rope  sharply 
until the engine  starts. When the engine  starts, adjust  the throttle. Always operate the 
engine at full throttle when under load. 
 
NOTE: These starting instructions are general guidelines only. Since many engine options 
are available, consult the Engine Manual included with this unit for specific instructions. 
Caution-Gasoline  Englnes-TO  improve  the  engine  service  life,  allow  the  engine  to  idle 
without load for (2) to (5) minutes before shutting it down. When the idling period is up, 
use the stop switch located on the engine and turn it to stop. Close the fuel valve under 
the gas tank. Engine flooding can occur if the valve is left open during transport. 

TO START CUTTING 

1. 

 Start engine and let engine warm up. All cutting is done at full throttle. 

2. 

 Align blade and cutter with cut. If wet cutting, open water valve and turn water 

safety switch on. 
3. 

 Step  on  the  left  side  of  PEDAL  until  hear  a  “click”,  then  turn  on  the  WHEEL 

HANDLE on the top of the machine to remove the equipment forward and reverse, step 
down the right side of PEDAL to change to “push” driving system. 
4. 

 Lower blade into cut slowly. 

5. 

 Cut as fast as blade will allow. If blade climbs out of cut, reduce forward speed 

or depth of cut. 
6. 

 Use only enough side pressure on cutter handles to follow cutting line.   

CUTTING 

Lower  the  blade  into  concrete  to  required  depth  by  turning  the  tilt  crank 
counterclockwise. Ease the saw slowly forward. Slow forward pressure if the saw begins 
to stall. 
Note:  For  deeper  cuts(4  inches/102mm  or  more),  several  cuts  should  be  made  in 
incremental  steps  of  1-1/2  inch  (38mm)  to  2  inches(51mm)  until  the  desired  depth  is 
reached. 
 
Push the saw steadily forward using the front pointer as a guide. Exert enough forward 
pressure so that the engine/motor begins to labor, but  does not  slow down. If the saw 
begins to stall, retard forward movement  until full RPM is restored to the blade. If saw 
stalls,  raise  the  blade  out  of the  cut  before  restarting.  Avoid  excessive  side  pressure  or 
twisting of the blade in the cut. 

Summary of Contents for BSC350

Page 1: ...EN RU 01 2014 www helmutworld com support CONCRETE CUTTER BSC350 BSC350H...

Page 2: ...stand these instructions before operating changing accessories or performing maintenance on this power equipment All possible situations cannot be covered in these instructions Care must be exercised...

Page 3: ...s when they become difficult to read ALWAYS check the machine for loosened threads or bolts before starting NEVER touch the hot exhaust manifold muffler or cylinder Allow these parts to cool before se...

Page 4: ...lace Caution must be exercised while servicing this equipment Rotating and moving parts can cause injury if contacted Keep all inexperienced and unauthorized people away from the equipment at all time...

Page 5: ...e into the cylinder head making the engine difficult to start NEVER transport the cutter with the blade mounted EMERGENCIES ALWAYS know the location of the nearest fire extinguisher and first aid kit...

Page 6: ...s ramps and other flat sawing applications You will find a cutter to fit a wide vanety of job applications Upon receipt of your machine CAREFULLY CHECK FOR ANY FREIGHT DAMAGE Any Damage should be imme...

Page 7: ...ends entirely on using the correct blade for the material to be cut Wet or dry diamond blades of various specifications are available for cutting concrete or asphalt Before Starting Cold Start Hot Sta...

Page 8: ...lve and turn water safety switch on 3 Step on the left side of PEDAL until hear a click then turn on the WHEEL HANDLE on the top of the machine to remove the equipment forward and reverse step down th...

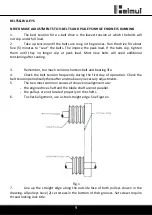
Page 9: ...after seating 3 Remember too much tension shortens belt and bearing life 4 Check the belt tension frequently during the first day of operation Check the belt tension periodically thereafter and make a...

Page 10: ...e sure arbor and threads are not worn damaged or bent Blade shaft bearings should be tight no free play side to side or up and down Grease blade shaft bearings daily Blade collars should be clean free...

Page 11: ...observed at all times To avoid the risk of accidents use the correct tool for the job and keep tools clean The draining of engine oil is best carried out when the oil is warm NOT hot Any spilled oil...

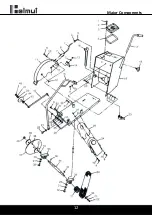
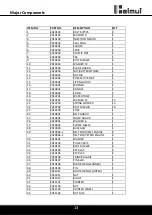
Page 12: ...12 Major Components...

Page 13: ...01 WATER TANK 1 20 2010702 WASHER 12 15 21 2010703 SPRING WASHER 13 22 2010704 BOLT M12x30 10 23 2010705 COCK 1 24 2010801 BELT GUARD 1 25 2010802 INNER GUARD 2 26 2010901 WASHER 6 1 27 2010902 SCREW...

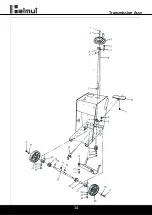
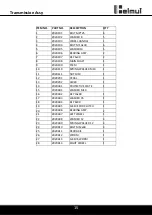
Page 14: ...14 Transmission Assy...

Page 15: ...2020110 SPRING WASHER M10 1 11 2020111 NUT M10 1 12 2020201 PEDAL 1 13 2020202 LEVER 1 14 2020301 PROTECTIVE PLATE 1 15 2020401 WASHER M10 16 2020402 KEY 10x40 1 17 2020403 WASHER 35 1 18 2020404 KEY...

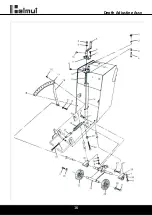
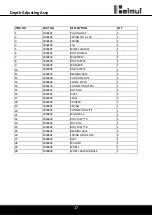
Page 16: ...16 Depth Adjusting Assy...

Page 17: ...11 2030207 BEARING ASSY 2 12 2030208 POSITION PLATE 2 13 2030209 SCREW STEM 1 14 2030210 CONNECTING STEM 1 15 2030211 NUT M10 4 16 2030301 RIVET 4 17 2030302 SCALE 3 18 2030303 POINTER 1 19 2030401 S...

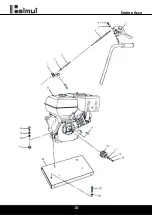
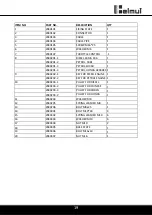
Page 18: ...18 Engine Assy...

Page 19: ...OL HONDA GX390K1 1 9 2040202 1 KEY FOR DIESEL ENGINE 1 2040202 2 KEY FOR PETROL ENGINE 1 10 2040203 1 PULLEY FOR DIESEL ENGINE 1 2040203 2 PULLEY FOR CHINESE PETROL ENGINE 1 2040203 3 PULLEY FOR ROB1N...

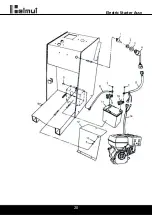
Page 20: ...20 Electric Starter Assy...

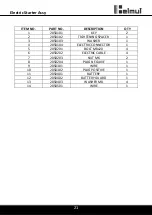
Page 21: ...ING SPACER 1 3 2050103 WASHER 1 4 2050104 ELECTRIC CONNECTOR 1 5 2050201 BOLT M8x20 4 6 2050202 ELECTRIC CABLE 4 7 2050203 NUT M6 2 8 2050204 PLUG NEGAIVE 1 9 2050301 WIRE 1 10 2050302 PLUG POSITIVE 1...

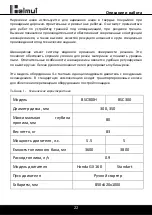
Page 22: ...22 4 1 BSC300H BSC300 300 350 80 83 5 5 5 3600 3800 0 9 Honda GX 160 Standart 850 520 1000...

Page 23: ...23...

Page 24: ...24 92 4 10 25 4 22 32...

Page 25: ...25 20 9 5 1200 3 1 2 5 4 6...

Page 26: ...26 2 SAE 15W40 92...

Page 27: ...27 8 10 98 10 0 8 1...

Page 28: ......

Reviews: