3
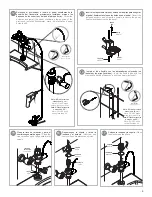
chapetón
flange
6
7
A
Nota:
La instalación puede ser izquierda o derecha.
Note:
Installation can be left or right.
Arme el niple para spud. /
Assemble the nipple to spud.
9
niple
armado
armed nipple
A:
Longitud final.
A: Final Length
tubería de alimentación
Ø 25 mm
(1”)
(no incluida)
supply pipe Ø 25 mm (1 ")
(not included)
pared con
acabado final
finish wall
adaptador
(incluido)
adapter
(included)
Solde el adaptador. /
Weld the
adapter.
Inserte el chapetón con la camisa y
enrosque la llave de retención.
/ Insert
the flange with the cover tube and
screw the stop valve.
cuerpo armado
body assembly
Coloque el chapetón y enrosque el cuerpo armado sin apretar. /
Place the escutcheon and screw the body assembly loosely.
Coloque el niple armado.
/ Place the nipple assembly.
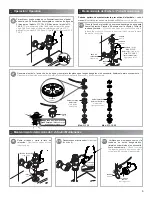
Utilice teflón en el niple
roscado.
/
Use Teflon
threaded nipple.
llave de
retención
stop valve
camisa
cover tube
8
cortador de tubo(no incluido)
pipe cutter (not included)
niple
nipple
B
Coloque el cuerpo armado y verifique
la distancia (B) y si es necesario
recorte el niple.
/
Place the body
assembly and check the distance (B)
and if necessary cut the nipple.
cuerpo armado
body assembly
rondana
washer
niple recto
straight nipple
tuerca
nut
tuerca spud
urinal nut
rondana de polietileno
polyethylene washer
sello mingitorio
seal urinal
Verifique el apriete del
spud.
/ Check the
tightness of the spud.
10
11
Verifique que las rondanas estén
bien colocadas.
/ Check that the
washers are properly installed.
spud
(no incluido)
spud
(not included)
rondana
washer
tuerca
nut
niple recto
straight nipple
chapetón
escutcheon
Nota:
Enrosque el niple armado, posteriormente apriete firmemente el cuerpo
armado a la llave de retención.
Note:
Screw nipple assembly, then firmly tighten the body assembly to stop valve.


