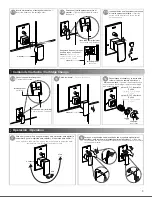
Instalación General /
2
General Installation
Nivele el cuerpo del monomando en
el plano horizontal y vertical.
/
Level
the body of the mixer in the
horizontal and vertical plane.
7
8
Aplique el acabado final.
/ Apply the
finish.
3
Ensamble la tubería al cuerpo del
monomando. /
Assemble the pipe to the
mixer body.
4
5
Arme nuevamente el cuerpo del monomando.
/ Reassemble
mixer body.
6
9
Retire el casquillo (guía de instalación).
Remove the cap (installation guide).
Desensamble el cuerpo del monomando.
Disassemble the body of the tap.
3
rosca exterior
½”-14 NPT
/
externally threaded
½“-14 NPT
tubo ½”
(no incluído)
/ tube ½”
(not included)
tapón
/
plug
cámara
de aire
/
air chamber
Utilice teflón en las
uniones roscadas.
/ Use Teflon screw
connections.
*70 cm
*30 cm
*20 cm min.
30 cm max.
*70 cm
*120 cm
conector no incluido
/
connector not included
Inserte la instalación armada dentro del
ranurado de su pared.
/ Insert the
installation groove armada inside your
wall.
nivel de piso
terminado NPT
/ floor level
finished NPT
2
inserto plástico
/ plastic insert
nivel
/
level
casquillo
(guía de instalación)
/ shell (intallation guide)
Es importante
enroscar el tornillo de
ajuste del porta cartucho a
tope sin apretar.
/ It is
important to tighten the
screw to slide the cartridge
cap loosely.
vástago
stem
chapetón con empaque
escutcheon with gasket
Verifique que el vástago del cartucho se
desplace de forma vertical y coloque el
chapetón con empaque deslizando el
10
o’ring. junto con el chapetón con empaque /
Verify
that the cartridge stem travels vertically and place
the escutcheon with sliding o'ring packaging. with
escutcheon with gasket.
o’ring
chapetón
/
escutcheon
o’ring
cartucho
cartridge
cuerpo
armado
armed
body
desviador
deflecting
tornillo
screw
chapetón
escutcheon
tuerca
nut
protector
plástico
plastic
protector
½” - 14 NPT
½” - 14 NPT
3/4” - 14 NPT
tornillo
screw
tuerca
nut
casquillo
(guía de instalación)
cap (installation
guide)
pared con
acabado final
wall finish
casquillo
(guía de instalación)
cap (installation
guide)
/ indicator label the deep
level
etiqueta indicadora
del nivel de profundidad
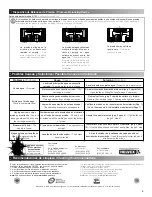
Medidas Recomendadas /
Recommended Measures
p/ salida de regadera
/ exit shower
p/ agua
fria
/ to cold
water
p/ salida de
tina
/ exit tub
p/ agua
caliente
/ to hot
water
* Medidas Recomendadas
/ *Recommended measures


