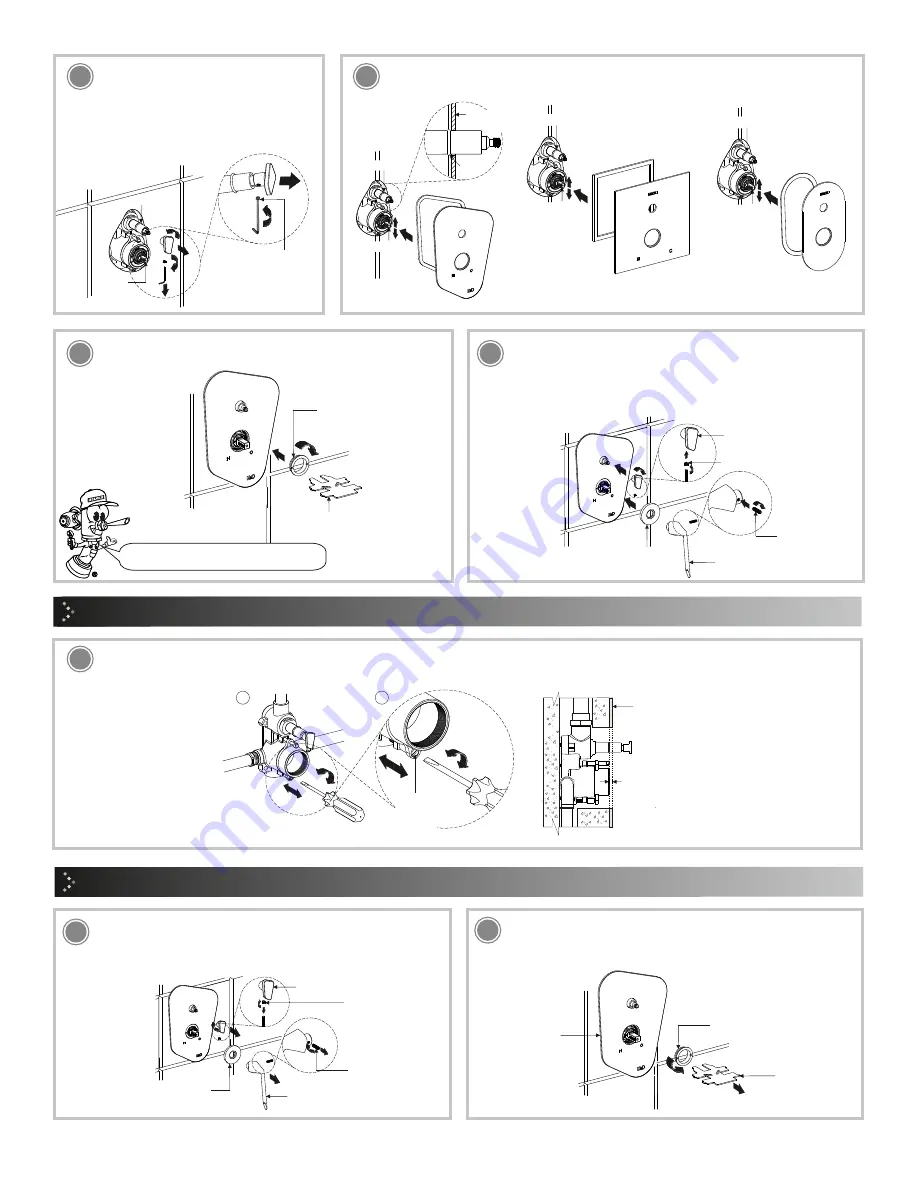
3
10
11
Para los modelos:
For models:
PIU-201
Inserte el chapetón con empaques y deslícelo hasta topar con pared.
/ Insert escutcheon
with gasket and slide until it meets wall.
E-701, E-701-S
Para los modelos:
For models:
E-703, E-703-S
Para los modelos:
For models:
o’ring
Desenrosque el opresor y retire el
botón, recorra el o’ring hacia la punta
del vástago , sin retirarlo.
/ Unscrew and
remove the setscrew button, scroll the
o'ring towards the tip stem without
removing.
vástago
stem
o’ring
chapetón
escutcheon
o’ring
vástago
stem
o’ring
vástago
stem
o’ring
12
Inserte el chapetón con empaque, la rondana y la palanca en el
vástago del cartucho y enrosque el opresor. Posteriormente
enrosque el botón y fijelo con el opresor.
I Insert the escutcheon
with gasket, the washer and the lever into the cartridge stem and
screw in the crush. Then screw the button and fix it with the
setscrew.
Enrosque el soporte chapetón con la llave especial (incluída).
/
Screw the escutcheon with special key holder (included).
soporte
chapetón
llave para soporte
Evite rayar el acabado del chapetón.
Avoid scratching the finish of the escutcheon.
escutcheon
support
support wrench
13
chapetón con empaque y rondana antifricción
escutcheon with gasket friction washer
palanca
lever
opresor
set screw
opresor
setscrew
botón
button
14
Ajuste de Instalación
/ Installation Adjustment
Si el acabado final de pared, quedó fuera del rango máximo del marcado en el protector plástico, proceda, con lo siguiente:
/ If the finish wall, stood
outside the maximum range of the marking on the plastic protector, proceed with the following:
1. Retire el porta cartucho
armado. Posteriormente gire el
tornillo de ajuste en sentido anti-
horario, para recorrer hacia afuera
(solo se tiene 10 mm de rango de
ajuste). /
1. Remove the armed
cartridge holder. Then turn the
adjusting screw anti-clockwise to
move outward (only 10 mm of
adjustment range is available).
2. Verifique que tenga 6mm entre
el acabado final y su cuerpo guía,
d e s p u é s p r o c e d a c o n l o s
siguientes pasos; 12,13 y 14.
/
2.
Verify that it has 6mm between the
final finish and its guide body, then
proceed with the following steps;
12,13 and 14.
6,0 mm
(0,23”)
acabado
final
finish wall
tornillo de
ajuste
adjusting
screw
1
2
soporte chapetón
llave especial
escutcheon support
special key
chapetón con
empaque
escutcheon with
gasket
15
Mantenimiento del Cartucho
/ Maintenance Cartridge
16
Desenrosque el opresor, retire la palanca, y el chapetón con
empaque, posteriormente desenrosque el opresor y desatornille el
botón.
/ Unscrew the clamp, remove the lever, and the escutcheon with
packing, then unscrew the clamp and unscrew the button.
opresor
setscrew
opresor
setscrew
botón
button
chapetón con empaque
escutcheon with gasket
palanca
lever
Desenrosque el soporte chapetón con la llave especial (incluida),
y retire el chapetón con empaque.
/ Unscrew the escutcheon with
special key holder (included), and remove the escutcheon with
gasket.
opresor
setscrew
vástago
stem


