6
EN
Assembly
• WARNING! Never connect the power plug into an
electrical outlet before the appliance is fully as-
sembled.
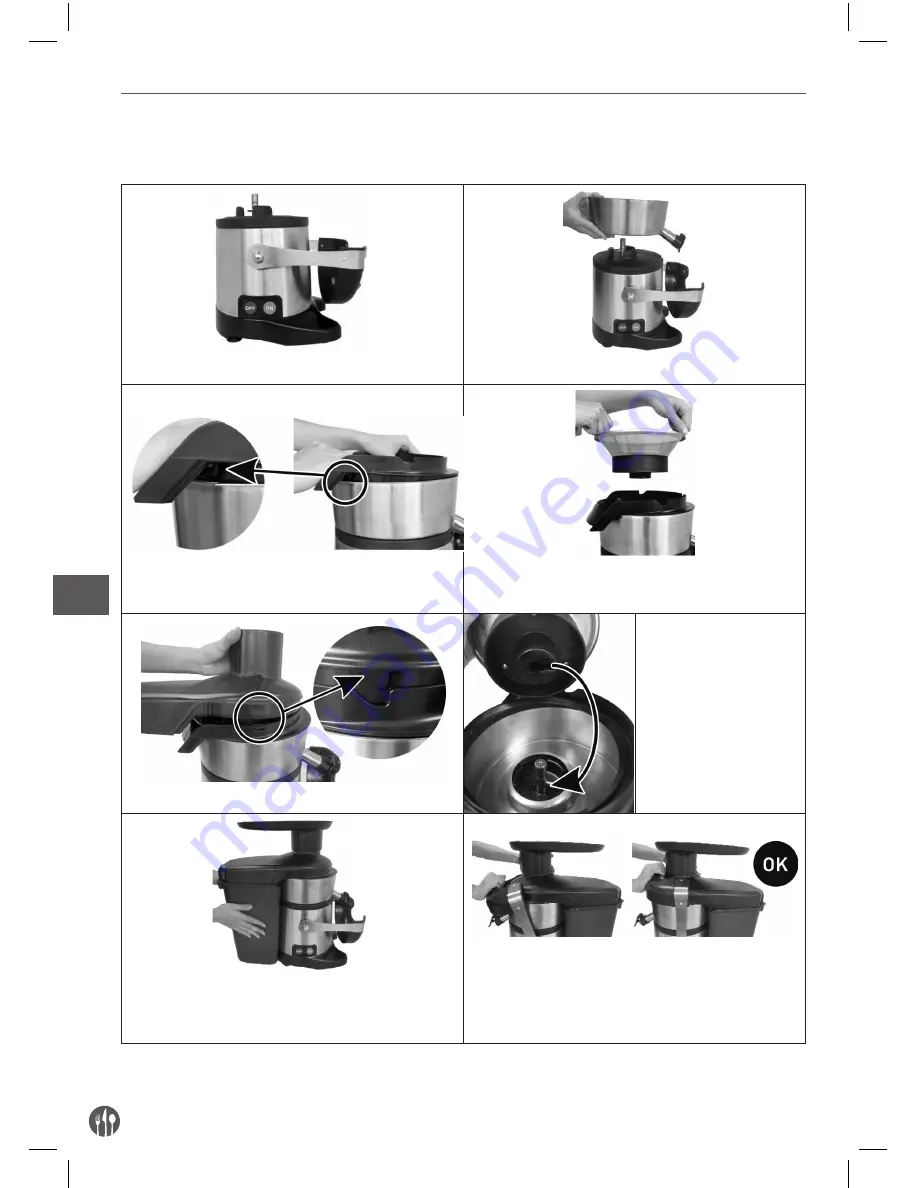
• Make sure the spout assembly is closed.
1.
2.
Position the motor unit firmly so that the OFF / ON buttons are facing you. Place the bowl on top of the motor unit.
3.
4.
Fit the flange onto the rim of the bowl. The ribs of the flange should be
lined up with the flat panel of the bowl. Make sure that the flange is cor-
rectly fitted.
Lower the basket assembly into correct place, holding it by the holders.
Rotate it until its slots into correct place.
5.
IMPORTANT:
Make sure that the
pin on the motor shaft is correct-
ly lined up with the corresponding
notch in the basket hub.
Line the lid with feeding chute with the notches in the flange.
6.
7.
(Opposite view)
Correctly fit the pulp container with the hopper plate.
Close the safety arm correctly.
The juicer will not start unless the safety arm has been closed properly
(safety switch).
Now, the appliance is assembled and ready for use.
Summary of Contents for 221082
Page 98: ...98 RU Hendi...
Page 99: ...99 RU...
Page 100: ...100 RU I...
Page 101: ...101 RU...
Page 102: ...102 RU 1 2 OFF ON 3 4 5 6 7...
Page 103: ...103 RU 2 3 3 2 3 6 7 15 6 7...
Page 104: ...104 RU I OFF OFF ON OFF...
Page 105: ...105 RU 2 3 3 5...
Page 107: ...107 RU 220 230 50 60 EP EA CD KD KM MA1 MA2 SW MF MO PTO...
Page 108: ...108 RU 4 3 6 1 2 1 300 1 3 3 Granny Smith 1 2 3 3 250 250 250...
Page 109: ...109 RU 3 1 2 3 1 4 4 Granny Smith 2 1 1 2 4 1 2 2 2 Granny Smith 4 750 1 2 20 20 4 4 4 1...
Page 111: ...111 RU 4 400 1 Granny Smith 1 2 4 1400 1 1 2 1 2 Golden Delicious 1 1 2 1...


