10
EN
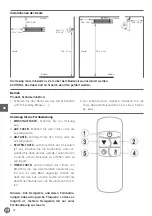
Ceiling mounted installation
Ceiling
Ceiling
Min. 0,5m
Min. 0,5m
Min. 0,5m
Min. 0,5m
Min. 2,4m
Min. 2,4m
Floor
Floor
Max. 90°
Min. 45°
Wall
Wall
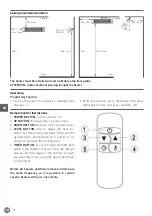
The heater must be installed at least 2.4M above the floor grade.
ATTENTION: cable should not passing thought the heater.
Operating
Product Key Function:
1. Turn on the power, the product is standby mode
display (- -);
2. Press key function: press the button, then press
the heat levels (L1-L2-L3-L4- standby- off).
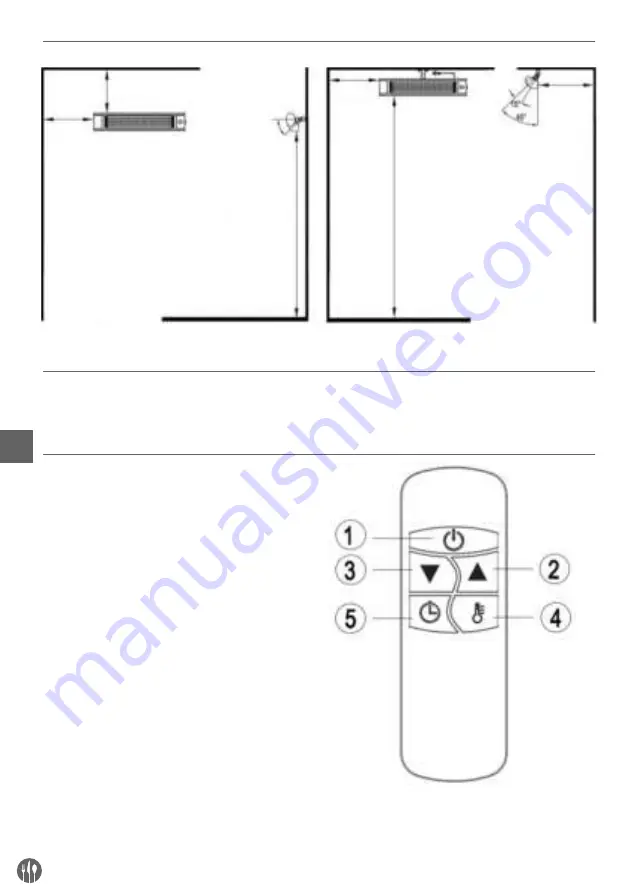
Remote Control Instructions
1.
POWER BUTTON:
Turn the heater off.
2.
UP BUTTON:
Increase timer or power level.
3.
DOWN BUTTON:
Decrease timer or power level.
4.
LEVEL BUTTON:
Use to adjust the heat lev-
els(L1-L4). Press the Level button then use the
up and down buttons(buttons 2 and 3) to in-
crease or decrease the heating level.
5.
TIMER BUTTON:
To set the timer from 0H-24H,
which is the number of hours it will run. 0H will
display and then adjust to the number of hours
you would like to set, using the up and down but-
tons(2 and 3).
Noted: All heaters and their remote controls have
the same frequency, so it is possible to control
several heaters with just one remote.
Summary of Contents for BOLA 272428
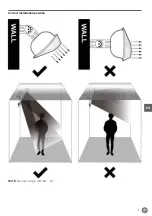
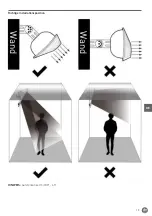
Page 7: ...7 EN Correct installation position NOTE Mounted angle with 30 45...
Page 19: ...19 DE Richtige Installationsposition Wand Wand HINWEIS Aufstellwinkel mit 30 45...
Page 30: ...30 NL Correcte installatiepositie Muur Muur OPMERKING Gemonteerde hoek met 30 45...
Page 52: ...52 FR Position d installation correcte Mur Mur NOTE Angle de montage avec 30 45...
Page 63: ...63 IT Posizione di installazione corretta Parete Parete NOTA Angolo di montaggio 30 45...
Page 74: ...74 RO Pozi ia corect de instalare Perete Perete NOT Instalare n unghi de 30 45...
Page 81: ...81 RU Hendi...
Page 82: ...82 RU 3 0 9...
Page 83: ...83 RU 200 C 10...
Page 84: ...84 RU I HENDI BOLA...
Page 85: ...85 RU 19 7 2 4 1 2 3 2 4 4 2 4 5 0 5 6 1 7 1 8 90 45 9 10 11 12 13 0 5 14 15 16 17 18 19...
Page 86: ...86 RU 30 45...
Page 87: ...87 RU 3 0 9...
Page 88: ...88 RU 1 2 3 4 1 4 2 M6 60 4 3 6 2 4 6 1 2 5 M6 12 2...
Page 90: ...90 RU 2 1 2 1 2 3 1 2 3 1 1 L1 2 3 4...
Page 91: ...91 RU 1 1 2 3 4 1 2 3 4 5 6 1 2 3 4 5 6 7...
Page 92: ...92 RU 272428 220 240 50 60 2500 I IP55 900x100x 174 3...
Page 93: ...93 GR Hendi...
Page 94: ...94 GR 3 0 9 m...
Page 95: ...95 GR 200 C 10...
Page 97: ...97 GR 30 45...
Page 98: ...98 GR 3 0 9...
Page 99: ...99 GR 1 2 3 4 1 L 4 2 M 6 mm 60 mm 4 3 M 6 mm 2 4 6mm 1 mm 2 5 M 6 mm 12 mm 2...
Page 100: ...100 GR 0 5 0 5 0 5 0 5 2 4 2 4 90 45 2 4 m 1 2 L1 L2 L3 L4 1 2 3 4 L1 L4 2 3 5 0 24 0H 2 3...
Page 101: ...101 GR 2 AAA 1 2 1 2 3 1 2 3 E1 1 L1 2 3 4...


