12
EN
Cleaning and maintenance
Maintenance
ATTENTION!
Careful and regular maintenance of
your heater considering our instructions assume
great importance so as to attain a long efficient op-
eration of your appliance.
1. Check the filthiness of the Reflector and IR-Fil-
ament at least once a month. If necessary, apply
cleaning and maintenance instructions.
2. The number of checks may be increased consid-
ering the amount of the dust in the environment.
3. Check the deformation of the Reflector, Wire and
Frame visually while cleaning the appliance. In
case of deformation, consult to your technical
service.
4. Check the Power Cord and Plug visually while
cleaning the appliance. In case of deformation,
consult to your technical service.
Cleaning
• Regular and careful cleaning helps your infrared
heater operate efficiently for many trouble free
years. To clean your heater follow steps below:
1. Unplug the power cord for your safety before
cleaning your appliance.
2. Make sure the heater is cool before continuing.
3. To keep the heater clean, the outer shell maybe
cleaned with a soft, damp cloth. You may use a
mild detergent if necessary. After cleaning, dry
the unit with a soft cloth. (CAUTION: DO NOT let
liquids enter the heater).
4. DO NOT use alcohol, gasoline, abrasive pow-
ders, furniture polish or rough brushes to clean
the heater. This may cause damage or deteriora-
tion to the surface of the heater.
5. DO NOT immerse the heater in water
6. Wait until the heater is completely dry before
use.
Storage: Store the heater in a cool, dry location
when not in use to prevent dust and dirt build up.
Use packaging carton to store.
ATTENTION
1. Always disconnect the heater from the electric-
ity supply and allow it to cool before attempting
to work on it.
2. If the heater has collected dust or dirt inside the
unit or around the heating element, have to unit
cleaned by a qualified service agent. Do not op-
erate the heater in this condition.
3. The only maintenance required is cleaning of the
external surfaces of the heater.
4. Do not touch the heating element with bare
fingers, as residue from your hand could affect
the life of the lamp. If it is accidentally touched,
remove the finger marks with a soft cloth mois-
tened with mentholated spirit or alcohol.
5. Do not attempt to repair or adjust any electrical
or mechanical functions on this heater.
6. The heater contains no user serviceable parts.
Should the product suffer damage or break-
down, it must be returned to the manufacturer
or its service agent.
7. Damaged supply cords to be replaced by the
manufacturer, service agent or similarly quali-
fied person in order to avoid hazard.
Technical specification
Item no.: 272428
Operating voltage & frequency: 220-240V~ 50/60Hz
Rated power: 2500 W
Protection class: Class I
Waterproof protection class: IP55
Dimension: 900x100x(H)174 mm
Net weight: approx. 3 kg
REMARK: Technical specification is subjected to change without prior notification.
Summary of Contents for BOLA 272428
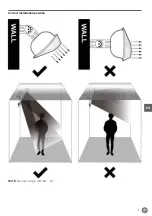
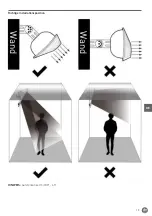
Page 7: ...7 EN Correct installation position NOTE Mounted angle with 30 45...
Page 19: ...19 DE Richtige Installationsposition Wand Wand HINWEIS Aufstellwinkel mit 30 45...
Page 30: ...30 NL Correcte installatiepositie Muur Muur OPMERKING Gemonteerde hoek met 30 45...
Page 52: ...52 FR Position d installation correcte Mur Mur NOTE Angle de montage avec 30 45...
Page 63: ...63 IT Posizione di installazione corretta Parete Parete NOTA Angolo di montaggio 30 45...
Page 74: ...74 RO Pozi ia corect de instalare Perete Perete NOT Instalare n unghi de 30 45...
Page 81: ...81 RU Hendi...
Page 82: ...82 RU 3 0 9...
Page 83: ...83 RU 200 C 10...
Page 84: ...84 RU I HENDI BOLA...
Page 85: ...85 RU 19 7 2 4 1 2 3 2 4 4 2 4 5 0 5 6 1 7 1 8 90 45 9 10 11 12 13 0 5 14 15 16 17 18 19...
Page 86: ...86 RU 30 45...
Page 87: ...87 RU 3 0 9...
Page 88: ...88 RU 1 2 3 4 1 4 2 M6 60 4 3 6 2 4 6 1 2 5 M6 12 2...
Page 90: ...90 RU 2 1 2 1 2 3 1 2 3 1 1 L1 2 3 4...
Page 91: ...91 RU 1 1 2 3 4 1 2 3 4 5 6 1 2 3 4 5 6 7...
Page 92: ...92 RU 272428 220 240 50 60 2500 I IP55 900x100x 174 3...
Page 93: ...93 GR Hendi...
Page 94: ...94 GR 3 0 9 m...
Page 95: ...95 GR 200 C 10...
Page 97: ...97 GR 30 45...
Page 98: ...98 GR 3 0 9...
Page 99: ...99 GR 1 2 3 4 1 L 4 2 M 6 mm 60 mm 4 3 M 6 mm 2 4 6mm 1 mm 2 5 M 6 mm 12 mm 2...
Page 100: ...100 GR 0 5 0 5 0 5 0 5 2 4 2 4 90 45 2 4 m 1 2 L1 L2 L3 L4 1 2 3 4 L1 L4 2 3 5 0 24 0H 2 3...
Page 101: ...101 GR 2 AAA 1 2 1 2 3 1 2 3 E1 1 L1 2 3 4...


