4
EN
• This appliance should not be operated by persons with reduced physical, sensory or mental
capabilities, or persons that have a lack of experience and knowledge.
• This appliance should, under any circumstances, not be used by children.
• Keep the appliance and its power cord out of reach of children.
•
WARNING:
ALWAYS switch off the appliance and unplug from power socket before
cleaning, maintenance or storage.
Special Safety Regulations
•
CAUTION:
FOR OUTDOOR USE ONLY.
• READ CAREFULLY-The infrared heater is designed for safe operation. Nevertheless, in-
stallation, maintenance and operation of the heater can be dangerous. Observing the fol-
lowing procedures will reduce the risk of fire, electric shock, injury to persons and keep
installation time to a minimum. Save these instructions for future use.
• Remove the unit from its packaging and check to make sure it is in good condition before
using.
• Do not let children play with parts of package (such as plastic bags).
• This heater is hot when in use. To avoid burns, do not let bare skin touch hot surfaces.
If provided, use handles when moving this heater. Keep combustible materials, such as
furniture, pillows, bedding, papers, clothes, and curtains at least 3 feet (0.9 m) from the
front of the heater and keep them away from the sides and rear.
• Extreme caution is necessary when the heater is used near children or invalids.
• Do not use near or in the immediate vicinity of a bath or swimming pool or any source of
liquid.
• Do not insert or allow foreign objects to enter any ventilation or exhaust opening, as this
may cause an electric shock, fire or damage to the heater.
• Always unplug the heater when not in use.
• Connect to properly grounded outlets only.
• Always plug heaters directly into a wall outlet/receptacle. Never use with an extension
cord or relocatable power tap (outlet/power strip).
• Do not allow cord to overhang the counter top where it can be easily pulled by children.
• Do not put fingers or foreign objects into the grill while in operation.
• Do not leave the appliance unattended when in use.
• This heater is not intended for use in bathrooms, laundry and similar indoor locations,
never put heater where it may fall into a bathtub or other water container.
• Do not operate any heater with a damaged cord or plug or after the heater malfunc-
tions, has been dropped or damaged in any manner. Disconnect power at service panel
and have heater inspected by a reputable electrician before reusing. If the supply cord is
damaged in any way, it must be replaced by the manufacturer or its service agent or a
similarly qualified person in order to avoid a hazard.
• Do not run cord under carpeting. Do not cover cord with throw rugs, runners, or similar
coverings. Do not route cord under furniture or appliances. Arrange cord away from traf-
fic area and where it will not be tripped over.
Summary of Contents for BOLA 272428
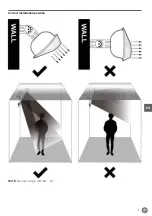
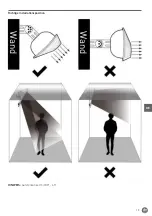
Page 7: ...7 EN Correct installation position NOTE Mounted angle with 30 45...
Page 19: ...19 DE Richtige Installationsposition Wand Wand HINWEIS Aufstellwinkel mit 30 45...
Page 30: ...30 NL Correcte installatiepositie Muur Muur OPMERKING Gemonteerde hoek met 30 45...
Page 52: ...52 FR Position d installation correcte Mur Mur NOTE Angle de montage avec 30 45...
Page 63: ...63 IT Posizione di installazione corretta Parete Parete NOTA Angolo di montaggio 30 45...
Page 74: ...74 RO Pozi ia corect de instalare Perete Perete NOT Instalare n unghi de 30 45...
Page 81: ...81 RU Hendi...
Page 82: ...82 RU 3 0 9...
Page 83: ...83 RU 200 C 10...
Page 84: ...84 RU I HENDI BOLA...
Page 85: ...85 RU 19 7 2 4 1 2 3 2 4 4 2 4 5 0 5 6 1 7 1 8 90 45 9 10 11 12 13 0 5 14 15 16 17 18 19...
Page 86: ...86 RU 30 45...
Page 87: ...87 RU 3 0 9...
Page 88: ...88 RU 1 2 3 4 1 4 2 M6 60 4 3 6 2 4 6 1 2 5 M6 12 2...
Page 90: ...90 RU 2 1 2 1 2 3 1 2 3 1 1 L1 2 3 4...
Page 91: ...91 RU 1 1 2 3 4 1 2 3 4 5 6 1 2 3 4 5 6 7...
Page 92: ...92 RU 272428 220 240 50 60 2500 I IP55 900x100x 174 3...
Page 93: ...93 GR Hendi...
Page 94: ...94 GR 3 0 9 m...
Page 95: ...95 GR 200 C 10...
Page 97: ...97 GR 30 45...
Page 98: ...98 GR 3 0 9...
Page 99: ...99 GR 1 2 3 4 1 L 4 2 M 6 mm 60 mm 4 3 M 6 mm 2 4 6mm 1 mm 2 5 M 6 mm 12 mm 2...
Page 100: ...100 GR 0 5 0 5 0 5 0 5 2 4 2 4 90 45 2 4 m 1 2 L1 L2 L3 L4 1 2 3 4 L1 L4 2 3 5 0 24 0H 2 3...
Page 101: ...101 GR 2 AAA 1 2 1 2 3 1 2 3 E1 1 L1 2 3 4...


