5
EN
• To prevent overheating of this appliance, keep the air inlets and outlets clean and free
of anything that may cause blockage. Check all inlets and outlets from time to time to
ensure it is clear of any dirt or dust accumulation. DO NOT COVER.
• A heater has hot and arcing or sparking parts inside. Do not use it in areas where gaso-
line, paint, or flammable liquids are used or stored.
• Parts of the heater may exceed 200ºC , contact with the heating tube, reflector, or metal
parts near the heating tube, may cause severe BURNS . To avoid burns, do not let bare
skin touch hot surface.
• NEVER place hands under the heating elements. ALWAYS allow heating element to cool
at least 10 minutes before touching the heating tube or adjacent parts.
• This product contains recyclable materials. Do not dispose this product as unsorted mu-
nicipal waste. Please contact your local municipality for the nearest collection point.
Intended use
• The appliance is intended for professional use.
• The appliance is designed for heating outside
only. Any other use may lead to damage of the
appliance or personal injury.
• Operating the appliance for any other purpose
shall be deemed a misuse of the device. The user
shall be solely liable for improper use of the de-
vice.
Grounding installation
This appliance is classified as
protection class
I
and must be connected to a protective ground.
Grounding reduces the risk of electric shock by
providing an escape wire for the electric current.
This appliance is fitted with a power cord that has a
grounding wire and grounded plug. The plug must
be plugged into an outlet that is properly installed
and grounded.
Introduction
The HENDI BOLA carbon infrared heaters produce
instant and comfortable heat like the sun. These
robust and weatherproof heaters are designed for
domestic and commercial heating applications at
outdoor well-protected areas.
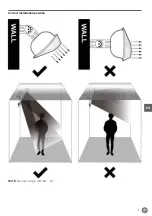
Summary of Contents for BOLA 272428
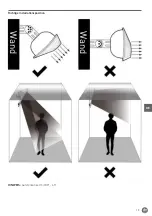
Page 7: ...7 EN Correct installation position NOTE Mounted angle with 30 45...
Page 19: ...19 DE Richtige Installationsposition Wand Wand HINWEIS Aufstellwinkel mit 30 45...
Page 30: ...30 NL Correcte installatiepositie Muur Muur OPMERKING Gemonteerde hoek met 30 45...
Page 52: ...52 FR Position d installation correcte Mur Mur NOTE Angle de montage avec 30 45...
Page 63: ...63 IT Posizione di installazione corretta Parete Parete NOTA Angolo di montaggio 30 45...
Page 74: ...74 RO Pozi ia corect de instalare Perete Perete NOT Instalare n unghi de 30 45...
Page 81: ...81 RU Hendi...
Page 82: ...82 RU 3 0 9...
Page 83: ...83 RU 200 C 10...
Page 84: ...84 RU I HENDI BOLA...
Page 85: ...85 RU 19 7 2 4 1 2 3 2 4 4 2 4 5 0 5 6 1 7 1 8 90 45 9 10 11 12 13 0 5 14 15 16 17 18 19...
Page 86: ...86 RU 30 45...
Page 87: ...87 RU 3 0 9...
Page 88: ...88 RU 1 2 3 4 1 4 2 M6 60 4 3 6 2 4 6 1 2 5 M6 12 2...
Page 90: ...90 RU 2 1 2 1 2 3 1 2 3 1 1 L1 2 3 4...
Page 91: ...91 RU 1 1 2 3 4 1 2 3 4 5 6 1 2 3 4 5 6 7...
Page 92: ...92 RU 272428 220 240 50 60 2500 I IP55 900x100x 174 3...
Page 93: ...93 GR Hendi...
Page 94: ...94 GR 3 0 9 m...
Page 95: ...95 GR 200 C 10...
Page 97: ...97 GR 30 45...
Page 98: ...98 GR 3 0 9...
Page 99: ...99 GR 1 2 3 4 1 L 4 2 M 6 mm 60 mm 4 3 M 6 mm 2 4 6mm 1 mm 2 5 M 6 mm 12 mm 2...
Page 100: ...100 GR 0 5 0 5 0 5 0 5 2 4 2 4 90 45 2 4 m 1 2 L1 L2 L3 L4 1 2 3 4 L1 L4 2 3 5 0 24 0H 2 3...
Page 101: ...101 GR 2 AAA 1 2 1 2 3 1 2 3 E1 1 L1 2 3 4...


