background image

Hengel Industrie 

ZA, Les Berges du Rhins - 42120 PARIGNY - FRANCE 
Tél : +33 (0)4 77 23 40 00 - Fax : +33 (0)4 77 23 40 09

Email: infos@hengel.com
Website: www.hengel.com

Notice-EN-BITRONIC-ST-F-1

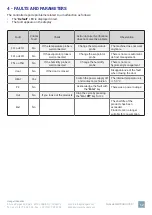
4 - FAULTS AND PARAMETERS

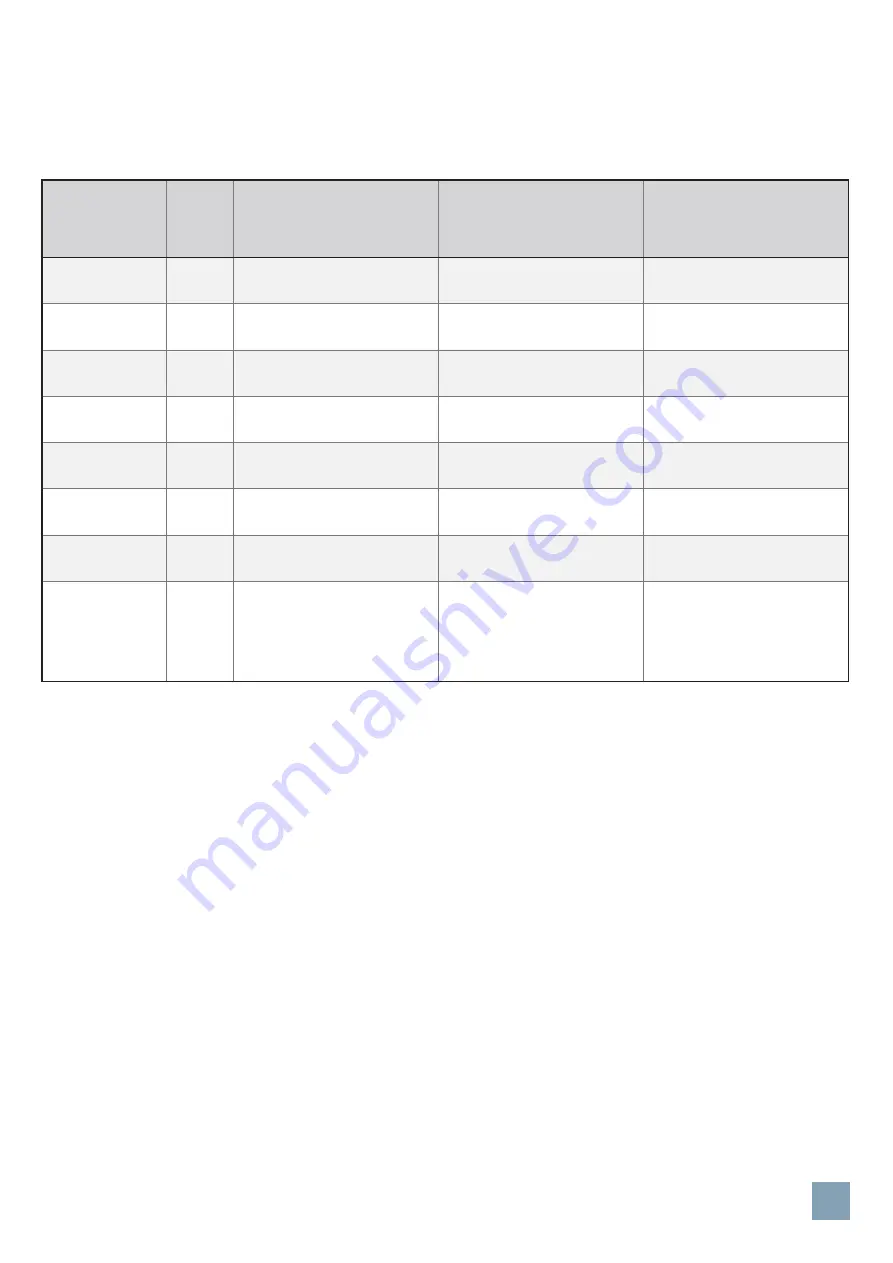
The controller reports problems related to a malfunction as follows:

•  The “

Default

” LED is displayed in red,

•  The fault appears on the display.

12

Fault

Critical

fault

Check

Action to take if verification

does not solve the problem

Observation

F1L ou F1H

No

If the temperature probe is

well connected

Change the temperature

probe

The machine does not work

anymore

F2L ou F2H

No

If the evaporator probe is

well connected

Change the evaporator

probe

There is no more automatic

defrost management.

F5L ou F5H

No

If the humidity probe is

well connected

Change the humidity

probe

There is no more 

hygrometry management

door

No

If the door is closed

Disappearance of the fault

when closing the door

HEAt

Yes

Switch the power supply off

and contact a technician

The internal temperature is

>= 50 °C

PF

No

Acknowledge the fault with

the “

Enter

” key

There was a power outage

Out

No

If you took out the products Stop the cycle by pressing

the “

On / Off

” key for 3 s

End

No

The shelf life of the 

products has been 

exceeded.

Products are no longer

suitable for consumption..

Summary of Contents for Bi-Tronic Control

Page 1: ...s du Rhins 42120 PARIGNY FRANCE Tél 33 0 4 77 23 40 00 Fax 33 0 4 77 23 40 09 Email infos hengel com Website www hengel com Notice EN BITRONIC ST F 1 User instructions Bi Tronic Control Retarder proving To be conserved by the user ...

Page 2: ...RIGNY FRANCE Tél 33 0 4 77 23 40 00 Fax 33 0 4 77 23 40 09 Email infos hengel com Website www hengel com Notice EN BITRONIC ST F 1 Versions of this document Index number Date Nature of evolution Revised by 1 28 03 19 Initial document creation YM SG 2 ...

Page 3: ... 1 Interface areas 4 1 2 Key s List and LEDs 5 2 GETTING STARTED WITH THE BI TRONIC CONTROL INTERFACE 6 2 1 Getting started 6 2 2 Setting the clock 6 3 EXAMPLE OF USE 7 3 1 Operating mode 7 3 1 1 Direct mode 7 3 1 2 Retarder proving cycle mode 7 3 2 Direct mode 8 3 2 1 To change the temperature 8 3 2 2 To change the humidity rate 8 3 3 Cycle mode 9 4 FAULTS AND PARAMETERS 12 5 STOPPING THE CONTROL...

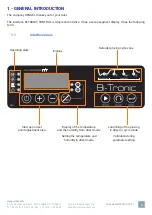
Page 4: ...for your trust The interface BI TRONIC CONTROL is simple and intuitive It has a seven segment display It has the following form 1 1 Interface areas Retarder proving cycle zone Display of the temperature and the humidity from direct mode Setting the temperature and humidity in direct mode Start up and set point adjustment area Launching of the proving in direct or cycle mode Validation during param...

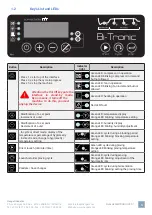
Page 5: ...t not allowed Green LED heating in operation Red LED fault Modification of a set point Increment of a unit Green LED temperature display Orange LED blinking temperature setting Modification of a set point Decrement of a unit Green LED humidity display Orange LED blinling humidity adjustment In cycle or direct mode display of the temperature or percentage of hygrometry In direct mode change to hygr...

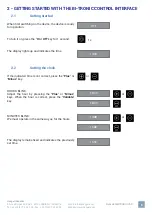
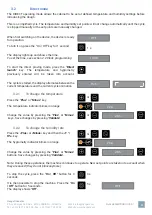
Page 6: ...hen first switching on the device the device is ready for operation To turn it on press the On Off key for 1 second The display lights up and indicates the time 2 2 Setting the clock If the indicated time is not correct press the Plus or Minus key HOURS BLINK Adjust the hour by pressing the Plus or Minus keys When the hour is correct press the Validate key MINUTES BLINK We must operate in the same...

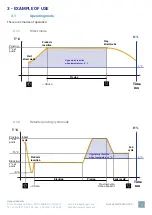
Page 7: ...s of operation 3 1 1 Direct mode T C Time mn H Proving T set point 6 C Proving Stop direct mode Products insertion Start direct mode 30 mn Hygrometry is active when temperature 6 C 3 1 2 Retarder proving cycle mode T C Time mn H 15 C 30 mn Proving cycle time set point 6 C 5 C Blocking Proving Back in cold End cycle Start cycle Proving T set point Blocking T set point Products insertion Hygrometry ...

Page 8: ...nch key The temperature and hygrometry previously entered will be taken into account The cycle is started the display alternates between the current temperature and the current cycle animation 3 2 1 To change the temperature Press the Plus or Minus key The temperature indicator blinks in orange Change the value by pressing the Plus or Minus keys Save changes by pressing Validate 3 2 2 To change th...

Page 9: ...s buttons and press the Validate button TIME WHEN THE PROVING WILL BE COMPLETED Indicate the time at which you want to get the dough back using the Plus or Minus buttons then Validate THE CYCLE IS LAUNCHED The display alternates between the current temperature and the current cycle animation The last recorded values of blocking temperature proving temperature and hygrometry rate are took back Note...

Page 10: ...s in orange and the display shows a temperature Adjust the temperature using the Plus and Minus buttons then Validate Then the proving temperature LED blinks in orange Adjust the temperature using the Plus and Minus buttons then Validate Then the hygrometry LED blinks in orange Adjust the rate using the Plus and Minus buttons then Validate Then the proving time LED blinks in orange Adjust the time...

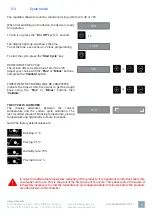
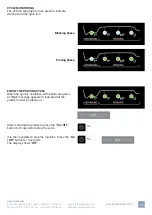
Page 11: ...n green to indicate which period the cycle is in Blocking phase Proving phase END OF THE PROVING CYCLE When the cycle is complete all the LEDs are green An Out message appears to indicate that the products must be taken out After removing the products press the On Off button for 3 seconds to stop the cycle It is then possible to stop the machine Press the On Off button for 5 seconds The display sh...

Page 12: ...robe The machine does not work anymore F2L ou F2H No If the evaporator probe is well connected Change the evaporator probe There is no more automatic defrost management F5L ou F5H No If the humidity probe is well connected Change the humidity probe There is no more hygrometry management door No If the door is closed Disappearance of the fault when closing the door HEAt Yes Switch the power supply ...

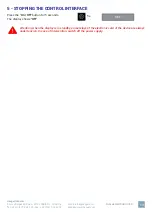
Page 13: ...l com Website www hengel com Notice EN BITRONIC ST F 1 5 STOPPING THE CONTROL INTERFACE Press the On Off button for 5 seconds The display shows Off Attention when the display is in standby some relays of the electronic card of the device are always under tension In case of intervention switch off the power supply 13 OFF 5 s ...

Reviews: