background image

DEEP-FREEZER AND STORAGE RANGE 

page 13 out of 37 

3.1.4 

Assembly of the grounds  



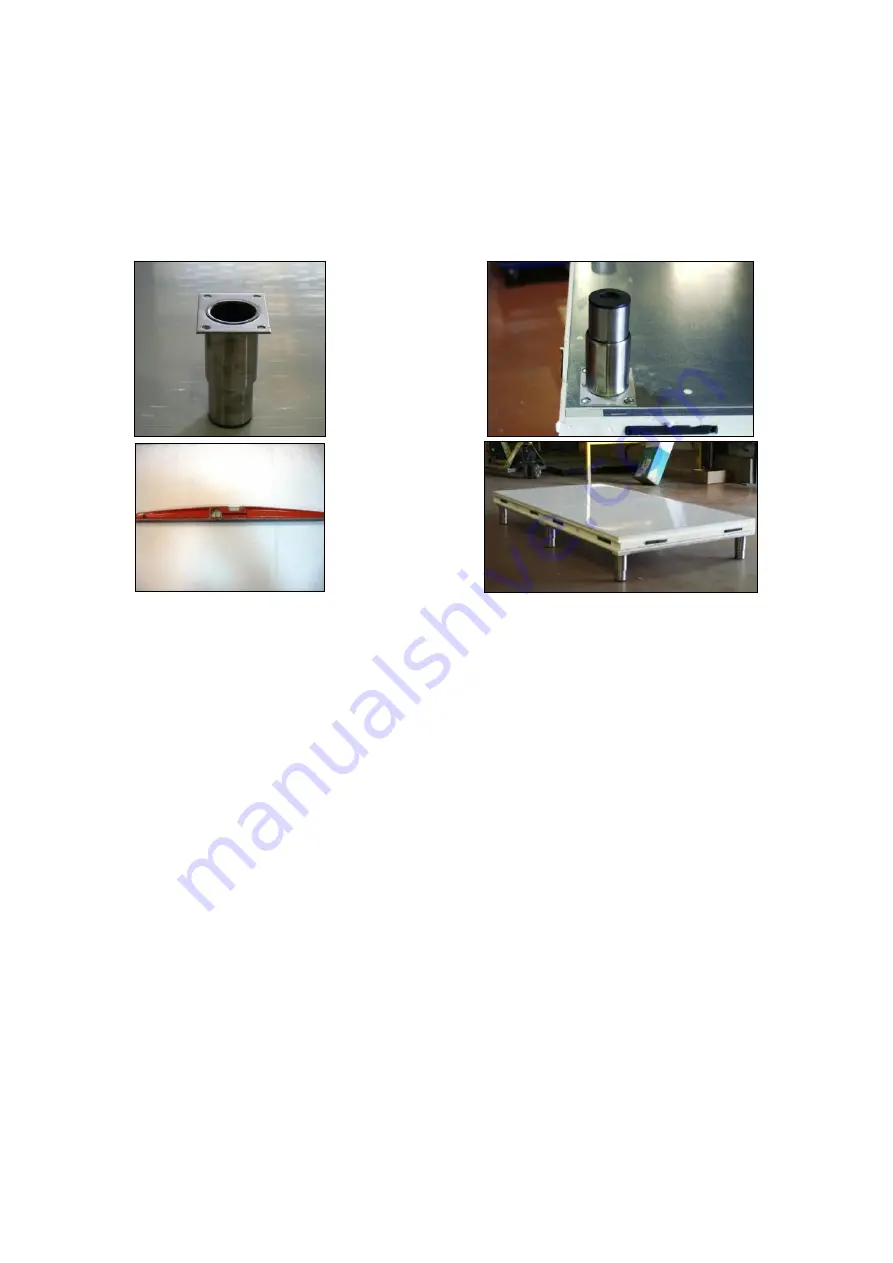
Screw the feet on the envisaged location.  



The ground must be controlled with a spirit level, which will allow a possible adjustment of the feet.  



One foot must necessarily be in each joint between two bottom panels  



Once all the ground is assembled, check again the level and the good support of all the panels on the feet.  



Protect the soil using a cardboard to prevent scratches  



Remove film all around the bottom.  


Summary of Contents for CCN20

Page 1: ...RO 2 CS10 to CS110 DUO 2 and QUATTRO 2 Basic and aditional module RCM20 to RCM3 20 Basic and aditional module RCN20 to RCN80 Basic and aditional module CCN20 to CCN80 Basic and aditional module RCP20 to RCP80 Basic and aditional module CCP20 to CCP80 Attached document To preserve by the user To preserve by the fitter Electric diagrams technician parameters X Hengel Performance at any degrees ZA Le...

Page 2: ... 3 2 1 Installation of the electric box 20 3 2 2 Installation of the environment probe 20 3 2 3 Installation of the thermosensor probe range of deep freezers 20 3 2 4 Connection of the servo motor range of deep freezers 20 3 2 5 Installation of the BUS cable connecting the electric box and keyboard 20 3 2 6 Connection of the door contact 20 3 2 7 Connection of the door contacts 20 3 2 8 Connection...

Page 3: ...en the compartment of deep freezing and the storage one the separation panel opens and closes shutters for the passage of air and thus manages the distribution of the cold thanks to its servo motor The logic of air circulation created by Hengel ensures a homogeneous temperature in the whole equipment Moreover it allows toavoid the products dryness because of the air blowing done along the walls of...

Page 4: ...f the precise deep freezing time for all the products 1 3 Technical data for Deep freezer range RS 600x800 Modular RS10 RS30 RS50 RS70 RS90 RS110 Appliance widht mm 1100 2000 2900 3800 4700 5600 Standard capacity in plates with spacing of 75mm 2 plates by levels Deep freezing 14 14 14 14 14 14 Storage 20 60 100 140 180 220 Compressor power R404 HP 3 HP Scroll 3 HP Scroll 3 HP Scroll 3 HP Scroll 3 ...

Page 5: ...ndard capacity in plates with spacing of 75mm Deep freezing 7 7 7 7 7 7 Storage 10 30 50 70 90 110 Compressor power R404 HP 2 HP 2 HP 2 HP 2 HP 2 HP 2 HP 400x600 Non modular DUO 2 QUATTRO 2 Appliance widht mm 865 1530 Standard capacity in plates with spacing of 75mm Deep freezing 7 7 Storage 10 30 Compressor power R404 HP 2 HP Hermetic 2 HP Hermetic ...

Page 6: ...m 1100 2000 2900 3800 Standard capacity in plates with spacing of 75mm 2 plates by levels 36 72 112 154 Compressor power R404 HP 3 4 2 2 2 1 2 Gamme 600x800 positive RCP20 RCP40 RCP60 RCP80 Appliance widht mm 1100 2000 2900 3800 Standard capacity in plates with spacing of 75mm 2 plates by levels 36 72 114 156 Compressor power R404 HP 1 2 5 8 5 8 3 4 ...

Page 7: ... mm 865 1530 2195 2860 Standard capacity in plates with spacing of 75mm 20 38 58 77 Compressor power R404 HP 1 2 3 4 1 1 2 2 400x600 positive CCP20 CCP40 CCP60 CCP80 Appliance widht mm 865 1530 2195 2860 Standard capacity in plates with spacing of 75mm 20 40 60 80 Compressor power R404 HP 1 2 1 2 5 8 5 8 ...

Page 8: ...s not improve the storage but generates a higher consumption To ensure a correct operation of the machine do not store in any case your products directly on the ground because it prevents the air circulation and thus the temperature homogeneity inside the cabinet The machine will have to be installed on a flat ground and of level The electric feeding and connections will have to be in conformity w...

Page 9: ...s in its generic form is presented in the following way Caution For the QUATTRO 2 range the evaporator platform is placed with the electric frame in front of the machine Designation Ground M F Fund M F Ceiling M F Frontage M F Ref 50 51 52 53 Designation Ground M F Fund M F Ceiling M F Frontage M F Ref 30 31 32 33 Designation Cheek ground Male Male Fund M M Platform évaporateur Frontage M Female R...

Page 10: ... form is presented in the following way Designation Ground M F Fund M F Ceiling M F Frontage M F Ref 50 51 52 53 Designation Ground M F Fund M F Ceiling M F Frontage M F Ref 30 31 32 33 Designation Cheek ground Male Male Fund M M Platform évaporateur Frontage M Female Ref 00 10 11 12 13 Désignatio Electric box Slide Foot Réf A G I ...

Page 11: ...ervatives Designation Ground M F Fund M F Ceiling M F Frontage M F Divider panel Ref 50 51 52 53 101 Designation Ground M F Fund M F Ceiling M F Frontage M F Ref 30 31 32 33 Designation Cheek ground Male Male Fund M M Platform évaporateur Frontage M Female Ref 00 10 11 12 13 Désignatio Electric box Slide Foot Réf A G I ...

Page 12: ...R DUO 2 CS10 DUO 2 RCN20 RCP20 CCN20 CCP20 00 00 10 11 12 13 RS30 MAJOR QUATTRO2 CS30 QUATTRO 2 00 00 10 30 11 31 12 32 13 33 RS50 CS50 RCN60 RCP60 CCN60 CCP60 00 00 10 30 50 11 31 51 12 32 52 13 33 53 RS70 CS70 RCN80 RCP80 CCN80 CCP80 00 00 10 30 50 70 11 31 51 71 12 32 52 72 13 33 53 73 RS90 CS90 00 00 10 30 50 70 90 11 31 51 71 91 12 32 52 72 92 13 33 53 73 93 RS110 CS110 00 00 10 30 50 70 90 1...

Page 13: ...trolled with a spirit level which will allow a possible adjustment of the feet One foot must necessarily be in each joint between two bottom panels Once all the ground is assembled check again the level and the good support of all the panels on the feet Protect the soil using a cardboard to prevent scratches Remove film all around the bottom ...

Page 14: ...rify the alignment of the frontage with the ground 3 1 7 Assembly of the first side left side of the equipment Please follow these steps carefully to get a good alignment during assembly of the panel Remove the protective film from the panel Place a bead of silicone moldings on the frontage the ground and the bottom Lock the hooks 13 1 and 13 2 of the frontage verifying the alignment of the panel ...

Page 15: ...pment after drilling Vue 3D et photo correspondante au montage de la plateforme 3 1 9 Assembly of the back and intermediate frontages as well as the separation panels The following steps do not apply to the models RS10 CS10 Major Duo 2 and Duo 2 Remove the protection film from the second panel of separation Engage this panel of separation in the U of the back Position the frontage with hinges at r...

Page 16: ...7 3 1 10 Assembly of the second side panel Remove the protection film of the panel Pose a silicone cord on the molding of the panel Position the side panel while taking care of the good alignment of the panels Lock the hooks starting with the ground ...

Page 17: ... servo motor Both servo motors ensure the operation of the deep freezing storage of the equipment The opening and closing of each servo motor determines the operation s mode In order to an optimal operation we ahve modified the position of the servo motor positioned beside the evaporator see picture 2 Picture 2 ...

Page 18: ...nner in order to insert it Move it to the right to be able to bring it to the horizontal Brin git to the left side Afterwards align it against the valve of the right servomotor to be able to block it Block it using the bracket provided for this purpose Position the steel plate between the isolating plate and the evaporator and put it in abutment against the tube of flow on the left Install the air...

Page 19: ... each module Warning sheets of air guiding channel are not centered compared to the racks please follow the steps about their assembly shown in the next diagram CAUTION It is forbidden to put anything on and between the metal sheets of the floor channel and the bottom panel of the unit This would prevent the air circulation and create a large temperature difference between the different modules of...

Page 20: ...es and collars Pass the cable in the hole located on the top of separation Pass the servo motor s cable in the hole of the environment probe and the thermosensor Stop this hole with silicone to avoid any passage of air formation of frost then of ice 3 2 5 Installation of the BUS cable connecting the electric box and keyboard Pass the BUS cable in the spring located in top of the first door and con...

Page 21: ...e liquid arrival for a length lower than 12m tube of 7 8 for the aspiration for a length higher than 12m CAUTION In the case of an installation with remote group the connection must be in conformity with the following diagram Carry out the setting with the vacuum during 3 hours of with dimensions the aspiration and repression using a vacuum pump Carry out a preload in refrigerant R404 to put in pr...

Page 22: ... screw by the interior of the strike Return or bring out the Strike according to a tighter or less tight adjustment of the joint of the doors CAUTION It is very significant at the time of the first startup check the good crushing of the joint on the entourage of the doors If after a few days of use a white frost appears on the entourage of the doors it is imperative to proceed to the re tightening...

Page 23: ...n Off key puts the regulator in standby It doesn t turn of at all the machine For that it is imperatively necessary to cut the disconnecting switch located on the electric box 3 6 3 Technician Parameters Bi tronic Control regulation The technical parameters are adjusted in the factory and ensure a good operation of the machine A parameter change request then a monitoring of the equipment The techn...

Page 24: ...e On first time start up of the unit the following message appears This message means that the unit is on and ready to operate TOTAL STOP To do this activate the On Off key LCD display lights and indicates 10 05 04 17 32 STORAGE To display the set temperature activate the Validation key At this time the display indicates The set temperature flashes it can be if necessary modified STORAGE 25 C Acti...

Page 25: ...y at 20 C and if the user wants that the product reaches 20 C in 3h30 hours approximately 200 minutes the temperature setpoint will evolve 2 C every 10 minutes This process avoids or limits the phenomena of drying the surface layers of the most delicate product From the STORAGE mode to launch a cycle of Thermo sensor deep freezing activate the Probe key The display indicates the following message ...

Page 26: ...g by pressing the Validation key Renew the operation to put the minutes Renew also the operation for the DEFROSTING 2 then the DEFROSTING 3 by respecting hours in the chronological order If a defrosting were to be programmed during a deep freezing this last cycle has priority the defrosting is then deferred It is possible to ask your technician to have an automatic defrosting after each deep freez...

Page 27: ...n From the STORAGE mode activate during five seconds the On Off key Caution when the display indicates COMPLETE STOP the components of the machines are always under tension In case of intervention cut the electric power supply on the level of the disconnecting switch of the main box control ...

Page 28: ...room s temperature Fine brioche Croissants Chocolate breads Idem 8 to 10 days Defrost during 3 minutes with the oven at 210 C and finish at room s temperature by leaving the articles in the same tray Detailed and not cooked products Products Deep freezing Storage Defrosting Puff pastry Chicken vol au vents Turnovers storages Pies Pithiviers Puffed pancake Palmiers etc After the shaping let the dou...

Page 29: ...net may be performed with clear water added by detergents compatible with stainless steel and aluminum in particular The surfaces are then rinsed with clean water Trays grids slide ways can be washed just with water If it is necessary to enter in the cabinet protect the bottom panels Exterior cleaning Clean the surfaces with a non detergent product 5 2 Maintenance of the equipment 2 to 3 times per...

Page 30: ...Adjust or change the control with default The ventilator does not turn Terminals of ventilation not supplied Control wiring while reporting to the electric diagram A door contact is in an open position Control the correct operation of the door contact Change the door contact with default Poor technical parameters of the control Check the technical parameters of the control Program the parameter St...

Page 31: ...bbles in the liquid indicator Liquid circuit partially blocked between the tank and the liquid indicator Control the components placed on the circuit Replace the components with default Lack of refrigerating liquid Find the leak Repair the leak Make the complement of load No circulation with the liquid indicator Circuit blocked Check that all components placed on the circuit are open and not block...

Page 32: ... servo motor Then pull in order to dismount the shutter completely Sight burst for model shutter RS and Range MAJOR Number Reference Designation Quantity 1 1240105 1 Shutter Sheet RS 1 2 7004063 Disc of blocking 1 3 7004062 Spring SPEC D12060 1 4 7004059 Flask shutter 2 5 9001324 Laiton Brace M6x20 1 6 7004061 Key shutter 1 7 6004408 Servo motor Belimo 2NM 1 8 7004060 Ring valve 1 9 6004408patte L...

Page 33: ...Remove the screws of the evaporator s vat with dimensions plays to have access to the resistance of vat located under internal sheet of the evaporator Flow cord Remove the cable clips in the evaporator s vat on the side Regulator Disassemble the evaporator s cover Direct access to the regulator a hole in the tub is provided for the adjustment of the regulator Klixon Disassemble the evaporator s co...

Page 34: ...131 Resistance battery evap RS 5 1 5001133 Resistance vat evap RS 17 2 5001304 Klixon isolated exit surgel 7 1 5002008 Pressure reducer TES2 MOP30 18 1 5001203 Cord of flow 34W 778HOMS 8 1 1240053 Intern vat evaporator 6 3 Frontage elements Unscrew the part of angle of the aluminium frame of frontage Remove the part of angle Make lever with a screwdriver to remove the aluminium Frame The door cont...

Page 35: ...DEEP FREEZER AND STORAGE RANGE page 35 out of 37 6 4 Door s element ...

Page 36: ...which this declaration relates is in conformity with the following standards NF IN 292 1 1991 Basic concepts general principles for design NF IN 292 2 1991 Basic Concepts general principles for design principles and technical specifications Part 1 NF IN 292 À 1 1995 Basic Concepts general principles for design principles and technical specification Part 2 NF IN 60204 1 1998 Electrical components i...

Page 37: ...However your device is not immune to any malfunction or collision with trolleys or trays In case of any problems or for preventive maintenance you can contact the following professional Professional stamp Handwritten coordinates of the professional Hengel Performance at any Degrees ZA Les Berges du Rhins 42120 PARIGNY France Tel 33 4 77 23 40 00 Fax 33 4 77 23 40 09 e mail infos hengel com website...

Reviews: