background image


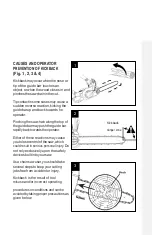
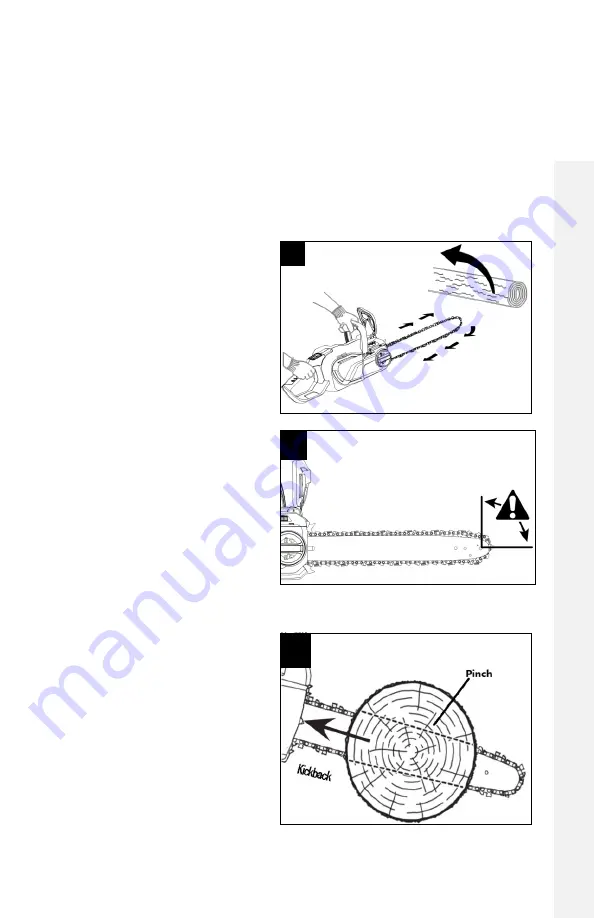
CAUSES AND OPERATOR 

PREVENTION OF KICKBACK 

(Fig. 1, 2, 3 & 4)


Kickback may occur when the nose or 

tip of the guide bar touches an 

object, or when the wood closes in and 

pinches the saw chain in the cut.


Tip contact in some cases may cause a 

sudden reverse reaction, kicking the 

guide bar up and back towards he 

operator.


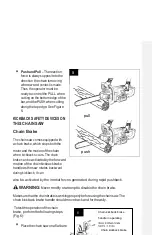
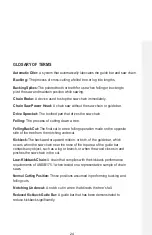
Pinching the saw chain along the top of 

the guide bar may push the guide bar 

rapidly back towards the operator. 


Either of these reactions may cause 

you to lose control of the saw, which 

could result in serious personal injury. Do 

not rely exclusively upon the safety 

devices built into your saw.


As a chain saw user, you should take 

several steps to keep your cutting 

jobs free from accident or injury.


Kickback is the result of tool 

misuse and/or incorrect operating


procedures or conditions and can be 

avoided by taking proper precautions as 

given below:


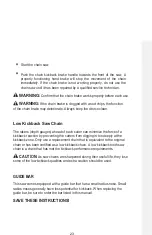
Kickback 

danger zone


Summary of Contents for A40LJ14B01

Page 1: ...40 Volt Cordless Chain Saw A40LJ14B01 A40LJ16B01 OPERATOR S MANUAL ...

Page 2: ...ENTS Safety Symbols 4 Safety Instructions 5 16 Introduction 17 Specifications 17 Packing List 18 Description 19 21 Assembly 22 Operation 23 35 Maintenance 35 45 Troubleshooting 46 47 Warranty 48 50 Parts List 51 52 ...

Page 3: ...m lead basedpaints Crystallinesilicafrombricksandcementandothermasonryproducts and Arsenic and chromium from chemically treated lumber Your risk from these exposures varies depending on how often you do this type of work To reduce your exposure to these chemicals work in a well ventilated area and work with approved safety equipment such as those dust masks that are specially designed to filter ou...

Page 4: ...and CAUTION before using this tool Failure to following all instructions listed below may result in electric shock fire and or serious personal injury SYMBOL MEANING SAFETYALERTSYMBOL Indicates DANGER WARNING OR CAUTION May be used in conjunction with other symbols or pictographs WARNING The operation of any power tools can result in foreign objects being thrown into your eyes which can result in ...

Page 5: ...5 comply with ANSI Z87 1 ...

Page 6: ...ust read instruction Wear Eye Protection Always wear safety goggles or safety glasses with side shields and a full face shield when operating this product Wear Ear Protection Chain saw noise may damage your hearing Always wear sound barriers ear plugs or ear mufflers to protect your hearing Wear Head Protection Wear an approved safety hard hat to protect your head Wear Protective Gloves Protect yo...

Page 7: ... to rain Do not expose to rain Recycle Symbols This product uses lithium ion Li ion batteries Local state or federal laws may prohibit disposal of batteries in ordinary trash Consult your local waste authority for information regarding available recycling and or disposal options Charging Store the battery pack Charging and Store the battery pack only in dry rooms with an ambient temperature of 50 ...

Page 8: ...8 W Watt Power min Minutes Time Alternating Current Type of current Direct Current Type or a characteristic of current n0 No Load Speed Rotational speed at no load min Per Minute Revolutions per minute ...

Page 9: ...battery operated cordless power tool WORK AREA SAFETY Keepworkareacleanandwelllit Clutteredordarkareasinviteaccidents Do not operate power tools in explosive atmospheres such as in the presenceofflammableliquids gasesordust Powertoolscreatesparks which may ignite the dust or fumes Keep children and bystanders away while operating a power tool Distractions can cause you to lose control ELECTRICAL S...

Page 10: ...at you are doing and use common sense when operatingapowertool Donotuseapowertoolwhileyouaretired or under the influence of drugs alcohol or medication Amomentof inattention while operating power tools may result in serious personal injury Use personal protective equipment Always wear eye protection Protectiveequipmentsuchasdustmask non skidsafetyshoes hardhat or hearing protection used for approp...

Page 11: ...tool for your application Thecorrectpowertoolwilldothejobbetterandsaferattheratefor which it was designed Donotusethepowertooliftheswitchdoesnotturnitonandoff Any powertoolthatcannotbecontrolledwiththeswitchisdangerousandmustbe repaired Disconnecttheplugfromthepowersourceand orthebatterypackfrom thepowertoolbeforemakinganyadjustments changingaccessories orstoringpowertools Suchpreventivesafetymeas...

Page 12: ...gnated batterypacks Useof any other battery packs may create a risk of injury and fire When the battery pack is not inuse keep it away from other metal objects like paper clips coins keys nails screws or other small metal objectsthatcanmakeaconnectionfromoneterminaltoanother Shorting the battery terminals together may cause burns or a fire Underabusiveconditions liquidmaybeejectedfromthebattery av...

Page 13: ... declared total value depending on the ways in which the tool is used WARNING and of the need to identify safety measures to protect the operator that are based on an estimation of exposure in the actual conditions of use taking account of all parts of the operating cycle such as the times when the tool is switched off and when it is running idle in addition to the trigger time CHAIN SAW SAFETY WA...

Page 14: ...lanceorcontrolofthechainsaw Whencuttinga limbthat isundertension bealert forspring back When thetensioninthewoodfibersisreleasedthespringloadedlimbmaystrikethe operator and or throw the chain saw out of control Use extremecautionwhen cutting brush and saplings Theslendermaterial may catch the saw chain and be whipped toward you or pull you off balance Carrythechainsawbythefronthandlewiththechainsa...

Page 15: ...that is damaged or improperly adjusted or thatisnotcompletelyandsecurelyassembled Besurethatthesawchain stops moving when the trigger switch is released Inspect the work piece for nails wire or other foreign objects prior to cutting When bucking secure the work piece prior to cutting When felling or pruning identify and secure hazardous branches Aggressive or abusive cutting or misuse of the chain...

Page 16: ...n or in wet locations Plan the work ensuring an obstacle free work area and in the case of felling at least one escape path from the falling tree When felling keep bystanders at least two tree lengths away If situations occur which are not covered in this manual use care and goodjudgment ContactHENXCustomerServiceforassistance ...

Page 17: ... top of theguidebarmaypushtheguide bar rapidlybacktowardstheoperator Either of these reactions may cause youtolosecontrolofthesaw which could result in serious personal injury Do not rely exclusively upon the safety devicesbuiltintoyoursaw As a chain saw user you should take severalstepstokeepyourcutting jobs free from accident or injury Kickback is the result of tool misuse and or incorrect opera...

Page 18: ...manufacturer Incorrectreplacementbarsandchainsmaycausechainbreakageand orkickback Followthemanufacturer ssharpeningandmaintenanceinstructionsforthe sawchain Decreasingthedepthgaugeheightcanleadtoincreasedkickback Make sure that the area in which you are cutting is free from obstructions Donotletthenoseoftheguidebarcontactalog branch fence oranyotherobstructionthatcouldbehitwhileyouareoperatingthes...

Page 19: ...19 When users find it s difficult to cut the hard tree or timber they shall not force the chain saw to do cutting work by restarting it frequently ...

Page 20: ...20 ...

Page 21: ...n when kickback occurs The chain brake can be activatedbytheforward motionofthe chainkickbackbrake handleasthesaw rotates backward during kickback it can also be activated by the inertial forces generated during rapid pushback WARNING Never modify or attempt to disable the chain brake Makesurethatthechainbrakeisworkingproperlybeforeusingthechainsaw The chain kickback brake handle should move back ...

Page 22: ...face and make sure no objects orobstructionsthatcouldcomein contactwiththebarandchainare in the immediate vicinity Disengage the chain brake by pulling the chain kickback brake handle towards the front handle ...

Page 23: ...h gauges ahead of each cutter can minimize the force of a kickback reaction by preventing the cutters from digging in too deeply at the kickback zone Only use a replacement chain that is equivalent to the original chain or has been certified as a low kickback chain A low kickback tooth saw chain is a chain that has met the kickback performance requirements CAUTION As saw chains are sharpened durin...

Page 24: ... cut in a tree felling operation made on the opposite side of the tree from the notching undercut Kickback The backward or upward motion or both of the guide bar which occurs when the saw chain near the nose of the top area of the guide bar contacts any object such as a log or branch or when the wood closes in and pinches the saw chain in the cut Low KickbackChain A chain that complies with the ki...

Page 25: ...sible dependability and performance Should you experience any problem you cannot easily remedy please contact HENX customer service center 866 678 898986 571 87248935 This manual contains important information on to the safe assembly operation and maintenanceofyourchainsaw Readitcarefullybeforeusingthechainsaw Keep this manual handy so you can refer to it at any time SPECIFICATIONS Voltage 40V DC ...

Page 26: ...red 95 5dB A K 3 LwA guranteed 99dB A Vibration 2 18m s2 K 1 5m s2 Battery Lithium Ion Models A40B75B01 A40B50B01 A40B25B01 voltage 40 VDC 40 VDC 40 VDC Capacity 7 5Ah 5 0Ah 2 5Ah Model charger A40KC400B01 Input 120VAC 60Hz 400W Output 40VDC 8A Allowable charge temperature range 0 40 C Model charger A40MC100B01 XVE129 4200300 Input 100 120VAC 50 60Hz 2 5A Max F ...

Page 27: ...EA041 OREGON 160SDEA041 OREGON 164MLEA041 OREGON Saw chain 91P052X OREGON 91P057X OREGON 90PX056X OREGON PACKING LIST PART NAME QUANTITY Chain Saw 1 Chain sheath 1 Oregon Chain 1 Oregon Guide Bar 1 Operator s manual 1 Slotted screwdriver 1 Output 42 0VDC 3A Allowable charge temperature range 0 40 C ...

Page 28: ...andingoftheinformation onthetool and in this operator s manual as well as knowledge of the project you are attempting Before useofthisproduct familiarizeyourselfwithalloperatingfeaturesandsafetyrules Chain Kickback Brake Handle 7 Chain Kickback Brake Handle Lock off Button Front Handle ...

Page 29: ...nt the left hand from touching the saw chain if it slips off the front handle Saw Chain Guide Bar Trigger Switch Oil Tank Cap Oil Inspection Window Battery Release Button Ejection Mechanism Electric Contacts Latch Rear Handle Side Cover Side Cover Knob Chain Tensioning Knob Chain tensioning Chain Sheath The control panel ...

Page 30: ...ch can be activated Oil Tank Cap Seals the oil tank Oil Inspection Window Provides a view the oil level Guide Bar Supports and guides the saw chain Chain Sheath The chain sheath keeps the operator from coming in contact with the sharp chain blades when the tool is not in use It also helps keep the chain blades from being nicked or damaged when the tool is in transportation and storage ...

Page 31: ...teeth that cut the wood when it is driven by the power head and supported by the guide bar Front Handle The support handle for the left hand at the front of the saw Rear Handle The support handle for the right hand located at the rear of the saw ...

Page 32: ...sion with a manual slotted screwdriver Side Cover Covers the chain sprocket and secures the guide bar Side Cover Knob Locks unlocks the side cover Battery Release Button Press to release the battery pack from the tool Latch Locks the battery pack in place when it is installed on the tool Ejection Mechanism Aids in removing the battery ...

Page 33: ...33 Mounting Slot Guides the battery pack ...

Page 34: ...erious personal injury WARNING To prevent accidental starting that could cause serious personal injury always remove the battery pack from the tool when assembling parts UNPACKING This product has been shipped completely assembled Carefully remove the product and any accessories from the box Make sure that all items listed in the packing list are included Inspectthetoolcarefullytomakesurenobreakag...

Page 35: ...aged missing or loose parts such asscrews nuts bolts caps etc Securelytightenallfastenersandcapsanddonot operate this product until all missing or damaged parts are replaced APPLICATION Youmayusethisproductforbasicfelling limbing pruningandwoodcuttingoflumber and trees FILLING OILTANK WITH BAR AND CHAIN LUBRICANT WARNING Toprevent accidental starting that could cause serious personal injury always...

Page 36: ...36 1 Remove the battery pack from the chain saw 2 Cleantheoiltankcapandtheareaaroundittoensurethatnodirtfallsintotheoiltank ...

Page 37: ...window Oil should fill the window NOTICE Use Oregon Chain and Bar oil for best results It is specially designed to provide low friction and faster cuts Never use oil or other lubricants not specifically designed for use on the bar and chain This can lead to a clogged oil system which may cause premature wear of the bar and chain Checktheoillevelfrequentlyandfillwhentheoillevelfallsbelowtheminimum ...

Page 38: ...wforoneminute When storingthetoolforalongperiodoftime besurethechainislightlylubricated this will prevent rust on the chain and bar sprocket Topreserve natural resources please recycle or dispose of oil properly Consult your local waste authority for information regarding available recycling and disposal options ...

Page 39: ... snaps into place and the battery pack is secured to the tool before beginning operation To Remove Fig 10 WARNING Always be aware of the location of your feet children or pets when pressing the battery release button Serious injury could result if the battery pack falls NEVER remove the battery pack at a high location 1 Hold the battery pack in the palm of your hand 2 Press the battery release but...

Page 40: ...t is loose securely tighten the side cover knob by turning it clockwise 5 Check the oil level and fill the tank as needed 6 Check the cutting teeth sharpness of the saw chain 7 Make sure the chain is well lubricated 8 Make sure the chain kickback brake handle moves easily to the brake position then pull the chain kickback brake handle back towards the front handle to the operating position 9 Stand...

Page 41: ...ueeze the trigger switch with the fingers of your right hand to start the saw Release the lock off button and continue to squeeze the trigger for continued operation WARNING Do not attempt to start the saw when the saw chain is in a cut To Stop the Chain Saw 1 Move the chain saw away from cutting area and then release the trigger switch to stop the chain saw 2 Push the chain kickback brake handle ...

Page 42: ...ea During felling operations the safe distance should be a least twice the height of the largest trees in the felling area During bucking operations keep a minimum distance of 15 feet 4 5 m between workers Trees should not be felled in a manner that would endanger any person strike any utility line or cause any property damage If a tree does make contact with any utility line stay clear of the tre...

Page 43: ...ith the saw on a firm flat surface hold the saw firmly with both hands Always grasp the front handle with the left hand and the rear handle with the right hand The fingers should encirclethe handle with the thumb wrapped under the front handle Fig 12 12 Grip with thumb below handle ...

Page 44: ...ight hand Neverallowanypartofyourbody to be in the chain line while operating a chain saw Fig 13 Proper Cutting Stance Fig 14 Both feet should be on solid ground with weight evenly spread between them The left arm should be straight with the elbow locked This helps to withstand the forces generated by kickback Your body should always be to the left of the chain line 13 Chain line 14 Chain line Str...

Page 45: ... throughout the cut releasing pressure just before the end of the cut 5 Releasethetriggerassoonasthecutiscompleted allowingthechaintostop WARNING Whenthesawchainisstoppedduetopinchingduringcutting releasethetriggerswitch removethesawchainandguidebarfromthewood then restart the chain saw WARNING Do not pull the saw chain with your hand when it is bound by the sawdust Serious injury could result if ...

Page 46: ...dhityouduringfelling Periodicallyglanceatthetopofthetreeduringthebackcuttoassurethetreeis going to fall in the desired direction Ifthetreestartstofallinthewrongdirection orifthesawgetscaughtorhung up during the fall leave the saw and save yourself Preparation For Tree Felling When bucking and felling operations are being performed by two or more persons atthesametime thefellingoperationshouldbesep...

Page 47: ...ed Clear the immediate area around thetreeandmakesurethatthere arenoobstructionsinyourplanned pathsofretreat Clearapathofsafe retreat approximately 135 from the plannedlineoffall Theretreatpath shouldextendbackanddiagonally totherearoftheexpectedlineof fall See Figure 15 FellingDirection Dangerous Zone Safety Retreat Path Safety Retreat Path 45 15 ...

Page 48: ...the horizontal notching cut Make the felling back cut so that enough wood is left to act as a hinge The hinge wood keeps the tree from twisting and falling in the wrong direction Do not cut through the hinge 2 As the felling cut gets close to the hinge the tree should begin to fall If there is any chance that the tree may not fall in the desired direction or it may rock back and bind the saw chain...

Page 49: ...ontacting the log or other limbs with the tip of the guide bar BUCKING A LOG Fig 18 Buckingiscuttingalogintolengths Itis importanttomakesureyourfootingis firmandyourweightisevenlydistributed on both feet When possible the log shouldberaisedandsupportedbythe useoflimbs logsorchocks Followthe simpledirectionsforeasycutting WARNING Keep a clear cutting area Makesurethatnoobjectscan contacttheguidebar...

Page 50: ...35 bottomofthesawagainstthelog exert lightpressuredownward Notethatthe sawwilltendtopullawayfromyou ...

Page 51: ... 3thediameterfromthe underside underbucking Thenmake thefinishingcutbyoverbuckingto meetthefirstcut Fig 20 Whenthelogissupported onboth ends cut 1 3 of that diameter fromthetopoverbuck Thenmake the finished cut by underbucking thelower2 3tomeet thefirstcut Fig 21 19 Log Supported Along the Entire Length Cut From Top Overbuck Avoid Cutting Earth 20 Log Supported One End 2nd Cut Overbuck 2 3 Diamete...

Page 52: ...2ndCutUnderbuck 2 3Diameter toMeet 1stCut To Avoid Pinching ...

Page 53: ...use product damage WARNING Alwayswearsafetygogglesor safetyglasseswithsideshieldsduring power tool operation or when blowing dust If the operation is dusty also wear a dust mask WARNING Toavoidseriouspersonalinjury removethebatterypackfromthe chainsawbeforeinspecting cleaning orperformingmaintenance Abatteryoperatedtool withthebatterypackinsertedis alwaysonandcanstartaccidently WARNING Whencleanin...

Page 54: ...sh Wipe thechainsawsurfacewithacleanclothmoistenedwithamildsoapsolution Removethesidecover andthenuseasoftbrushtoremovedebrisfromtheguide bar saw chain sprocket and side cover Alwayscleanoutwoodchips sawdust anddirtfromtheguidebargroovewhen replacing the sawchain ...

Page 55: ...e the specified bar and chain combination listed in the later section Recommended Bar and Chain for this Chain Saw Disassembling the Worn Bar and Chain 1 Remove the battery allow the saw to cool and tighten the oil tank cap 2 Positionthechainsawonitssideon afirm flatsurface sothattheside coverisfacingupwards Fig 23 3 Wear gloves Remove the side cover byturning the side cover knob counterclockwise ...

Page 56: ...37 5 Guide plate chain cover can tie the plate clockwise disassemble the plate anticlockwise Fig 24 NOTICE This is a good time to inspect the drive sprocket for excessive wear or damage ...

Page 57: ...oldthechaininpositiononthe guide bar and place the loop around thesprocketofthepowerhead NOTICE Small directional arrows are engraved in the saw chain Fig 26a Another directional arrow is molded into the housing Fig 26a When looping thesawchainontothesprocket makesurethatthedirectionofthearrowsonthe sawchainwillcorrespondtothedirectionofthearrowonthehousing Iftheyfacein oppositedirections turnover...

Page 58: ...37 Alignment Flange Tension Adjusting Pin 26b ...

Page 59: ...guide bar with the drive links in the guide bar groove 8 Lift the tip of the guide bar up to check for sag Fig 27 Release the tip of the guide bar and turn the chain tensioning knob once clockwise Repeat this process until the sag is eliminated 9 Holdthetipoftheguidebarup andtightenthesidecoverknob securely The chain is correctly tensionedwhenthereisnosagon theundersideoftheguidebarandthechainissn...

Page 60: ...e of the guide bar and the chain is snug but it can be turned by hand without binding The chain must be re tensioned whenever the flats on the drive links do not sit in the bar groove During normal saw operation the temperature of the chain will increase The drivelinks of a correctlytensioned warmchainwillhangapproximately 0 04in 1 1mm outofthebar groove Fig 28 NOTICE New chains tend to stretch ch...

Page 61: ... cutting results and increased wear For smooth and fast cutting the chain needs to be maintained properly The chain requires sharpening when the wood chips are small and powdery the chain must be forced through the wood during cutting or the chain cuts to one side During maintenance of your chain consider the following Improperfilingangleofthesideplatecanincreasetheriskofaseverekickback Raker dept...

Page 62: ...41 have the drive sprocket replaced by qualified service technician ...

Page 63: ... and holder available separately Do allofyourfilingat themiddlepositionoftheguidebar 4 Keepthefilelevelwiththetopplateof thetooth Donotletthefilediporrock 5 Keepacorrectsharpeningangleof 30 betweenthefileandthesaw chain seeFig 30 31 Alwaysuse afileholder availableseparately whensharpeningsawchainsby hand File holders have markings for the sharpeningangle 6 Using light but firm pressure stroke towa...

Page 64: ... Improperchainsharpeningincreasesthepotentialofkickback WARNING Failuretoreplaceorrepairadamagedchaincancauseseriousinjury Top Plate Sharpening Angles Fig 33 CORRECT30 Thisoptimalangle canbeobtainedonlywhenthe specifiedfilesandpropersetting areused Fileholdersaremarked withguidemarkstoalignthefile properly to produce the correcttop plate angle LESS THAN 30 The tooth is too dull for cutting MORETHA...

Page 65: ...uge Clearance 1 Thedepthgaugeshouldbe maintained at a clearance of 0 025in 0 6mm asshownin Fig 35 Useadepthgaugetool available separately to check the depth gaugeclearances 2 Checkthedepth gaugeclearance everytimethechainisfiled Use a flat file and a depth gauge jointer both available separately to lower all gauges uniformly Fig 36 Depth gauge jointers are available in 0 020 in to 0 035 in 0 5 mm ...

Page 66: ...adjoining cutterwasfiledwiththeround file Use Depth Gauge Jointer care not to contact the cutter face with the flat file when adjusting depth gauges ...

Page 67: ... bar with any of the following faults should be replaced Wear inside the bar rails which permits the chain to lay over sideways Bent guide bar Cracked or brokenrails Spread rails In addition the guide bar has a sprocket at its tip The sprocket must be lubricated weekly with a grease syringe to extend the guide bar life Use a grease syringe to lubricate weekly with chain oil by means of the lubrica...

Page 68: ...g the section REPLACINGTHE BARAND CHAIN and ADJUSTING THE CHAIN TENSION TRANSPORTING AND STORING Donotstoreortransportthechainsawwhenitisrunning Alwaysremovethe battery pack before storing or transporting Alwaysplacetheguidebarsheathontheguidebarandchainbeforestoringor transporting the chain saw Use caution to avoid the sharp teeth of the chain Clean the chain saw thoroughly before storing Store t...

Page 69: ...check contacts and reinstall the battery pack Thebatterypackisdepleted Charge the battery pack The battery pack or chain saw is too hot Allowthebatterypackorchainsaw tocooluntilthetemperaturedrops below 152 F 67 C The lock off button is not depressed before pressing the trigger switch Pressdownthelock offbuttonand holdit thendepressthetrigger switchtoturnonthechainsaw Chain brake is engaged Pull t...

Page 70: ...ackand forth to discharge the debris Debris in side cover Remove battery pack then remove side cover and clean out debris Motor runs but chain does not rotate Chaindoesnotengagedrive sprocket Reinstallthechain makingsurethat thedrivelinksonthechainarefully seated on the sprocket ...

Page 71: ... chain Sharpenthechaincutters following thesection HOWTOSHARPEN THE CUTTERS Chain installed backwards Reinstall the saw chain following the section REPLACING THE BAR AND CHAIN Worn chain Replace the chain following the section REPLACING THE BAR AND CHAIN Dry or excessively stretched chain Checktheoillevel Refilltheoiltank if necessary Chain not in bar groove Reinstall the saw chain following the s...

Page 72: ...47 Bar and chain running hot and smoking Chain oil tank is empty Filling bar and chain lubricant Debris in guide bar groove Clear the debris in the groove ...

Page 73: ...s not cover routine maintenance parts and consumables such as the saw chain and guide bar that can wear out from normal use within the warranty period a This warranty applies only to the original purchaser from an authorized HENX retailer and may not be transferred b The warranty period for any HENX product or part used for industrial professional or commercial purpose is ONE year c This warranty ...

Page 74: ... f This warranty does not cover normal deterioration of the exterior finish including butnot limited to scratches dents paintchips or to any corrosion or discoloring by heat abrasive and chemical cleaners ...

Page 75: ...es including warranties of merchantability or fitness for a particular purpose that cannot be disclaimed under state law are limited to five years from the date of purchase for outdoor power equipment and three years from date of purchase for battery pack and charger Some states do not allow limitations on how long an implied warranty lasts and or do not allow the exclusion or limitation of incide...

Page 76: ...THIUM ION CORDLESS CHAIN SAW Model Number A40LJ14B01 A40LJ16B01 The Model Number will be found on the Nameplate attached to the housing of the chain saw Always mention the Model Number when ordering parts for this tool 39 ...

Page 77: ...1 Oil tank cap 1 2 Seal Ring 1 3 Oil filter Assembly 1 4 Chain sheath 1 5 Guide bar 16 400 mm 1 6 Saw chain 1 7 Side cover assembly 1 8 Screws ST4 x 14 4 9 Front handle 1 10 Screws ST3X10 2 11 Cover plate 1 12 Tensioning screw assembly 1 F ...

Reviews: