Maintenance / cleaning
41
Important!
Check the leak tightness of seals at regular intervals.
7.5 Cleaning
Remove any sediment deposits when dismounting or dis-
mantling the pump. Doing this will ensure flawless operation.
Important!
Do not damage the coating during cleaning.
Before decommissioning and storing the pump after a pro-
longed period of operation rinse it thoroughly with clear water
and then clean it carefully. Hardened dirt deposits, limescale
etc. could block the impeller and the motor shaft.
Danger!
The rotating impeller can cut or crush
hands and arms.
Observe section 3.5 Shut off proce-
dures.
7.6
Cleaning the filter strainer
The filter area of the filter strainer (002) is generously dimen-
sioned. This makes long cleaning intervals possible, even in
case of strong soiling.
The soiling of the filter strainer (002) lowers the pressure
value. This can be recognised if the displayed value:
- is lower than the initial value (with digital pre-filter monitor-
ing).
- no longer accords with the locking indicator (with analogue
pre-filter monitoring).
Important!
Before removing the filter strainer (002), close the pressure-
side and suction-side gate valves.
Ensure the pump casing is free from pressure.
After that, drain the filter casing (001) through the bottom
screwed connection (005.1).
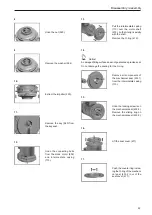
Disassembly of the filter strainer (002):
1. Detach the star handles (004) securing
the filter cover (003) and put them aside
together with the washers.
2. Lift the filter cover (003) with both hands.
3. Remove the filter strainer (002) from the
filter casing (001) by turning it lightly.
Important!
Only use a flame when cleaning the filter strainer if the profile
sealing (410) has previously been removed.
Important!
Check the proper seat of the filter strainer during installation!
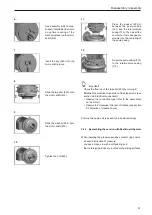
Installation of the filter strainer (002):
1. If the profile sealing (410) has been re-
moved, fix it back onto the filter strainer
(002).
2. Push the filter strainer (002) with the open-
ing facing forward into the filter casing
(001) to the limit stop.
3. Push the filter cover (003) onto the filter
casing (001) with both hands.
4. Attach and secure the star handles (004)
including the washers. Tighten them cross-
wise by hand.
Summary of Contents for herborner.X
Page 4: ......


