background image

Page 14

For technical questions, please call 1-888-866-5797.

Item 58260 


SAFET

Y

O

PERA

TION

M

AINTENANCE

SETUP

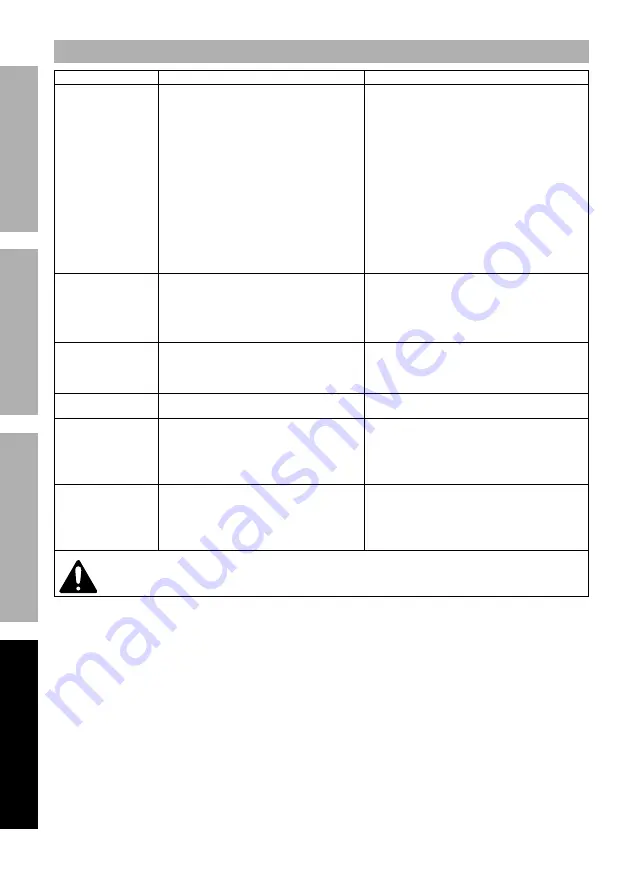
Troubleshooting

Problem

Possible Causes

Likely Solutions

Tool will not start.

1.  Battery Pack not properly connected. 


2.  Battery Pack not properly charged. 


3.  Battery Pack burnt-out. 

4.  Tool’s thermal reset 

breaker tripped (if equipped).

5.  Internal damage or wear.  

(Switch, for example.)

1.  Remove Battery Pack, make sure there 

are no obstructions, reinsert the Battery 

Pack according to its shape (it should 

only fit one way), and press firmly until 

the Battery Pack locks in place.

2.  Make sure Charger is connected and 

operating properly.  Give enough time 

for Battery Pack to recharge properly.

3.  Dispose of old Battery Pack 

properly or recycle.  Replace Battery Pack.

4.  Turn off tool and allow to cool.  

Press reset button on tool.

5.  Have technician service tool.

Tool operates slowly. 1.  Excess pressure applied to workpiece. 

2.  Battery Pack power low.
3.  Battery Pack burnt-out.

1.  Decrease pressure, allow 

tool to do the work.

2.  Recharge Battery Pack.
3.  Dispose of old Battery Pack 

properly or recycle.  Replace Battery Pack.

Performance 

decreases over time.

Battery Pack wearing out.

Battery Pack capacity will gradually 

decrease through use.  If symptoms 

are severe, recycle old Battery Pack 

(or dispose of properly) and replace it.

Excessive noise 

or rattling.

Internal damage or wear.  

(Bearings, for example.)

Have technician service tool.

Overheating.

1.  Forcing tool to work too fast.
2.  Blocked motor housing vents. 


1.  Allow tool to work at its own rate.
2.  Wear ANSI-approved safety goggles 

and NIOSH-approved dust mask/

respirator while blowing dust out of 

motor using compressed air.

Tool does not 

operate effectively.

1.  Accessory loose. 

2.  Accessory damaged, worn or 

wrong type for the material.

1.  Confirm accessory arbor is correct 

and Outer Flange/Arbor Nut is tight.

2.  Check condition and type of disc accessory. 

Use only proper type of disc 

accessory in good condition.

  Follow all safety precautions whenever diagnosing or servicing 

the tool.  Disconnect power supply before service.

Summary of Contents for HC61PB

Page 1: ...der WARNING To prevent serious injury User must read and understand Owner s Manual SAVE THIS MANUAL When unpacking make sure that the product is intact and undamaged If any parts are missing or broken please call 1 888 866 5797 as soon as possible Reference 58260 Owner s Manual Safety Instructions 22a ...

Page 2: ...r wrench before turning the power tool on ZUHQFK RU D NH OHIW DWWDFKHG WR D URWDWLQJ SDUW RI WKH SRZHU WRRO PD UHVXOW LQ SHUVRQDO LQMXU 5 Do not overreach Keep proper footing and balance at all times This enables better control RI WKH SRZHU WRRO LQ XQH SHFWHG VLWXDWLRQV 6 Dress properly Do not wear loose clothing or jewelry Keep your hair clothing and gloves away from moving parts Loose clothes je...

Page 3: ...signed and recommended by the tool manufacturer Just because the DFFHVVRU FDQ EH DWWDFKHG WR RXU SRZHU WRRO LW GRHV QRW DVVXUH VDIH RSHUDWLRQ 4 The rated speed of the accessory must be at least equal to the maximum speed marked on the power tool Accessories running faster than WKHLU 5 7 63 FDQ EUHDN DQG IO DSDUW 5 The outside diameter and the thickness of your accessory must be within the capacity...

Page 4: ...c fields in close proximity to heart pacemaker could cause pacemaker interference or pacemaker failure In addition people with pacemakers should Avoid operating alone Do not use with power switch locked on Properly maintain and inspect to avoid electrical shock 24 The warnings precautions and instructions discussed in this instruction manual cannot cover all possible conditions and situations that...

Page 5: ...H R QRW ZHDU SDQWV ZLWK FXIIV VKLUWV ZLWK RSHQ SRFNHWV RU DQ FORWKLQJ WKDW FDQ FDWFK DQG KROG PROWHQ PHWDO RU VSDUNV Safety Warnings Specific for Abrasive Cutting off Operations 1 Do not jam the cut off wheel or apply excessive pressure Do not attempt to make an excessive depth of cut Overstressing the ZKHHO LQFUHDVHV WKH ORDGLQJ DQG VXVFHSWLELOLW to twisting or binding of the wheel in the cut and...

Page 6: ...uld not use this tool If you feel any medical or physical symptoms related to vibration such as tingling numbness and white or blue fingers seek medical advice as soon as possible 2 Do not smoke during use Nicotine reduces the blood supply to the hands and fingers increasing the risk of vibration related injury 3 Wear suitable gloves to reduce the vibration effects on the user 4 Use tools with the...

Page 7: ...hether the outlet is properly grounded Do not modify the power cord plug provided with the charger Never remove the grounding prong from the plug Do not use the charger if the power cord or plug is damaged If damaged have it repaired by a service facility before use If the plug will not fit the outlet have a proper outlet installed by a qualified electrician Extension Cords Note Extension cords mu...

Page 8: ...isk of Explosion Do not puncture short or open battery packs and do not charge damaged battery packs Warning Symbols and Definitions This is the safety alert symbol It is used to alert you to potential personal injury hazards Obey all safety messages that follow this symbol to avoid possible injury or death Indicates a hazardous situation which if not avoided will result in death or serious injury...

Page 9: ... end of this manual Charging Charge battery before using this tool Follow instructions included with battery charger Battery Pack and Charger sold separately Adjusting the Wheel Guard TO PREVENT SERIOUS INJURY Do not operate this tool without the Wheel Guard properly installed 1 Pull out Lock Lever 2 Slide the collar of the Wheel Guard over the rim of the Gear Housing 3 Rotate the Wheel Guard as n...

Page 10: ...ch Outer Flange Grinding Wheel Inner Flange Wheel Guard Spindle Spindle Lock 2 Press in and hold the Spindle Lock Button to prevent the Spindle from turning 3 Remove the Outer Flange Keep the Inner Flange in position on the Spindle 4 Closely inspect the wheel before mounting 5 For wheels with metal gaskets Slip the grinding wheel onto the Spindle with the gasket first The gasket should be centered...

Page 11: ... limited to ANSI approved eye and hearing protection as well as heavy duty work gloves 5 Before beginning work provide for sparks and debris that will fly off the work surface General Operation TO PREVENT SERIOUS INJURY Grip the tool firmly in both hands 1 Insert a fully charged Battery Pack into the Grinder making sure it clicks in securely 2 Flip the Switch Lock off then squeeze the Paddle Switc...

Page 12: ...st be performed only by a qualified technician TO PREVENT SERIOUS INJURY FROM ACCIDENTAL OPERATION Make sure that the Paddle Switch is in the off position and remove its Battery Pack before performing any procedure in this section TO PREVENT SERIOUS INJURY FROM TOOL FAILURE Do not use damaged equipment If abnormal noise or vibration occurs have the problem corrected before further use ...

Page 13: ...dically wear ANSI approved safety goggles and NIOSH approved breathing protection and blow dust and grit out of the motor vents using dry compressed air 4 Disconnect battery pack and store battery pack charger and tool in dry indoor area out of reach of children and away from metal objects i e paperclips coins to prevent shorting Accessory Storage and Handling 1 Handle accessories carefully to pre...

Page 14: ...k power low 3 Battery Pack burnt out 1 Decrease pressure allow tool to do the work 2 Recharge Battery Pack 3 Dispose of old Battery Pack properly or recycle Replace Battery Pack Performance decreases over time Battery Pack wearing out Battery Pack capacity will gradually decrease through use If symptoms are severe recycle old Battery Pack or dispose of properly and replace it Excessive noise or ra...

Page 15: ...NANCE SETUP Record Product s Serial Number Here Note If product has no serial number record month and year of purchase instead Note Some parts are listed and shown for illustration purposes only and are not available individually as replacement parts Specify UPC 193175434838 when ordering parts ...

Page 16: ...lusion or limitation of incidental or consequential damages so the above limitation of exclusion may not apply to you THIS WARRANTY IS EXPRESSLY IN LIEU OF ALL OTHER WARRANTIES EXPRESS OR IMPLIED INCLUDING THE WARRANTIES OF MERCHANTABILITY AND FITNESS To take advantage of this warranty the product or part must be returned to us with transportation charges prepaid Proof of purchase date and an expl...

Reviews: