background image

2

Physical Installation

Remember to select a location that is readily accessible for periodic inspection and
cleaning of your humidifier. This unit should be located on the cold air return side of
the system for best results. However, if space does not permit, it can be mounted on
the warm air supply side of the system. Please keep in mind that the evaporative
capacity of the humidifier will be reduced if this alternate installation method is
utilized.

CAUTION

Only a trained service person should install this humidifier. Do not connect the
unit to power source until installation is complete. A thorough checkout of the
unit installation should be completed before operation. Failure to follow these
directions may void the manufacturer’s original warranty.

Prior to installing this product...

1. 

Read the instructions carefully to
ensure safe operation. Failure to
follow them could damage the
product or cause personal injury,
and/or property damage..

2. 

Check the ratings given on the
product to make sure it is suitable for
your application.

Preparing ductwork 

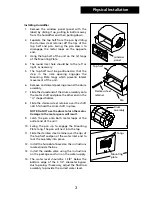
1. 

Level and attach the mounting
template to the selected location.

2. 

Drill 1/8” diameter holes and cut the
opening as marked on the template.
Remove the template from the duct.

3. 

Cut a 7” diameter bypass hole in the
opposite duct using the Return Air
Flange as a template.

4. 

Insert the notched flange of the
Return Air Flange through the hole
and bend the tabs inside the duct to
secure the flange to the duct.

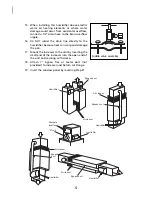
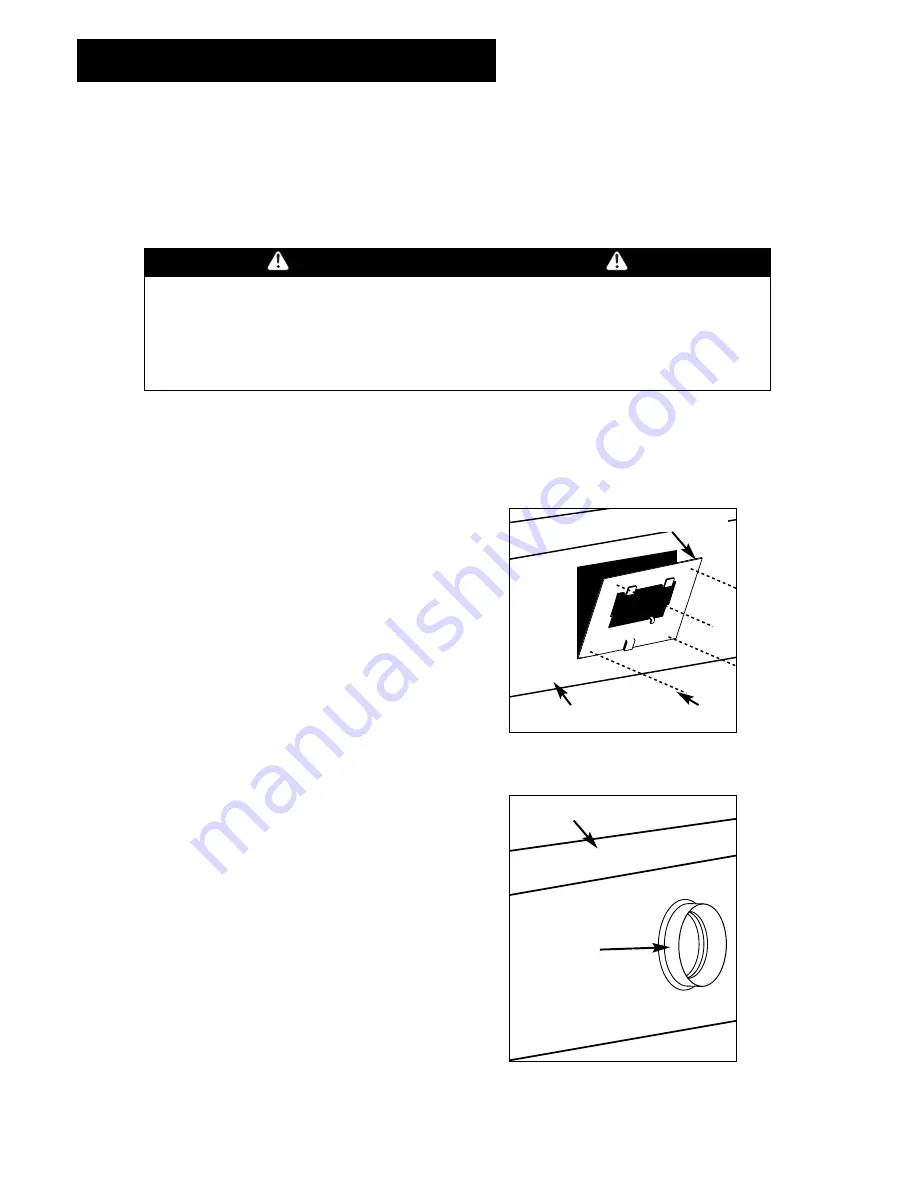
5. 

Position the Mounting Plate to the air
duct with (2) tangs up and (1) tang
down. If needed, position the
Damper Plate behind the Mounting
Plate.

6. 

Secure the Mounting Plate to the air
duct with (4) sheet metal screws and
spring nuts (provided).

Mounting plate

Duct

Screws

Return air
flange

Return Air Duct

Summary of Contents for 465-C1

Page 1: ...Maintenance 7 Unit Diagram and Parts List 9 Warranty Back cover Manual for Installation Operation Maintenance Duct Mount Rotating Drum Humidifier Model 465 C1 Table of Contents 252911 001 9 04 CAUTION...

Page 2: ...storm windows Air exchange rate of 1 0 change per hour A Loose Home is generally one constructed before 1930 has little or no insulation no storm doors storm windows weather stripping or vapor barrie...

Page 3: ...his product 1 Read the instructions carefully to ensure safe operation Failure to follow them could damage the product or cause personal injury and or property damage 2 Check the ratings given on the...

Page 4: ...motor shaft and place the other end in the U shaped holder 8 Slide the stainless steel retainer over the shaft notch to hold the drum shaft in place NOTE Do NOT use the drum to turn the motor Damage...

Page 5: ...ould occur from accidental overflow connect a 1 2 drain hose to the brass overflow nipple 16 Do NOT solder the drain line directly to the humidifier because heat can warp and damage the pan 17 Mount t...

Page 6: ...lectrical wiring can cause personal shock injury or property damage It is required by local codes that the unit be installed by a properly qualified HVAC technician or electrician following NEC and an...

Page 7: ...the proper cleaning schedule Clean the unit at the end of each heating season or whenever mineral deposits appear to clog the openings in the evaporator pad You can easily check your humidifier to be...

Page 8: ...e OFF position and disconnect the humidifier from the power source 3 Turn off the water at the saddle valve by turning clockwise 4 Remove the window panel panel with label attached on the front of the...

Page 9: ...ly into the humidifier and replace the drain plug 13 Latch the pan onto both metal loops at the outlet end of the unit 14 Swing the pan up to engage the Mounting Plate tang The pan will nest into the...

Page 10: ...9 21 20 2 7 1 3 8 9 10 11 12 13 14 18 16 17 15 4 19 23 22 6 5 Unit Diagram...

Page 11: ...ve FV 11 7 Brass Compression Nut FV 12 8 Closed End 1221 9 Cage 1219 10 Evaporator Pad 1220P 11 Open End 1222 12 Drum Bearing 1223 13 Bracket 1213 14 Drum Bearing Clip 1316 15 Outlet Clamp 251040 001...

Page 12: ...ders com Humidifiers which have been installed or become part of real estate cannot be returned CareCo will receive freight prepaid only removable parts or components of such defective humidifiers 6 T...

Reviews: