background image


PL790

 / English Instruction Manual


3


ADJUSTING THE TONE ARM 
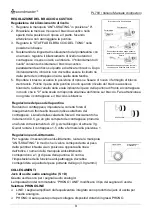
Level Balance Adjustment 

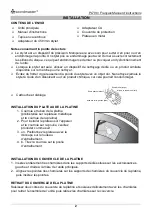
1.   Set the 

“ANTI-SKATING” knob to"0". 

2.   Release the arm clamp and move the tonearm to the space 

between the arm rest and the platter, taking care not to 
damage the stylus. 

3.    Set the 

“CUE LEVER” to the down position.  

4.   Support the headshell's finger-lift with one hand and attain 

the level balance by turning the counterweight either 
clockwise or counter-clock wise. "Level balance" means that 
the tonearm is parallel to the record on the platter and that 
the tonearm pipe. Therefor should not tilt toward the 
counterweight side or the headshell side.  

5.    Return the tonearm to the arm rest and fasten the arm 

clamp. Since the tracking force is zero when the tonearm is balanced level, turn just the 
tracking force scale ring in front of the counter-weight and set the "0" on the scale to the 
index line on the shaft. Be careful not to turn the counterweight otherwise the tonearm will 
become unbalanced e 


Tracking Force Adjustment 

Turning the counterweight, set the correct tracking force opposite 
the index line on the counterweight shaft. The tracking force 
scale ring has 0.5g steps and one full turn of the


counterweight 

will yield a tracking force of 2,0g. You will need at least 3g. 
So turn the counterweight 1,5 times and stop by position 1. 
 

Anti-Skating Adjustment 

To adjust the Anti-skating mechanism, turn the 

“ANTI-SKATING” 

Knob so that the number corresponding to the required tracking 
force is opposite the index line. As a rule, the setting of the anti-
skating function should correspond to that of the support weight 
of the needle (3 grams). 

 
CONNECTIONS 
Analog audio output jacks (L + R) 

These output analog audio signals. 
The 

“PHONO EQ” switch setting changes the type of output signal. 

Use the included audio cable (or commercially available ones) to connect other equipment to 
the output jacks of this unit. 

 
PHONO/LINE Selection Switch 

  LINE: Signals that have been amplified by the built-in equalizer amp are output from the 

analog audio output jacks. 

  PHONO: Use this when connecting to equipment that has PHONO inputs. 


Summary of Contents for SOUNDMASTER PL790

Page 1: ...O ENGLISH SVENSKA FRAN AIS E TINA NEDERLANDS SLOVENSK PL790 Hersteller W rlein GmbH Tel 49 9103 71670 Gewerbestrasse 12 Fax 49 9103 716712 D 90556 Cadolzburg Email info soundmaster de GERMANY Web www...

Page 2: ...gs und Wartungsanweisungen bez glich des Ger ts hin Das Ger t ausnahmslos nur in trockenen Innenr umen betreiben und niemals mit Feuchtigkeit in Verbindung bringen Sch tzen Sie das Ger t vor tropfende...

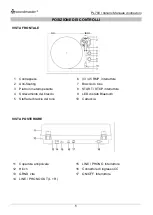
Page 3: ...ter 2 Anti Skating 7 Tonarm 3 Metallplattenteller 8 START STOP Schalter 4 Tonarmlift 9 Bluetooth Status LED 5 Tonarmhalterung 10 Tonabnehmer System R CKANSICHT 11 Plattenspielerabdeckung 15 LINE PHONO...

Page 4: ...LERS 1 Antriebsriemen und Montagehilfe vorinstalliert auf dem Plattenteller 2 Installieren des Plattentellers und Riemens a Positionieren Sie die Platte mit dem Ausschnitt ber dem Antriebsmotor b Zieh...

Page 5: ...m Skalenring langsam zur Mitte bis die Skala das 1 5 Umdrehungen gegen den Uhrzeitersinn damit die Nadel am Ende auf 1g senkrecht steht Somit haben Sie die vom Hersteller angegeben 3gramm 0 5g Auflage...

Page 6: ...g mit der Hand auf die Schallplatte legen um die Wiedergabe zu starten 9 Bewegen Sie den Tonarm zum Anfang der Schallplatte oder zum gew nschten Titel 10 Senken Sie den Tonarm mit dem Tonarmlift ab Di...

Page 7: ...exposed to excessive heat such as sunshine fire or the like CAUTION Danger of explosion if battery is incorrectly replaced Replace only with the same or equivalent type Use the device in dry indoor en...

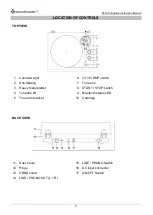
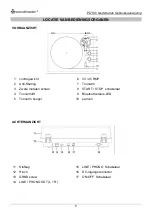
Page 8: ...33 45 RMP switch 2 Anti Skating 7 Tone arm 3 Heavy metal platter 8 START STOP switch 4 Tonearm lift 9 Bluetooth status LED 5 Tone arm bracket 10 Cartridge BACK VIEW 11 Dust Cover 15 LINE PHONO Switch...

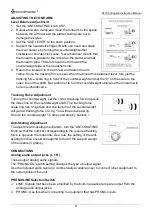
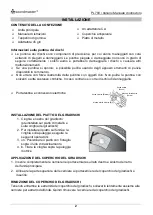
Page 9: ...stylus with thinner or other chemicals Doing so could harm it Headshell electrical connections INSTALLING THE TURNTABLE PLATTER 1 Turntable belt and ribbon pre installed to the metal platter and turn...

Page 10: ...nearm will become unbalanced e Tracking Force Adjustment Turning the counterweight set the correct tracking force opposite the index line on the counterweight shaft The tracking force scale ring has 0...

Page 11: ...5 Move the tone arm clasp to release the tone arm 6 Lift the TONE ARM BRACKET 7 You can also leave the cue lever down and moved the raised tone arm over the record and then lower the tone arm slowly t...

Page 12: ...sonnel qualifi Ne connectez cet appareil qu une prise murale correctement install e et reli e la terre Assurez vous que la tension principale corresponde aux recommandations de la plaque d indice Assu...

Page 13: ...ing 7 Bras de lecture 3 Plateau en m tal lourd 8 START STOP switch 4 Relevage du bras de lecture 9 Voyant d tat Bluetooth 5 Support de bras de lecture 10 Cartouche VUE ARRI RE 11 Housse de protection...

Page 14: ...r cela pourrait l endommager Cartouche et c blage INSTALLATION DU PLATEAU DE LA PLATINE 1 Courroie et ruban de la platine pr install s sur le plateau m tallique et la courroie de la platine 2 Pour ins...

Page 15: ...ecte l oppos de la ligne d index sur l arbre du contrepoids L anneau d chelle de la force d appui a des pas de 0 5 g et un tour complet du contrepoids donnera une force d appui de 2 0 g Vous aurez bes...

Page 16: ...RAS DE LECTURE 7 Vous pouvez galement laisser le rel ve bras au repos et d placer le bras de lecture au dessus du disque puis l abaisser d licatement pour d marrer la lecture 8 Placez le bras de lectu...

Page 17: ...er aan gekwalificeerd onderhoudspersoneel Sluit dit apparaat alleen aan op een goed ge nstalleerd en geaard stopcontact Zorg ervoor dat de netspanning overeenkomt met het de specificaties op het etike...

Page 18: ...cht 6 33 45 RMP 2 Anti Skating 7 Toonarm 3 Zware metalen schaal 8 START STOP schakelaar 4 Toonarmlift 9 Bluetooth status LED 5 Toonarm beugel 10 patroon ACHTERAANZICHT 11 Stofkap 15 LINE PHONO Schakel...

Page 19: ...en Cartridge en elektrische aansluitingen DE DRAAITAFEL INSTALLEREN 1 Draaitafelriem en lint vooraf ge nstalleerd op de metalen plaat en draaitafelriem 2 Ga als volgt te werk om het plateau op de unit...

Page 20: ...ntragewichtas De volgkrachtschaalring heeft stappen van 0 5 g en een volledige draai van het contragewicht levert een volgkracht van 2 0 g op Je hebt minimaal 3 gram nodig Dus draai het contragewicht...

Page 21: ...de verhoogde toonarm over de plaat verplaatsen en vervolgens de toonarm langzaam laten zakken om het afspelen te starten 7 Verplaats de toonarm naar de rand van de plaat of de track waar u het afspele...

Page 22: ...ostruire o danneggiare il cavo di alimentazione in alcun modo Avvisi per la disconnessione del dispositivo La spina di alimentazione serve per la connessione del dispositivo alla rete elettrica quindi...

Page 23: ...7 Braccio di tono 3 Piatto in metallo pesante 8 START STOP interruttore 4 Sollevamento del braccio 9 LED di stato Bluetooth 5 Staffa del braccio del tono 10 Cartuccia VISTA POSTERIORE 11 Copertura ant...

Page 24: ...schio di danneggiarla Portatestina e connessioni elettriche INSTALLAZIONE DEL PIATTO DEL GIRADISCHI 1 Cinghia e nastro del giradischi preinstallati sul piatto di metallo e sulla cinghia del giradischi...

Page 25: ...il contrappeso impostare la corretta forza di inseguimento di fronte alla linea di indice sull albero del contrappeso L anello della scala della forza di tracciamento ha incrementi di 0 5 g e un giro...

Page 26: ...evare la STAFFA DEL BRACCIO DEL TONO 7 Lasciando abbassata la leva di contatto anche possibile sollevare il braccio acustico e posizionarlo sul disco quindi abbassarlo lentamente per avviare la riprod...

Page 27: ...under drift Kl m inte eller skada n tkabeln p n got s tt Varning vid fr nkoppling av apparaten N tkontakten anv nds som anslutning s den b r alltid vara tillg nglig En skadad n tkabel eller kontakt m...

Page 28: ...vikt 6 33 45 RMP 2 Anti Skating 7 Tonarm 3 Tallrik i tung metall 8 START STOP 4 Tonarmslyft 9 Bluetooth status LED 5 Tonarmsf ste 10 Patron UTSIKT BAK T 11 Dammskydd 15 LINE PHONO V xla 12 Hinch 16 DC...

Page 29: ...n den blir smutsig Gnugga inte pickupens n l mot n got h rt Torka inte av pickupen med thinner eller andra kemikalier Detta kan skada den Pickupf ste och elektriska anslutningar MONTERING AV SKIVTALLR...

Page 30: ...kten och tonearmen kommer att bli obalanserad Justering av n ltryck Vrid motvikten och st ll in r tt sp rkraft mitt emot indexlinjen p motviktsaxeln Skalringen f r sp rningskraft har 0 5 g steg och et...

Page 31: ...lyftaren vara nedf lld och flytta den upplyfta tonarmen ver skivan f r att sedan sakta s nka ned den f r att starta uppspelningen 8 Flytta tonarmen till kanten p den skiva eller det sp r som du vill b...

Page 32: ...ak muko vek po kodeniu nap jacieho k bla Upozornenie pri odp jan zariadenia Nap jacia z str ka sl i ako pripojenie preto mus v dy umo ova manipul ciu Nap jacia z str ka sl i ako odp jacie zariadenie s...

Page 33: ...a 33 45 RPM 2 Protikor u ovanie 7 T nov rameno 3 a k kovov tanier 8 START STOP 4 Zdvih ramena 9 Stavov LED di da Bluetooth 5 Dr iak na rameno t nu 10 N pl POH AD SP 11 Prachov kryt 15 LINE PHONO Prep...

Page 34: ...ot prenosky nenan ajte rozp adlo ani iadne in chemik lie Mohlo by ho to po kodi Prenoska a elektrick pripojenia IN TAL CIA OTO N HO KRUHU GRAMOF NU 1 P s oto n ho taniera a p ska predin talovan na kov...

Page 35: ...tavenie pr tlaku Ot an m protiz va ia nastavte spr vnu vodiacu silu oproti indexovej iare na hriadeli protiz va ia Kr ok na stupnici sily sledovania m kroky po 0 5 g a jedno pln oto enie protiz va ia...

Page 36: ...TART 5 Posu te zar ku prenoskov ho ramienka m ho uvo n te 6 Zdvihnite prenosov p ku Dr iak na rameno t nu 7 Pr padne m ete prenosov p ku necha dole a posun zdvihnut prenoskov ramienko nad plat u a pot...

Page 37: ...st te aby s ov kabel z stal b hem provozu such S ov kabel nep isk pn te ani jin m zp sobem nepo kozujte Varov n pro odpojov n za zen S ov z str ka se pou v jako p ipojen m la by proto z stat v dy p st...

Page 38: ...P P ep na 2 Anti Skating 7 T nov rameno 3 T k kovov tal 8 START STOP p ep na 4 Zdvih ramene 9 Stavov LED dioda Bluetooth 5 Dr k t nov ho ramene 10 Kazeta ZP TN POHLED 11 Prachov kryt 15 LINE PHONO P e...

Page 39: ...jejich i t n a jehlu vy ist te Nedrhn te hrot jehly ni m tvrd m p li velkou silou Neot rejte jehlu edidlem ani dn mi jin mi chemik liemi V opa n m p pad byste ji mohli po kodit Dr k p enosky a elektr...

Page 40: ...souladu s rou ukazatele na h deli P i prov d n tohoto nastaven je nutn dr et z rove z va a stupnici D vejte pozor abyste neot eli protiz va m a ram nko by mohlo b t nevyv en Nastaven p tla n s ly Ot...

Page 41: ...ART STOP do polohy START 5 Posunut m svorky ramene p enosky uvoln te rameno p enosky 6 Zvedn te p ku CUE LEVER 7 M ete tak ponechat zvedac p ku dole a p esunout zvednut rameno p enosky nad desku a pot...

Page 42: ...tifik tor modelu HS1200500V Spannungseingang Power input Entr e d alimentation Voedingsingang Ingresso di alimentazione Entrada de energia Kraftuttag Vstup nap jen Zdroj nap jania 100 240V 50 60Hz 0 1...

Page 43: ...este dispositivo cumple con los requisitos esenciales y otras disposiciones relevantes de la Directiva 2014 53 EU Se puede obtener una copia de la declaraci n de conformidad en la direcci n anterior...

Reviews: