background image

H8 DSP

Digital Interface Processor

User’s manual

6

15

4. 

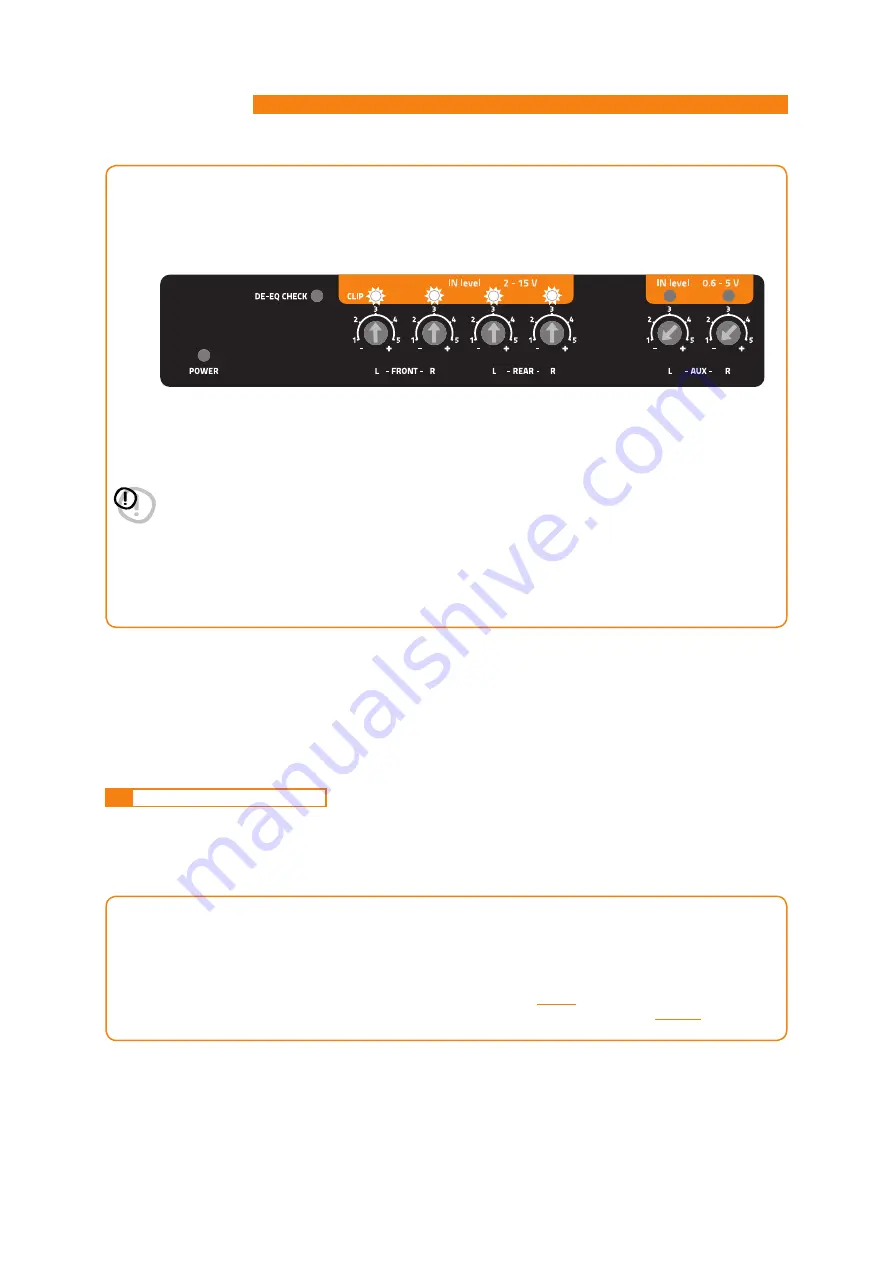
MASTER inputs IN LEVEL calibration

.


This procedure is delicate and requires utmost accuracy. Improper execution may invalidate the final acoustic 

 results. 

The H8 DSP outputs must be disconnected from the amplifiers

.


• While playing track 1 of the CD, turn the first knob towards the highest sensitivity (po).


• When the orange LED lights up or flashes, stop turning and go back slightly until the LED turns off.


• It is normal for the LED to flash briefly; this indicates correct sensitivity calibration.


• Repeat the procedure for the other 3 Front / Rear knobs.


• Note down the calibration level used by the head unit volume control.

WARNING:


Some OEM head units require a low load impedance to enable the outputs (usually the Rear section). 


    If during the calibration process the input signal level can’t be adjusted, it may be necessary to connect in


    parallel a 47Ω - 3W resistor to the input cables of the channels showing the issue.


    OEM audio systems are often provided with equalized outputs.


    This means that the response curve is not flat and the difference between the highest and the lowest level 


    can reach 6 dB. By calibrating the device so that the LED never lights up, the 

H8 DSP

 sensitivity may be 


    suboptimal (low) and you may experience noise (whistle) on the speakers. A few quick LED flashes indicate 


    only a small distortion when handling maximum peaks (very occasional) of music tracks.


    If the source is not equalized, response is flat and the LEDs will always be on or always off. In this case, 


    calibrating is easy because you will simply need to adjust the knobs so that the LEDs turn off just below the 


    point they turn on.

6.2

  SOURCE DE-EQUALIZATION

Source de-equalization (De-Eq) is only required if the source is equalized. 

OEM sources often have a high output level (speaker output) with preset equalization that can not be deleted.

By replacing the OEM audio system (speakers and / or amplifiers), this equalization is harmful.

The 

H8 DSP

 features an automatic procedure to verify equalization and, if present, can eliminate it.

1. 

Equalization analysis: source set up.


To run this procedure, follow the instructions below:


• Disconnect  the 

H8 DSP

 RCA outputs (CH1

÷

CH8) if they are connected to the amplifiers.


• Play track 2 of the 

H8 DSP

 cd.


• Set all tone and equalizer controls to zero (0).


• Set balance and fader to center (0).


• Don’t change or reset the volume of the input sensitivity calibration 

(see 6.1.3)

.


If the calibration volume is lost, to find it simply proceed again as described in paragraphs 

6.1.1 - 6.1.3

 and verify 


that the IN LEVEL LEDs flash occasionally.

Summary of Contents for H8 DSP

Page 1: ...H8 DSP Digital Interface Processor USER S MANUAL rev 1 0 www hertzaudiovideo eu ...

Page 2: ... rear input sensitivity 14 6 2 Source de equalization 15 6 3 Amplifiers sensitivity calibration 17 6 4 How to calibrate the aux in input sensitivities 17 7 H8 DSP SOFTWARE AND DRIVERS INSTALLATION UNINSTALLATION GUIDE 18 7 1 PC software installation guide 18 7 2 Drivers installation guide 20 7 3 H8 dsp software uninstall 21 8 H8 DSP INSTALLATION GUIDE USING A PC 22 8 1 Selecting the master front r...

Page 3: ...ocessor and 24 bit AD and DA converters It can connect to any factory system even in vehicles featuring an integrated audio processor since thanks to the de equalization function the H8 DSP will provide a linear signal It features 7 signal inputs 4 Hi Level 1 Aux Stereo 1 S PDIF optical digital and It provides 8 PRE OUT Each output channel has a 31 band equalizer available It also features a 66 fr...

Page 4: ... 3 14 191 mm 7 51 121 mm 4 76 34 mm 1 33 183 6 mm 7 22 80 mm 3 14 191 mm 7 51 121 mm 4 76 34 mm 1 33 183 6 mm 7 22 80 mm 3 14 191 mm 7 51 121 mm 4 76 34 mm 1 33 How to install 4 2x20mm 0 16 x0 78 3 4 3 H8 DSP AND DRC INSTALLATION External dimensions Mounting dimensions ...

Page 5: ...ow BATT 12V 19 N C 20 Black BATT 1 RR Violet Violet RR 11 Gray FR 12 White FL 13 Green RL 14 Red REM IN 15 Pink MEM B 16 Orange AUX SELECT 17 Yellow BATT 18 Black BATT 20 N C 19 2 FR Gray 3 FL White 4 RL Green 5 REM IN Red 6 MEM A Pink 7 OPTICAL SELECT Brown 8 N C 9 REM OUT Blue 10 KEY MEM Cyan CABLE SIDE REAR VIEW 4 5 The H8 DSP features a 20 multipolar interface for input signals power supply an...

Page 6: ...r other audio sources Input sensitivity is adjustable from 0 6 to 5 V RMS Remark If a low level output source PRE OUT with output signal equal or higher than 2 V RMS is available you can connect it to the high level MASTER inputs SPEAKERS Sensitivity is increased by adjusting the IN LEVEL controls see 8 1 9 3 Optical digital S PDIF input Connect an optical fiber cable with TOSLINK connector The H8...

Page 7: ...ast 10 seconds before turning the H8 DSP on 2 REMOTE IN OUT REM IN input for the processor remote turn on through the source Remote Out signal REM OUT output to turn on other devices amplifiers connected after the processor From the REMOTE IN signal the processor only takes 1 second to supply the signal to the REM OUT output The 130 mA output current capability can also drive an automotive relay m...

Page 8: ...n it on by using either the DRC or REM IN 4 OPTICAL SEL AUX SEL Selection of the auxiliary OPTICAL or AUX inputs The terminals can be set up with positive or negative selection This function is active at 12V by setting up the UCS switch as shown in fig 1 while to obtain a BATT GROUND set up the switch as shown in fig 2 5 MEM A SEL MEM B SEL Selection of the DSP MEM A o MEM B memories The terminals...

Page 9: ... a de equalization analysis of the MASTER main input signal see 8 1 9 4 DE EQ SET Button to activate analysis or de equalization functions during system calibration without using a PC see 6 2 5 SPEAKER TURN ON Switch OFF to prevent turning the device on from the MASTER high level main input see 4 2 1 Switch ON allows turning the device on from the MASTER high level main input see 5 4 6 UPGRADE MOD...

Page 10: ... off in the following ways 1 Press the DRC main POWER switch to turn on Keep the DRC main POWER switch pressed to shut down In this case no other connections Remote In KEY MEM are required but they can coexist 2 Connecting one of the Remote In plugs using a signal coming from a source The KEY MEM connection is not required but it can coexist 3 Through the KEY MEM This method is memory dependent 4 ...

Page 11: ...hannel move the indicated switch to the left to OFF position 2 SPEAKERS IN HI LEVEL MULTICHANNEL see 8 2 5 3 PERSONAL COMPUTER AND DIGITAL REMOTE CONTROL DRC 5 4 HIGH LEVEL INPUT SIGNALS optional DRC HE WARNING if a DRC is not installed in the system the H8 DSP is set up with the volume adjustment to the maximum acoustic level Connecting the processor without performing the required adjustments ma...

Page 12: ...stereo signal Sensitivity is adjustable from 0 6 to 5 V RMS DIGITAL INPUT WARNING the digital input accepts up to 96 kHz 24 bit stereo PCM signals So DOLBY DIGITAL AC3 multi channel signals coming from audio video sources such as the audio of a film in DVD or DTS can not be reproduced The output of these devices will therefore be set in STEREO mode for the signal to be reproduced If digital signal...

Page 13: ...NKWITZ 80Hz 12dB 0 cm CH6 Rear RIGHT HI PASS LINKWITZ 80Hz 12dB 0 cm CH7 CENTER BAND PASS LINKWITZ 120Hz 12dB 5500Hz 12dB 0 cm CH8 SUBWOOFER BAND PASS LINKWITZ 30Hz 12dB 80Hz 12dB 0 cm 5 CH 1 CH 4 CH 5 CH 6 CH 7 CH 8 13 5 7 OUTPUT SIGNALS OUTPUT TO PRE AMPLIFIERS SYSTEM WARNING if a DRC is not installed in the system the H8 DSP is set up with the volume adjustment to the maximum acoustic level Con...

Page 14: ...ows a sine wave with slightly cut peaks as shown in the figure Note down the volume used by the head unit It must be left in this position for the following 6 HOW TO SETUP THE H8 DSP WITHOUT A PC The H8 DSP can be used without a PC and in this case it will not be possible to use the sole the DE EQ de equalization function to eliminate any pre existing equalization in the OEM audio system The devic...

Page 15: ...e LED never lights up the H8 DSP sensitivity may be suboptimal low and you may experience noise whistle on the speakers A few quick LED flashes indicate only a small distortion when handling maximum peaks very occasional of music tracks If the source is not equalized response is flat and the LEDs will always be on or always off In this case calibrating is easy because you will simply need to adjus...

Page 16: ... be off If the DE EQ CHECK LED on the H8 DSP is on you can run the de equalization procedure again The new data will erase the ones previously stored Important Confirm or abort the de equalization process within 5 minutes otherwise the H8 DSP will automatically reset and turn off DE EQ CHECK LED ANALYZING NO NEED DE EQ DE EQ IN PROGRESS OUT OF DE EQ PROCESS ABORT DE EQ PROCESS MEMORY CANCEL LED OF...

Page 17: ...pear Check if the IN Level AUX LEDs flash occasionally 1 Amplifiers sensitivity calibration by listening Place the head unit volume on the H8 DSP inputs sensitivity calibration level and play a highly dynamic track Work on the amplifiers sensitivity controls slowly bringing them to higher sensitivity less than 4 0 Volts Once the first distortion symptoms show you should stop This is easier if you ...

Page 18: ...e H8 DSP Setup CD 1 0 CD icon and select Explore Windows Vista right click the H8 DSP Setup CD 1 0 CD icon and select Explore Windows 7 right click the H8 DSP Setup CD 1 0 CD icon and select Open Windows 8 10 double click on the Computer icon Windows XP Windows Vista Windows 7 Windows 8 10 4 Windows XP double click the Setup icon Windows Vista double click the Setup icon Windows 7 double click the...

Page 19: ...istrator privileges so that once installed the program can be used by anyone who uses that PC Just me if you want that once installed the program can only be used by yourself as a single system user Then select NEXT Windows 7 select Everyone if you have system administrator privileges so that once installed the program can be used by anyone who uses that PC Just me if you want that once installed ...

Page 20: ... XP complete the installation procedure then select CLOSE to exit the installation Windows Vista complete the installation procedure then select CLOSE to exit the installation Windows 7 complete the installation procedure then select CLOSE to exit the installation Windows 8 10 go on and complete the installation procedure then select CLOSE to exit the installation WARNING When connecting a laptop ...

Page 21: ... DSP PC software you can use the link listed on the following menu Start All Programs H8 DSP uninstall Procedure 2 To uninstall the H8 DSP PC software you can also follow the standard procedure Start Control Panel Applications Installation H8 DSP uninstall 7 3 H8 DSP SOFTWARE UNINSTALL ...

Page 22: ...ay system with active mid low During this procedure you should disconnect the H8 DSP output RCA plugs to the amplifiers 3 Turn on the H8 DSP and connect the USB cable to a PC Start H8 DSP software by clicking the icon previously created on the PC desktop The first window is the start page where you need to choose among three operational modes Select the CONNECT start mode on the drop down menu 8 1...

Page 23: ...sed e g AUX OPTICAL Which kind of signals will be allocated to the main inputs e g Front Left or Front Right etc Which speakers you are using for your system e g 2 way Front Sub etc If the system features passive crossovers managing speaker groups e g 2 way system with active mid low 6 Inputs Selection Select the auxiliary inputs to be used between AUX and OPTICAL You can change this setting later...

Page 24: ...ng chapter 9 Head unit input level instrument check You will need an oscilloscope for this instrument check Connect the head unit output to the oscilloscope Play track 1 of the H8 DSP CD Set tone fader balance controls and the equalizer if any to zero flat Turn on the car Adjust the volume control so that the oscilloscope shows a sine wave with slightly cut peaks as shown in the figure Note down t...

Page 25: ...s that the response curve is not flat and the difference between the highest and the lowest level can reach 6 dB By calibrating the device so that the LED never lights up the H8 DSP sensitivity may be suboptimal low and you may experience noise whistle on the speakers A few quick LED flashes indicate only a small distortion when handling maximum peaks very occasional of music tracks If the source ...

Page 26: ... NEXT to go ahead with the setup procedure Select CANCEL to exit the procedure 13 Source equalization analysis Source de equalization De Eq is required only when the source is equalized OEM sources often feature a high output level speaker output with preset equalization that can not be deleted By replacing the OEM audio system speakers and or amplifiers this equalization is harmful The H8 DSP has...

Page 27: ...ns as below Play track 2 of the H8 DSP Setup CD press Play Set all source tone controls to zero 0 Set source balance and fader to center 0 Don t change the source volume level previously set through the input calibration Select BACK to go back to the previous step Select NEXT to go ahead with the de equalization Select CANCEL to exit the procedure 18 Through a real time progress bar and specific m...

Page 28: ...ess than 4 0 Volts Once the first distortion symptoms show you should stop This is easier if you work on one channel stereo at a time by disconnecting the other channels amplifiers inputs Once the amplifiers are calibrated reconnect all the system channels and if necessary reduce the sensitivity back to 4 0 volts of those channels that may have excessive volume B Amplifiers sensitivity instrument ...

Page 29: ... music track C Turn the IN Level AUX knobs until the first distortion symptoms appear Check if the IN Level AUX LEDs flash occasionally In this mode even if the H8 DSP processor is connected to the PC it does not interact with the software The OFFLINE mode see 8 1 3 can be used to work on the software without connecting the H8 DSP to the PC to get familiar with the many functions of the processor ...

Page 30: ...used to load all the settings that have been previously saved This is useful if you want to resume all the settings you previously selected to install another H8 DSP with the same settings Output levels calibration and de equalization if any must be repeated In OFFLINE mode it can be used to check the features you previously saved 8 5 FILE MAIN MENU The following chapters detail the system adjustm...

Page 31: ...P The PC loads the settings that have been previously stored in the H8 DSP WARNING This operation cannot guarantee that data are always retrieved If the operation is not successful you need to 1 exit the H8 DSP software 2 turn the H8 DSP off 3 turn the H8 DSP on 4 launch the H8 DSP software again Synchronization will be restored but the selected settings will be lost 5 Check for updates it enables...

Page 32: ...n assigned to the MASTER inputs 4 Start up Shutdown delays it enables the modification of the H8 DSP turn on off time settings StartUp Time delay between turning the device on and audio output activation Every amplifier exhibits while turning on its own delay before being operational If you set Startup Time to a value higher than or equal to the longest of these delays the entire audio system will...

Page 33: ...sponse of all selected channels taking into account the crossover filters and equalizations and a green line for the final result To act on another channel and keep your selection click to the right of the desired channel where the EDIT column is The CHANNEL MAP window allows to silence each channel by clicking on the word MUTE to the left of the desired channel If MUTE is on the word is highlight...

Page 34: ...ther one To do so click on the blue led which will light up Xover L R Link manages all Filter Settings adjustments except Set Distance Delay 2 Invert Phase it inverts the phase of the channel under examination by 180 This can be done by selecting the green light which will light up This can be useful to solve phase alignment problems among the different filtered channels 3 Filter Type it enables t...

Page 35: ...ing from one value to the other by using the arrow keys up down on the PC keyboard clicking on the corresponding drop down menu and then moving from value to value with a mouse featuring a rotating scroll wheel 6 Filter slope Hi P Slope 12 24 dB Oct Linkwitz 6 12 18 24dB Oct Butterworth Lo P Slope 12 24 dB Oct Linkwitz 6 12 18 24 dB Oct Butterworth When starting the software the H8 DSP offers Link...

Page 36: ...rors in distance measurement back wave reflections inside the car compartment and mainly the speaker phase problem Two speakers reproducing two areas of frequency close to each other e g Woofer and Midrange will simultaneously reproduce in their crossing area at attenuated level the same frequencies Due to the different nature of the speakers they will show a difference in phase that for a short f...

Page 37: ...ine Set box By shifting the values between positive or negative except for the Subwoofer in Fig 6 since it is the farthest speaker the best time alignment and correct acoustic scene can be obtained It is advisable to listen to different types of music percussion melodic etc for a comprehensive evaluation of the different musical instruments coherence space stability 6 Once the time alignment proce...

Page 38: ...lick the first slider on the left of the equalizer and move the equalizer sliders towards the right shaping the curve as desired see Fig 1 Fig 1 Fig 2 Fig 3 Example of visualization with magnifier function 24dB Example of visualization with magnifier function 3dB The graphic equalizer features five specific functions to ease the calibration see Fig 2 1 Select ALL once an equalization curve has bee...

Page 39: ...can be adjusted 60 0 dB By using the Sub Volume slider the Subwoofer output level can be adjusted 12 0 dB if the system features a Subwoofer WARNING the output level adjustment as detailed in affects the system signal noise ratio whistle background hiss We recommend that you always set the H8 DSP output level high and the amplifiers sensitivity low so that the amplifiers will be less affected by n...

Page 40: ... memory into the current memory Current Preset Default it restores the crossover and equalization default values that would be suggested at the end of the setup procedure The following data are stored in each memory the filter settings for each channel the time delay settings for each channel the equalization settings for each channel the output levels of each channel listening point markers We re...

Page 41: ...ain using the function FILE LOAD SETUP 3 The H8 DSP does not respond If while tuning the system with a laptop PC the H8 DSP does not respond proceed as per the following steps a Spegnere l H8 DSP premendo la manopola del DRC oppure scollegando il Remote IN o anche scollegando per un istante il cavo di alimentazione b Salvare il setup in un file sul PC tramite la funzione FILE SAVE SETUP c Uscire d...

Page 42: ...rvice might need to be contacted to reprogram the H8 DSP 5 Before starting H8 DSP update the program warns you to not disconnect H8 DSP from the PC not disconnect H8 DSP from power temporarily disable the PC automatic stand by processes temporarily disable the PC screen saver close all running applications temporarily disable the anti virus and anti spyware systems 6 Once you have clicked on OK th...

Page 43: ...follows Save the previous setup in case you want to open it in OFFLINE mode Unplug the H8 DSP from the amplifiers Turn the H8 DSP off disconnect the power supply Set the UPGRADE MODE to ON Reconnect the power supply and turn the H8 DSP on Restart the H8 DSP PC software and select RESCUE MODE The screenshot on the right shows the Boot Loader version c urrently installed on the processor enabling th...

Page 44: ...A Master Input 95 dBA AUX Input 96 dBA Channel Separation 1 kHz 85 dB Input sensitivity Speaker In 2 15 V RMS Input sensitivity AUX In 0 6 5 V RMS Input impedance Speaker In 2 2 kΩ Input impedance AUX 15 kΩ Max Output Level RMS 0 1 THD 4 V RMS CONNECTIONS From To Personal Computer 1 x USB B DRC HE Audio controls and Memory Inputs selection Optical AUX select Optical In Aux wire control 12V GND ena...

Page 45: ...Tutte le specifiche riportate sono soggette a cambiamento senza preavviso ...

Reviews: