Procedura per l’installazione
Per l’installazione delle colonne occorre
procedere per fasi come segue. In base
alle condizioni installative scegliere il me-
todo di fissaggio delle colonne più idoneo.
❐
Fissaggio a parete
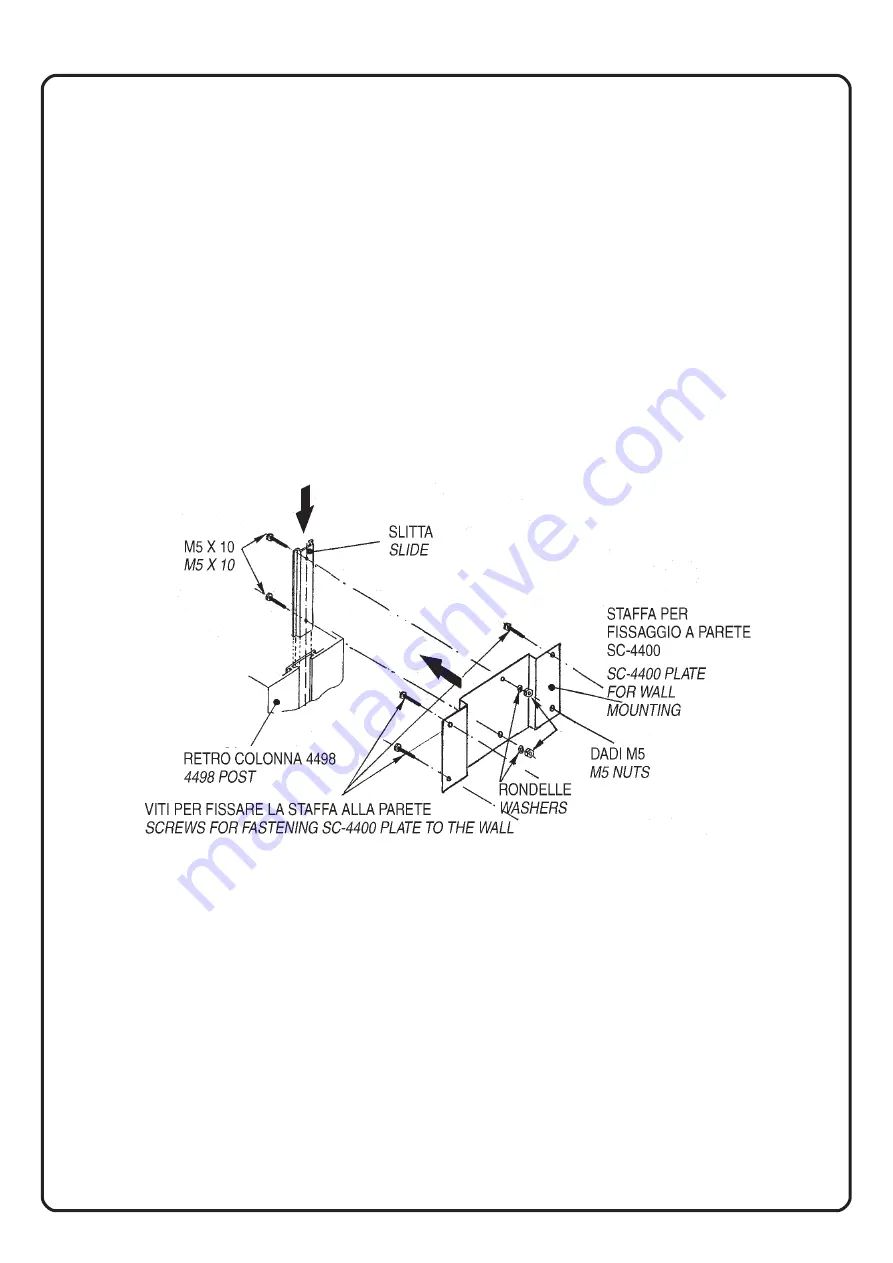
Usando due o più staffe Art. SC-4400
montate sul retro delle colonne alle due
estremità di queste, secondo la procedura
illustrata in Fig. 1 (per colonne superiori a
m 2 si consigliano 3 staffe di fissaggio).
❐
Fissaggio sul terreno
Metodo 1:
Costruendo un plinto delle di-
mensioni consigliate nella Tabella A nel qua-
le consolidare una putrella per il fissaggio di-
retto della colonna (installazione consigliata
in tutte le situazioni con forte vento e in pre-
senza di possibili vibrazioni).
Metodo 2:
Consolidando nel plinto o nel
pavimento 4 bulloni M8 su cui ancorare il
basamento Art. BC4498 (vedi Fig. 2). Que-
sto basamento è utilizzabile quando la co-
lonna non è più alta di m 1.5 o per installa-
zioni in zone esenti da venti.
Installation Procedure
Please refer to the following step-by-step
procedure to perform the installation of the
4498 Post. Depending on the specific in-
stallation site, you should select the proper
mounting procedure.
❐
Wall mounting
The installation should be performed by
using two or more SC-4400 plates mounted
on the back of the Post, according to the pro-
cedure shown in Fig. 1. Please note that for
Posts higher than 2 meters it is recommen-
ded to use three SC-4400 plates.
❐
Ground mounting
Procedure 1:
The installation should be per-
formed by building a plinth in concrete accor-
ding to the dimensions shown in Table A, in
which an I-beam should be placed by faste-
ning the Post directly to it (installation proce-
dure suggested in all critical environments).
Procedure 2:
By inserting four M8 bolts
into the plinth to fasten the BC-4498 Base
(see Fig. 2). It is recommended to use the
BC-4498 Base when the Post is less than
1.5 meters high or in environments where
wind is not a critical factor.
2
Fig. 1
Summary of Contents for 4498
Page 8: ...8 DT00464HE0703R01 ...


