background image

EN

©2021 Hestan Commercial Corporation

19

INSTALLATION 

(continued)

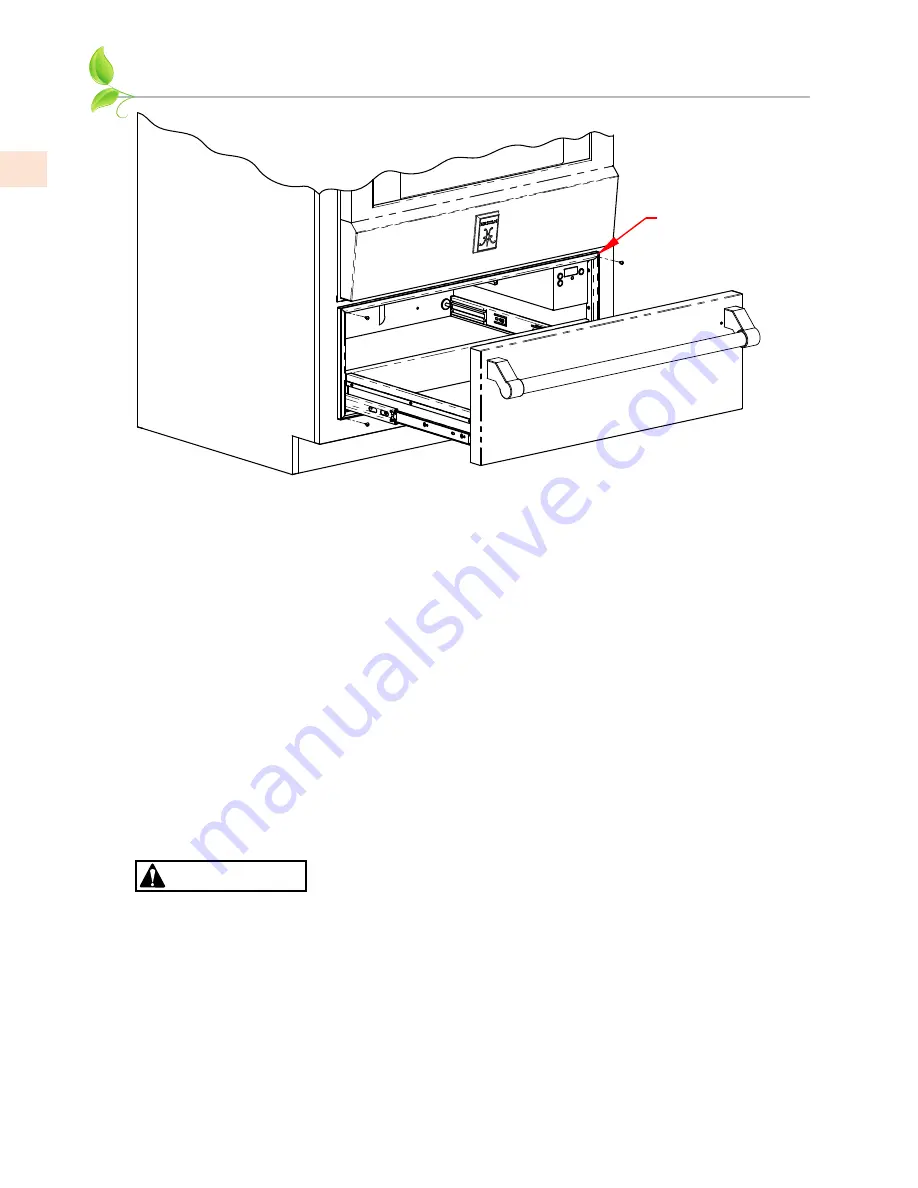
Typical indoor installation 

beneath a wall oven.

HOLES FOR

MOUNTING 

FRAME

PLACING THE DRAWER

PLACING THE DRAWER

NOTE:  The unit is heavy and requires at least two people or proper equipment to move.  Verify 

there is room to run the power cord before placing the drawer without pinching it.

1.  As shown on the previous page, the electrical outlet may be located directly behind the unit, or 

in a nearby adjacent cabinet opening.  If the plug will not be accessible after placing the unit, 

turn power OFF at the service panel.  Lock service panel to prevent power from being turned 

ON accidentally. 

2.  Run the cord through to the outlet.
3.  Position the drawer so that it is directly centered and slide the warming drawer assembly into 

the cutout until it is flush with cabinet face.

4.  Securely fasten the drawer mounting frame to the cabinet in all four corners using the wood 

screws provided.  

CAUTION

Failure to secure the warming drawer could result in the drawer moving 

or tipping during use and causing damage to the drawer or cabinets or 

personal injury.

5.  Turn the power back on or plug in the unit.
6.  Test operation of the unit (see page 9).  Observe that the interior light comes on.  Operate the 

unit for approximately 5 minutes, then check for warmth.   

7.  After verifying that the drawer is warming up, turn the unit OFF.

•  Make sure that the customer knows how to disconnect the power to the warming drawer at 

the circuit breaker or fuse box in case of an emergency.

Summary of Contents for GWD30

Page 1: ...OUTDOOR COOKING Outdoor Warming Drawer GWD Use and Care Manual Installation Instructions...

Page 2: ...GUIDANCE ALL OTHER SERVICING SHOULD BE DONE BY A HESTAN AUTHORIZED SERVICE TECHNICIAN READ THESE INSTRUCTIONS CAREFULLY AND COMPLETELY BEFORE INSTALLING OR USING YOUR APPLIANCE TO REDUCE THE RISK OF F...

Page 3: ...HESTAN OUTDOOR MOST POWERFUL VERSATILE AND RELIABLE OUTDOOR COOKING AVAILABLE...

Page 4: ...perfectionist passion Our engineers experimented innovated tweaked and tinkered until they created the most powerful versatile and reliable outdoor products available We pride ourselves on restless i...

Page 5: ...erly grounded three prong receptacle If the receptacle is not the proper grounding type contact an electrician Do not remove the grounding prong from this plug This appliance is designed to use a grou...

Page 6: ...l MODEL NO DESCRIPTION CIRCUIT BREAKER REQ D GWD30 30 Outdoor Warming Drawer 15 Amp RATING LABEL TYPICAL RATING LABEL REGULATORY CODE REQUIREMENTS Installation of this cooking appliance must be made i...

Page 7: ...not operate this appliance if it is not working properly or if it has been damaged until an authorized servicer has examined it Install or locate this appliance only in accordance with the Installati...

Page 8: ...he warming drawer is 80 lbs 36 kg Do not keep plastic containers or any flammable objects in the appliance Such objects pose a risk of catching fire once the warming drawer is turned on In the event t...

Page 9: ...eriod The metal parts have been specially treated with a protective coating that can sometimes cause odors the first time the drawer is heated These odors will quickly dissipate and should not be cons...

Page 10: ...as run out and the unit shuts down 4 Press the TIME button to cycle through the 5 preset time intervals 0 5 1 2 3 4 hours During the selection the display shows the time for 3 seconds and then returns...

Page 11: ...more than an hour to prevent it from losing nutritional value If food will be held for more than one hour it must be held at 140 F 60 C or above Cover moist food and liquids with a lid or heat resista...

Page 12: ...two hours APPLICATIONS APPLICATIONS Slow cooking is suitable for all tender cuts of beef pork veal lamb game and poultry The initial browning times and the subsequent cooking times depend on the size...

Page 13: ...ly before attempting to remove the drawer TO REMOVE TO REMOVE 1 Open drawer to its fully open position 2 Locate the black tabs on both sides of the drawer 3 Press the tab down on the right side of the...

Page 14: ...come opaque if you use any harsh cleaners If your Hestan appliance has a colored drawer panel use warm soapy water ONLY Rinse and dry thoroughly DRAWER INTERIOR DRAWER INTERIOR Use a moist cloth to cl...

Page 15: ...amp housing and pull out the old light bulb 4 Before installation it is very important to clean the new bulb carefully with a clean soft cloth or tissue paper Grease fingerprints or oils in your skin...

Page 16: ...ER DOES NOT GET WARM THE DRAWER DOES NOT GET WARM Is it turned on Is there a power outage or has the circuit breaker tripped Can you hear the fan running If the fan is running then the heating system...

Page 17: ...ructions are intended for use by a qualified installer Assure that electrical installation is adequate and in conformance with National Electrical Code ANSI NFPA 70 latest edition or Canadian Electric...

Page 18: ...ible after the drawer is installed so that the drawer can be unplugged and plugged in after installation The cord is about 47 120 cm long PREPARATION PREPARATION 1 See drawings on the following pages...

Page 19: ...ontinued 10 3 8 26 4 cm 29 5 8 to 29 7 8 75 4 to 75 8 cm 23 58 1 cm 8 1 4 20 8 cm 9 1 16 23 cm 23 58 3 cm 75 cm 29 1 2 70 7 cm 27 7 8 10 3 8 26 4 cm 24 3 4 63 1 cm 29 7 8 75 8 cm 9 1 16 23 cm 23 58 3...

Page 20: ...the cord through to the outlet 3 Position the drawer so that it is directly centered and slide the warming drawer assembly into the cutout until it is flush with cabinet face 4 Securely fasten the dra...

Page 21: ...LS CUSTOM PANEL REQUIREMENTS CUSTOM PANEL REQUIREMENTS Have a typical thickness of 3 4 19 mm Have all edges finished If using wood the back must be sealed to prevent moisture damage Be capable of with...

Page 22: ...lay panel A typical overlay panel is 3 4 19 mm thick A light pipe is supplied in the kit which helps the red indicator light on the control shine through the drawer face The light pipe may be press fi...

Page 23: ...IMIT SWITCH 120V CONVECTION ELEMENT 120V 914W OVEN LIGHT 12V 20W w w XFMR 40VA BLK WHT BLK WHT N C J2 SWITCH N BLK L N C PLUNGER DRAWER OPEN POSITION SHOWN CONVECTION FAN 120V WHT BLK BLK BLK GND GRN...

Page 24: ...RRANTY COVERS Hestan Commercial Corporation HCC warrants to the original consumer purchaser of a Hestan Indoor Cooking product the Product from an HCC authorized dealer that the Product is free from d...

Page 25: ...Limited Warranty does not cover and HCC will not be responsible for and will not pay for damage to or defects in any Product not purchased from an HCC authorized dealer color variations in color finis...

Page 26: ...or agent of HCC will create a warranty or in any way increase the scope of this express Limited Three Year Warranty If there is any inconsistency between this Limited Warranty and any other agreement...

Page 27: ...areil L installation et le service doivent tre effectu s par un installateur qualifi ou une agence de service NE PAS R PARER REMPLACER OU ENLEVER TOUTE PI CE DE L APPAREIL SAUF SI SP CIFIQUEMENT RECOM...

Page 28: ...n le gril de plein air Hestan Nos ing nieurs ont exp riment innov ajust et modifi jusqu ce qu ils aient cr les produits de plein air les plus puissants polyvalents et fiables disponibles sur le march...

Page 29: ......

Page 30: ...LECTRIQUE Important Cet appareil doit tre mis la terre conform ment aux codes locaux ou en l absence de codes locaux au National Electrical Code ANSI NFPA 70 1990 Les appareils quip s d un cordon d al...

Page 31: ...laque NO DE MOD LE DESCRIPTION DISJONCTEUR REQUIS GWD30 Tiroir Chauffant Plein Aire 30 po 15 Amp res PLAQUE SIGNAL TIQUE PLAQUE SIGNAL TIQUE TYPIQUE RESPECT DE LA R GLEMENTATION ET DES CODES EN VIGUEU...

Page 32: ...r parateur agr l ait examin Installez ou installez cet appareil uniquement conform ment aux instructions d installation Ne couvrez ni ne bloquez aucune ouverture de cet appareil Utilisez ce tiroir ch...

Page 33: ...kg Ne conservez pas de r cipients en plastique ni d objets inflammables dans l appareil De tels objets risquent de prendre feu une fois que le tiroir chauffant est allum Dans le cas o des v tements o...

Page 34: ...t sp cialement trait es avec un rev tement protecteur qui peut parfois cr er des odeurs lors du chauffage initial du tiroir Ces odeurs vont rapidement se dissiper et ne doivent pas tre consid r es co...

Page 35: ...le bouton TIME pour faire d filer les 5 intervalles de temps pr d finis 0 5 1 2 3 4 heures Pendant la s lection l cran affiche le temps pendant 3 secondes puis revient pour afficher la temp rature r...

Page 36: ...ements ne remplissez pas trop la vaisselle Disposez la vaisselle dans le tiroir et fermez le soigneusement pour viter tout d versement de liquide Il est conseill de ne pas r chauffer les aliments plus...

Page 37: ...ous voulez garder la viande chaude apr s la cuisson red marrez la commande une temp rature plus basse 100 150 F 38 65 C Les petits morceaux de viande peuvent tre gard s au chaud pendant 45 minutes et...

Page 38: ...r de retirer le tiroir POUR LE RETIRER POUR LE RETIRER 1 Ouvrir le tiroir dans sa position enti rement ouverte 2 Localisez les languettes noires des deux c t s du tiroir 3 Appuyez sur la languette ver...

Page 39: ...ilisez UNIQUEMENT de l eau chaude savonneuse Rincez et s chez soigneusement ESPACE INT RIEUR ESPACE INT RIEUR Utilisez un chiffon humide pour nettoyer l int rieur du tiroir Si l appareil n cessite un...

Page 40: ...qu sur l image ci dessous 4 Avant l installation il est tr s important de nettoyer l ampoule neuve avec un chiffon doux propre ou du papier de soie La graisse les empreintes digitales ou les s cr tion...

Page 41: ...il allum Y a t il une panne de courant ou le disjoncteur s est il d clench Pouvez vous entendre le ventilateur fonctionner Si le ventilateur fonctionne le syst me de chauffage devrait fonctionner Le...

Page 42: ...SSEMENTS Ces instructions d installation sont destin es tre utilis es par un installateur qualifi Assurez vous que l installation lectrique est ad quate et conforme au Code national de l lectricit ANS...

Page 43: ...puisse tre d branch et branch apr s l installation Le cordon mesure environ 47 po 120 cm de long PR PARATION PR PARATION 1 Voir les dessins la page suivante pour les dimensions de d gagement et de d c...

Page 44: ...LATION suite 10 3 8 26 4 cm 29 5 8 to 29 7 8 75 4 to 75 8 cm 23 58 1 cm 8 1 4 20 8 cm 9 1 16 23 cm 23 58 3 cm 75 cm 29 1 2 70 7 cm 27 7 8 10 3 8 26 4 cm 24 3 4 63 1 cm 29 7 8 75 8 cm 9 1 16 23 cm 23 5...

Page 45: ...elle 2 Faites passer le cordon jusqu la prise 3 Positionnez le tiroir de mani re ce qu il soit directement centr et faites glisser l ensemble tiroir chauffant dans la d coupe jusqu ce qu il affleure l...

Page 46: ...DU PANNEAU PERSONNALIS SP CIFICATIONS DU PANNEAU PERSONNALIS Avoir une paisseur minimale de 3 4 po 19 mm Avoir tous les bords finis Si vous utilisez du bois le dos doit tre scell pour viter les domma...

Page 47: ...ue a une paisseur de 3 4 po 19 mm Un tube optique est fourni dans le kit qui aide le voyant rouge sur la commande briller travers la face du tiroir Le tube optique peut tre ajust par pression dans le...

Page 48: ...12V 20W XFMR 40VA NOIR BLANC NOIR BLANC N C J2 N NOIR L N C TIROIR POSITION OUVERTE MONTR VENT DE CONVECTION 120V BLANC NOIR NOIR NOIR TERRE VERT CORDON D ALIMENTATION 4 Pieds 3 14 AWG SJTW BLANC BLA...

Page 49: ...valable que pour les Produits achet s chez et re us d un revendeur agr HCC dans tous les Etats Unis dans le District de Columbia et au Canada La pr sente Garantie limit e ne s applique qu aux Produit...

Page 50: ...incorrecte du Produit dommages r sultant de la r paration ou du remplacement incorrect ou sans autorisation de tout composant ou pi ce du Produit dommages r sultant d un service apr s vente assur par...

Page 51: ...que Si une disposition quelconque de la pr sente Garantie limit e est d clar e invalide ou inapplicable elle sera r put e modifi e dans la limite n cessaire pour la rendre applicable et le reste de la...

Page 52: ...mmercial Corporation 3375 E La Palma Ave Anaheim CA 92806 888 905 7463 RETAIN THIS MANUAL FOR FUTURE REFERENCE CONSERVEZ CE MANUEL POUR UNE R F RENCE FUTURE 2021 Hestan Commercial Corporation P N 0348...

Reviews: