background image

Aruba 9012 Gateway

| Installation Guide

Specifications, Safety, and Compliance |

21

Chapter 3

Specifications, Safety, and

Compliance

Aruba 9012 Gateway Specifications

Physical

Device Dimensions (without mounting brackets) (HxWxD): 3.95 cm x 26.00 cm x 4.37 cm

Device Weight: 7.54 lbs (3.42 kg)

Electrical

Ethernet

12 x 10/100/1000BASE-T auto-sensing Ethernet RJ-45 ports

6 x PoE+ ports

MDI/MDX

2 x USB A 3.0 ports

1 x Micro USB console port

1 x RJ-45 console port

Bluetooth

185 W AC Power Supply

AC Input Voltage: 100 V AC to 240 V AC

AC Input Current: 3 A at 100 Vrms

AC Input Frequency: 50 Hz to 60 Hz

Environmental 

Operating

Temperature Range: 0 °C to 40 °C (32 °F to 104 °F)

Humidity Range: 10% to 90% (RH), non-condensing 

Storage and Transportation 

Temperature Range: –40 °C to 70 °C (–40 °F to 158 °F)

Humidity Range: 10% to 95% (RH), non-condensing

For additional specifications on this product, please refer to the data sheet. The data sheet can be 

found at 

www.arubanetworks.com

Safety and Regulatory Compliance

Aruba, a Hewlett Packard Enterprise company provides a multi-language document that contains 

country-specific restrictions and additional safety and regulatory information for all Aruba products. 

Summary of Contents for Aruba 9012

Page 1: ...Aruba 9012 Gateway Installation Guide ...

Page 2: ...al Public License the GNU Lesser General Public License and or certain other open source licenses A complete machine readable copy of the source code corresponding to such code is available upon request This offer is valid to anyone in receipt of this information and shall expire three years following the date of the final distribution of this product version by Hewlett Packard Enterprise Company ...

Page 3: ...ation Steps 16 Table or Shelf Installation 17 Required Tools and Equipment 17 Installation Steps 17 Wall Mounting 18 Required Tools and Equipment 18 Installation Steps 18 Aruba 9012 Gateway Specifications 21 Physical 21 Electrical 21 Environmental 21 Safety and Regulatory Compliance 21 FCC 22 EU Regulatory Conformance 22 Wireless Channel Restrictions 23 Japan VCCI 24 Thailand 24 Regulatory Model N...

Page 4: ...4 Aruba 9012 Gateway Installation Guide ...

Page 5: ...ation The latest ArubaOS User Guide and ArubaOS CLI Reference Guide are required for the complete management of an Aruba gateway The latest documentation and the translation of this document into other languages can be found at www arubanetworks com documentation Contacting Support Table 1 Contact Information Main Site www arubanetworks com Support Site http support arubanetworks com Airheads Soci...

Page 6: ...6 Preface Aruba 9012 Gateway Installation Guide ...

Page 7: ...form your supplier if there are any incorrect missing or damaged parts To return this product repack this unit and other materials included into the original packaging before returning it to the supplier Table 2 Aruba 9012 Gateway Port Configuration Model Ports Number of APs Supported Number of Users Supported 9012 12 x 10 100 1000BASE T ports 6 x PoE ports 32 2048 The Aruba 9012 gateway requires ...

Page 8: ...g various other features These front panel LEDs provide basic monitoring information of the overall status of the Aruba 9012 gateway The following table describes the LED indicators and their corresponding status The rack mounting kit is available for use with the Aruba 9012 gateway and is sold separately Contact your Aruba sales representative for details and assistance Table 4 LED Status LED Fun...

Page 9: ...ectivity Status Blue Solid Connected to Central Blue Blinking Connecting to Central Cellular Link Status Green Solid Modem Initialized and Connected to the Network Good Signal Strength Signal Strength Threshold 65 dBm Green Blinking Modem Initializing Green Amber Greenish Yellow Solid Modem Initialized and Connected to the Network Average Signal Strength Signal Strength Threshold 65 dBm 80 dBm Amb...

Page 10: ...s the same pair is used for both data transmission and reception Figure 3 illustrates the Gigabit Ethernet port pin out for an RJ 45 connector The pins paired on a 10 100 1000Base T Gigabit Ethernet port are 1 2 3 6 4 5 and 7 8 Figure 3 Figure 3 Gigabit Ethernet Port Pin Out Ethernet Port LEDs Each 10 100 1000BASE T Ethernet port is equipped with two LEDs that allow basic monitoring of link act an...

Page 11: ...ollowing steps 1 Go to https support arubanetworks com 2 Click on the Tools Resources tab 3 Open the USB Console Driver folder 4 Open the Mobility Gateway and Mobility Access Switch folder Select the appropriate file for your application The corresponding operating system is in the file name RJ 45 Console Port The serial console port allows connecting a gateway to a serial terminal or a laptop for...

Page 12: ...USB LTE Modems These modems can be connected to either USB Port 0 and Port 1 When two modems are connected simultaneously the modem that gets registered with the device first will be in use To use the second modem Table 6 RJ 45 Console Terminal Settings Baud Rate Data Bits Parity Stop Bits Flow Control 9600 8 None 1 None Serial Console Port 1 2 3 4 5 6 7 8 TxD GND RxD RJ 45 Female Pin Out Directio...

Page 13: ... one and reboot the device After initiation the second modem gets registered and can be used The 9012 gateway provides support for two USB LTE Modems You can use only one USB LTE Modem at a time To use both modems simultaneously it is recommended to use a USB extension cable ...

Page 14: ...14 9012 Gateway Aruba 9012 Gateway Installation Guide ...

Page 15: ...ugged into an electrical outlet Remove all rings jewelry and other potentially conductive material before working with this device Never insert foreign objects into the chassis power supply or any other component even when the power supply is turned off unplugged or removed Ensure that the main power is fully disconnected from the gateway by unplugging all power cords from their outlets For safety...

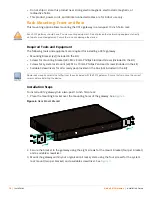
Page 16: ...table Screwdrivers for all screw types provided in the box not included in the kit Installation Steps To install a 9012 gateway into a two post 19 inch Telco rack 1 Place the mounting bracket over the mounting holes of the gateway See Figure 6 Figure 6 Rack Mount Bracket 2 Secure the bracket to the gateway using the eight screws for the mount bracket four per bracket and a suitable screwdriver 3 M...

Page 17: ... 1 Attach the rubber feet to the bottom of the gateway See Figure 8 Figure 8 Attaching Rubber Feet 2 Place the gateway in the location you have chosen Leave a minimum of 10 cm 4 inches of space on the left and right side of the device for proper air flow and ventilation Leave additional space in the front and the back of the device to access network cables LED status indicators and power cord ...

Page 18: ...chors Minimum weight rating 20 lbs 9 kg Required quantity 2 screws and 2 anchors per unit Installation Steps To install a 9012 gateway on a wall 1 Fasten the mounting brackets over the mounting holes on the sides of the gateway using the eight screws for mounting brackets four per bracket and a suitable screwdriver See Figure 9 Figure 9 Attaching the Wall Mount Brackets 2 After you have chosen a m...

Page 19: ...Aruba 9012 Gateway Installation Guide Installation 19 Figure 10 Wall Mounting ...

Page 20: ...20 Installation Aruba 9012 Gateway Installation Guide ...

Page 21: ... Input Voltage 100 V AC to 240 V AC AC Input Current 3 A at 100 Vrms AC Input Frequency 50 Hz to 60 Hz Environmental Operating Temperature Range 0 C to 40 C 32 F to 104 F Humidity Range 10 to 90 RH non condensing Storage and Transportation Temperature Range 40 C to 70 C 40 F to 158 F Humidity Range 10 to 95 RH non condensing For additional specifications on this product please refer to the data sh...

Page 22: ...er un fonctionnement indésirable de l appareil EU Regulatory Conformance The Declaration of Conformity made under RED Directive 2014 53 EU is available for viewing at http www hpe com eu certificates Select the document that corresponds to your device s model number as it is indicated on the product label Aruba gateways must be installed by a professional installer The professional installer is re...

Page 23: ...he wiring must be grounded at both ends Table 7 Frequency Range Table Frequency Range MHz Max EIRP 2402 2480 5 dBm Il y a danger d explosion s il y a remplacement incorrect de la batterie Remplacer uniquement avec une batterie due même type ou d un équivalent recommandé par le constructeur Mettre au rebut les batteries usagées conformément aux unstruction du fabricant The battery supplied with thi...

Page 24: ...cal and Electronic Equipment WEEE European Union RoHS Aruba a Hewlett Packard Enterprise company products also comply with the EU Restriction of Hazardous Substances Directive 2011 65 EU RoHS EU RoHS restricts the use of specific hazardous materials in the manufacture of electrical and electronic equipment Specifically restricted materials under the RoHS Directive are Lead including Solder used in...

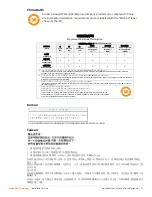
Page 25: ... O O O O O 㒘ઙ Mechanical Subassembly X O O O O O Ḯㅎ ེ Power Adaptor X O O O O O O 䆹 Ქ ኂ 䋼 䆹ㇱઙᚲ ဋ䋼 ᢱਛ ဋ SJ T11363 2006 ಎ㾘ቯ 㒢 ⷐ એਅ ޕ This component does not contain this hazardous substance above the maximum concentration values in homogeneous materials specified in the SJ T11363 2006 Industry Standard X 䆹 Ქ ኂ 䋼 ዋ 䆹ㇱઙ ᨱ ဋ䋼 ᢱਛ SJ T11363 2006 ಎ㾘ቯ 㒢 ⷐ ޕ This component does contain this hazardous substa...

Page 26: ...т Аль Фараби 77 7 Телефон факс 7 727 355 35 50 Kazakhstan ЖШС Хьюлетт Паккард Энтерпрайз Ресей Федерациясы 125171 Мәскеу Ленинград тас жолы 16A блок 3 Телефон 7 499 403 4248 Факс 7 499 403 4677 HEWLETT PACKARD Bel ЖШС Беларусь Республикасы 220030 Минск қ Интернациональная көшесі 36 1 Телефон факс 375 17 392 28 20 ЖШС Хьюлетт Паккард К Қазақстан Республикасы 050040 Алматы к Бостандык ауданы Әл Фара...

Reviews: