The SR series of amplifiers offer impressive specifications and features, the case is ruggedly constructed from steel
and rack mountable for versatility. All feature two channels, Switched Mode Power Supply and are suitable for live
concert, disco, studio etc.
The front panel includes gain controls for each channel, these are normally illuminated green, but turn to red when
the associated channel clips. Indicators for protection, signal activity, mode and clip, as well as a mains power rocker
switch and illuminated HH Logo complete the line up.
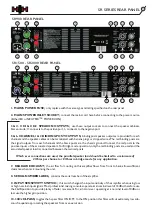
The rear panel carries all of the input & output connectors and slide switches for the selection of Mode, Input
Sensitivity and Hi-Pass filter. The mains cord is attached here either with a Neutrik
Powercon or IEC
Connector depending on the model.
This manual contains important information on operating your amplifier correctly and safely. Please take some
time to read this manual to familiarise yourself with the advanced features of this amplifier.
™
?
?
Unpacking
Inspect the amplifier during unpacking, if any damage is found, notify the dealer immediately. Be sure to save the
carton and all packaging materials. Should you ever need to return the unit back to the dealer or HH Electronics,
use only the original factory packing.
Installation
HH professional amplifiers are designed for durability in commercial installations and provide the quality
performance required in studio and live performance applications. They are 2U rack height, with 360mm depth,
designed to mount in a standard EIA 19" rack. Rear mounting ears are provided for additional support. The
minimum depth required in the rack space is 430mm (to allow adequate clearance for the connectors). When
using the equipment in a rack, consideration should also be given to cooling. The air flow through the unit from
front to back should not be obstructed or hindered in any way, so adequate ventilation in the front and rear of the
rack cabinet is important.
Basic Setup
Rack mount the amplifier in the location where it is to be used, with consideration to accessibility, cooling etc.
Make all the connections to the input connectors on the desired channels. Select the mode configuration (Bridge,
Parallel or Stereo). Connect speaker cabinets to the required output connectors, paying attention to the
impedance and phase.
With the power switch OFF and both gain controls set in their lowest position (-0
dB), connect the mains power
cord to the amplifier, then to a suitable electrical source to allow proper current draw. The amplifier is now
electrified and on standby status, there is no indication on the amplifier that there is power connected.
Turn ON the power switch, the HH logo, gain controls and the protection indicators are all illuminated, the
amplifier will now selftest automatically for around 10 seconds. The protection indicators will go out when the test
is finished.
Now the gain controls can be raised slowly to the desired settings.
Switching Off
After using the amplifier, please adjust the gain controls to their lowest settings (-0
dB), then the amplifier can be
turned off safely. Turn the power switch to the OFF position and remove the power cord from the electrical
source.
NOTE:
Do not connect or disconnect from the input signal source when the amplifier is turned ON, damage could occur
to the amplifier and the speaker.
When the amplifier is connected to the power supply, power is present inside, even in standby mode where the
power switch is in the OFF position.
If the amplifier is in standby mode without use for over 3 hours, remove the power cord from the electrical source.
INTRODUCTION
Summary of Contents for SCALAR SR Series
Page 1: ...PROFESSIONAL POWER AMPLIFIER WWW HHELECTRONICS COM...
Page 18: ...NOTES...
Page 19: ...NOTES...
Page 20: ......


