background image


Declaration of conformity with the 

Machinery Directive 2006/42/EC


We 

…………………


…………………


……………

hereby declares that the loader crane: 

Mark: 

…………

.. 

Type: 
 Serial number:


……………..


.

………………


Manufact. year:


…………


complies with the provisions of the machinery 
directive 2006/42/EC; 


also complies with the provisions of  the 
directive on electromagnetic compatibility 
2004/108/EC as amended. 

Technical file in accordance with Directive 
2006/42/EC, Annex VII A is compiled by: 

Name:


……………………

.


Address:


..............................


……………………

This declaration is drawned up by:


Name 

……………………


Position 

……………………

..  


xxxxxxxxxxx


xxxxxxxxxxx


10

Knowledge required

Operator's Manual GB

1.3

1.3

The Machinery Directive
2006/42/EC

• The Declaration of Conformity, delivered

with the crane contains

:

• Business name and full address where the

crane is manufactured

:

Factory addresses:

Hiab Cranes S.L.U. Pol. Ind. Malpica, calle
E, 86 50016 Zaragoza, Spain

Cargotec Poland Sp. z o. o. Ul. Metalowa 2,
73-102 Stargard, Poland

• Description and identification of the loader

crane

:

Mark

Type: see chapter Identification of the crane.

Serial number

Manufact. year

Declaration of which provisions the loader
crane fulfils.

• Name and address of the person authorised to

compile the technical file

:

Name

Address

• Identity and signature of the person who

drawn up the declaration

:

Name

Position

Date and Signature

Summary of Contents for HIAB T-HiDuo 013 CE

Page 1: ...erator s manual is an Original Instruction and applies for cranes from serial number BL013000001 BL018000001 BL023000001 BL029000001 BL038000001 2016 04 Operator s Manual GB HIAB T HiDuo 013 018 023 029 038 CE ...

Page 2: ... handle your crane safely and with full satisfaction Please read the complete manual It provides detailed information about the crane control system and the practical management and maintenance of the crane We advise you to read it carefully and familiarize yourself with your crane before you start to use it Help us to improve this manual Please send your comments and suggestions to documentation ...

Page 3: ...erating system hydraulic components 15 2 9 LHV Load holding valves 15 2 10 Description of HIAB T HiDuo 013 018 023 029 038 16 3 Safety precautions and warnings 17 3 1 Operating conditions 17 3 2 Definition of a HIAB loader crane 18 3 2 1 Noise declaration 19 3 2 2 Warning signs 20 3 2 3 Maximum load 20 3 2 4 Maximum load moment 23 3 2 6 Determination Hoist 25 3 3 Signals when using a crane 25 3 4 ...

Page 4: ...oller 51 4 14 Functions in XSDrive Lite 52 5 Starting crane operation 54 5 1 Starting operations 54 5 2 Extend stabiliser extensions and set stabiliser legs 56 5 3 Operate the crane out of parked position 59 6 During operation 60 6 1 OLP Overload protection 60 6 2 Manual extensions option 61 7 Change from hoist to hook operation 64 7 1 Change from hoist to hook operation 64 8 Ending crane operatio...

Page 5: ...4 1 Lubrication schedule 85 9 4 2 Lubrication of the column bearings 86 9 5 Hydraulics 86 9 5 1 Replacing the cartridge in return oil filter 86 9 5 2 Checking the oil tank level 87 9 5 3 Changing the hydraulic oil 87 9 5 4 Hoist gear top up or exchange oil 90 9 5 5 Bleeding air from the hydraulic system 91 9 6 Troubleshooting 93 9 6 1 Main fuses 93 9 6 2 Faults on the crane 94 9 6 3 Faults in the ...

Page 6: ... not study the complete Operator s Manual for your crane carefully it could lead to fatal accidents or serious damage Therefore you should Study the entire Operator s Manual carefully Study the operating manuals for other add on equipment if fitted Use the crane only after having done so Follow the directions for use operation and maintenance of the crane and add on equip ment exactly Store the Te...

Page 7: ...o the Equipment the Information The Customer shall not in any way remove or alter the System nor interfere with the use of the System or the Information The System and the Information and all their further developments shall at all times be and remain the exclusive property of HIAB without granting any right or license to the customer 1 2 Indications in the Operator s Manual What must you do and n...

Page 8: ...reference to a component in an illustration Refers to a component in an illustration option Indication for parts that are not standard for the crane but are an option DANGER Only persons with the requisite knowledge and experience with cranes may use the crane Never operate the crane when you are sick tired under the influence of medicines alcohol or other drugs Take the delivery instructions from...

Page 9: ...be performed by personnel in a HIAB service workshop WARNING Never clean the electronic system plastic components signs or bearings with a high pressure jet cleaner It could cause damage Never expose the electronic system to high electrical voltages This could damage the safety system Never immerse the controller in water or other liquid This will make the controller unusable If your crane is equi...

Page 10: ...d Operator s Manual GB 1 3 1 3 The Machinery Directive 2006 42 EC The Declaration of Conformity delivered with the crane contains Business name and full address where the crane is manufactured Factory addresses Hiab Cranes S L U Pol Ind Malpica calle E 86 50016 Zaragoza Spain Cargotec Poland Sp z o o Ul Metalowa 2 73 102 Stargard Poland Description and identification of the loader crane Mark Type ...

Page 11: ... Manual GB 1 3 1 1 3 1 Identification of the loader crane The information below is to be filled in by the installer The same information will be found on the serial number plate on the crane Mark HIAB Type Serial number Manufact year ...

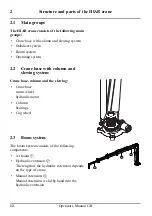
Page 12: ... Operating system 2 2 Crane base with column and slewing system Crane base column and the slewing Crane base worm wheel hydraulic motor Column bearings Cog wheel 2 3 Boom system The boom system consists of the following components 1st boom Hydraulic extension The length of the hydraulic extension depends on the type of crane Manual extension Manual extension is slid by hand into the hydraulic exte...

Page 13: ...om system consists of the following components 1st boom Hydraulic extensions The length of the hydraulic extension depends on the type of crane Hoist option Sheave block option The sheave block must only be attached to a hydraulic extension Never to a manual exten sion Counterweight option Hook option ...

Page 14: ...rate lifting accessories option Separate lifting accessories help to make or use a slinging device eye hooks shackles eye bolts etc 2 7 Stabiliser leg system Every truck mounted HIAB crane has a minimum of one stabiliser leg Auxiliary stabilisers may be needed for heavy cranes Stabiliser beam Stabiliser extension Stabiliser leg Stabiliser leg locking device Stabiliser extension locking device Supp...

Page 15: ...er extension cylinder s filter s 2 9 LHV Load holding valves The cylinder is equipped with a load holding valve After a crane movement it holds the crane in position If there is a leak or a component fractures such as a pipe hose or a coupling the load holding valve will stop the boom from collapsing down even when the hydraulic system is switched off and you operate a particular crane function To...

Page 16: ...AB T HiDuo 029 approx 2 8 tonne metres HIAB T HiDuo 038 approx 3 6 tonne metres The cranes are supplied in versions from HIAB T HiDuo 013 1 reach 2 metres to HIAB T HiDuo 013 3 reach 4 2 metres Note VSL is not available on Hiab T HiDuo 013 HIAB T HiDuo 018 1 reach 2 metres to HIAB T HiDuo 018 3 reach 4 2 metres HIAB T HiDuo 023 2 reach 3 4 metres to HIAB T HiDuo 023 3 reach 4 4 metres HIAB T HiDuo...

Page 17: ...npredictably Never use the crane during a thunderstorm Never use the crane at temperatures below 40 C 40 F as the steel s properties deteriorate below this temperature WARNING At temperatures below 0 C 32 F Do not touch the operating levers during the first few minutes When starting in cold weather the wear on the hydraulic system is greater than at normal working temperatures To minimise wear the...

Page 18: ...i cle Lifting of loads from the ground vehicle to a higher place Installation work beams concrete plates windows in building constructions Lifting construction material wall boards bricks blocks on a pallet fork to a build ing taking the material from the vehicle on which the crane is mounted from another vehicle or from the ground Hoisting e g beams concrete plates and any other material and equi...

Page 19: ... noise may be taken as general and conservative values for ordinary installations of loader cranes on normal diesel engine powered trucks Declared dual number noise emission values in accordance with ISO 4871 Emitted A weighted sound power level for basic loader cranes in accordance with ISO 3744 LwA 103 dB Uncertainty KwA 2 dB Emitted A weighted sound power level for loader cranes with hoist in a...

Page 20: ...essed in kNm or tm This lifting capacity is also known as the load moment The lifting capacity is the payload at hook multiplied by the outreach in metres that the crane can operate at different positions The lifting capacity of your crane determines the maximum load your crane may lift within its working zone However take careful note the greater the operating radius of the crane the lower the li...

Page 21: ... accesso ries the load you can lift is less heavy Load plate You will find the load plate on the boom system On the plate is the maximum weight that you may lift at a given reach with the 1st boom in the optimum position In chapter Technical Data in this manual you will find these values for your crane Optimum position The weight that your crane can lift will be determined by Stabiliser extensions...

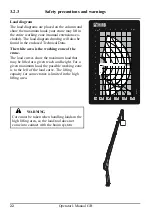
Page 22: ...he load diagram drawing will also be found in the enclosed Technical Data The white area is the working zone of the crane The load curves show the maximum load that may be lifted at a given reach and height For a given maximum load the possible working zone is to the left of the load curve The lifting capacity for some cranes is limited in the high lifting area WARNING Care must be taken when hand...

Page 23: ...ing capacity the OLP gives a warning and locks any crane movement that will increase the load moment This is known as an OLP situation If the first boom is raised then the following movements are locked first boom down up extension boom out If the first boom is downward then the following movements are locked first boom up extension boom out ...

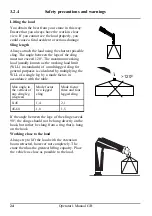
Page 24: ... standards of a multilegged sling for general purposes is calculated by multiplying the WLL of a single leg by a mode factor in accordance with the table Max angle to the vertical of any sling leg degrees Mode factor two legged sling Mode factor three and four legged sling 0 45 1 4 2 1 45 60 1 0 1 5 If the angle between the legs of the sling exceeds 90 the slings should not be hung directly on the...

Page 25: ... regulations as well as of the safety notes Passenger transport with a m hoists is forbidden The use as determined also includes the related equipment manufacturer s recommendations re garding installation operation and maintenance Machine safety is guaranteed only if it is used for its intended purpose and according to instructions in this manual 3 3 Signals when using a crane DANGER If it is not...

Page 26: ...d Lower Arm pointing downwards and index finger down Circular motion with hand Stop all crane movements Also Hold the load in position Raise the open hand with the palm clearly visible and arm at shoulder height Keep the hand still Emergency stop for all movements by the crane Raise the hands and the arms to an oblique angle ...

Page 27: ... hands may be held either horizontally or vertically The next movement may be Lift lower move the lifting gear change the reach or turn Change the reach Signal with your hands Sideways movement outwards with both hands Thumbs outwards Sideways movement inwards with both hands Thumbs inwards Turn in the direction indicated Indicate the direction with the hands ...

Page 28: ... begin to move over the ground 5 8 0 10 7 Fairly strong wind Small leaved branches make swaying movements crested waves form on lakes and canals 6 10 8 13 8 Strong wind Large branches move you can hear the wind whistling in telephone wires umbrellas can only be held with diffi culty 7 13 9 17 1 Severe wind Entire trees move the wind causes difficulty when you walk into it 8 17 2 20 7 Stormy wind T...

Page 29: ...he ground is not undermined Look out for sewers cellars excavations etc The stabiliser legs must not be able to sink in Use support plates that are large and firm enough for your crane The plates must not bend under load Check that the support plate as it comes under load is not pushed into the ground Ensure you can see the stabiliser legs and stabiliser extensions when you are operat ing them Do ...

Page 30: ... legs while the crane has a load WARNING Use low force when placing the stabiliser legs on the ground Do not raise the vehicle with the stabiliser legs if the crane is equiped with only two stabiliser legs If you raise the vehicle with the stabiliser legs this may damage the stabiliser legs Check that the add on lifting accessories and separate lifting accessories are in good order Add on lifting ...

Page 31: ...d in front of the boom system when operating the crane out of parking position 3 5 1 Preparations for use DANGER Ensure that there are no unauthorised persons within the operating range of your crane TIP Mark out the working range e g with cones Put on your vehicle s warning lights ...

Page 32: ...lines Voltage V Minimum distance to an insulated conductor Minimum dis tance to an un insulated con ductor 500 V 0 5 m 2 m 500 40000 V 1 5 m 4 m 40000 V 2 0 m 6 m Voltages are found up to 500 V to buildings 500 40000 V trams trains over 40000V power transmisson Crane operation DANGER You remain responsible for safe use of the crane Therefore always work according to the oper ating instructions In ...

Page 33: ...te have someone else give you signals See the list of signals Make certain that you and the person assisting you know these signals Pay attention to the safety of the person giving the signals Never move the vehicle if you have a freely suspended load on the crane Never walk or stand under a suspended load During operation never stand below the boom system or load Never slew at full speed to the f...

Page 34: ... working with loads in restricted spaces for example windows Check that the boom system can move up and down freely The boom system will bend somewhat when loading and unloading the crane If the boom system is in a high position first boom above 70 do not allow the boom to lower at full speed The crane could go into anuncontrolled movement Be careful if in particular the OLP gives an early warning...

Page 35: ...k Make sure the stowed crane can not hit bridges tunnels etc Pay attention to overhead power lines Make sure that no part of the crane ever comes in contact with overhead power lines 3 5 4 Ending crane operation DANGER Always end crane operation as follows After use always place the crane in the transport position Withdraw the stabiliser legs and stabiliser extensions Check that the locking mechan...

Page 36: ...ing hoist operation the rope must not be pulled off the hoist drum completely The hoist safety system is fitted with an automatic system to prevent that Three safety windings will all ways remain on the drum WARNING The counterweight should not touch the sheave block As a safety measure distance A between them should preferably not be less than a visible gap to allow getting out of an overload sit...

Page 37: ...he load should not swing excessively Max permissible swing angle pendulum angle e g 20 If the load starts to swing it shall be stabilized and return to a calm state especially in the last 1 5 2 meter towards the sheave block The swing amplitude increase exten sively while the counterweight approach the sheave block DANGER When using the hoist follow the instruc tions carefully Watch out for hazard...

Page 38: ...ever try to adjust lifting accessories when you are working on the crane After the lifting accessories have been fitted 1 Check that the lifting accessories are securely fixed 2 Only after this should you use your crane WARNING Clean the couplings when connecting and disconnecting lifting accessories Dirt can damage the hydraulic system Take care that your fingers are not trapped 3 8 Use of demoun...

Page 39: ...39 Safety precautions and warnings Operator s Manual GB 3 8 WARNING Take care when mounting demounting the crane on off the vehicle Roughly handling can seriously damage the crane or the vehicle ...

Page 40: ...s are standard others are options If you do not use the system for 30 minutes it will switch itself off in order to prevent draining the truck battery This feature can be cancelled Contact your HIAB service workshop 4 2 How the safety system works On the crane there are various sensors and indicators which send signals about the crane s load position and movements to a central micro processor The ...

Page 41: ...ed completely DANGER Never try to repair the control system yourself Repairs may only be made by a HIAB service workshop 4 3 Components of the SPACE 4000 Safety System Control valve The crane can be operated from the main control valve but as soon as you have selected remote control operation it is impos sible to operate the main control valve levers User Interface Microprocessor This is the user ...

Page 42: ... control the crane There is also an emergency stop button on the controller Warning lamp A warning lamp on each stabiliser leg is used to warn the surrounding about ongoing activ ity by amber light indication A warning lamp also gives information to the operator about the different statuses of the crane System ON the warning lamps light up Remote control ON the warning lamps blink 90 of maximum pe...

Page 43: ... function corresponds to the extent of the lever movement as long as the oil flow is sufficient When the oil flow is insufficient one or more functions will stop Control valve lever function Slewing First boom Extension boom Stabiliser leg Stabiliser leg Remote control lever function ...

Page 44: ... active in this configuration Button For OLP release if the crane is in an OLP situation and for disconnecting the automatic dump function Stop button When the button is pressed all crane func tions are stopped To release turn the button clockwise Button Sounds the horn Button Activates OLP for manual extensions Button Activates the remote controller ...

Page 45: ... Release Red light blinking OLP Release active crane VSL or stabiliser leg Green light flashing Critical error Manual extensions Green light on Manual extension mode is active Remote control Green light on Remote control is active Green light flashing Button for remote control has been pressed waiting for connection to hand unit Red light on Radio interference Parking control Blue light on Slew is...

Page 46: ...Green light on Stabiliser leg set Red light on OLP stabiliser leg Stability sector Red light on 0 19 stability LED off 20 69 stability Yellow light on 70 89 stability Green light on 90 100 stability Cylinder pressure 1 of 4 green light on 50 pressure 2 of 4 green light on 70 pressure 3 of 4 red flashing light 90 pressure 4 of 4 red light on 100 pressure 4 of 4 red flashing light OLP release activa...

Page 47: ...Repeat for full speed Channel shift Press to change radio channel There are 12 channels in total Stop button When the button is pressed all crane functions are stopped To release turn the button clockwise Locking the controller 1 Ensure that the stop button is pressed 2 Press both arrows on the toggle button at the same time while releasing the stop button 3 The four LEDs flash simultaneously abou...

Page 48: ...l the 1st boom diodes will light red OLP Release Red light on OLP Red light blinking OLP Release Cylinder pressure LEDs Lower LEDs green light on 70 of maximum pressure Lower LEDs red light flashing 90 of maximum pressure Lower and upper LEDs red light 100 of maximum pressure Hoist LED Red light flashing 90 of maximum pressure Red light on 100 of maximum pressure Low speed Green light on Low speed...

Page 49: ...ery provides approx 5 8 hours use at 25 C 77 F Indicator light on the controller burns steady red when the battery becomes weak and the horn will also sound twice Push the stop button before changing the battery Button Pushing the button once changes to the next channel WARNING When the stop button on the controller is pulled out the controller is not to be used closer to the crane truck than 1 0 ...

Page 50: ...tinuous charging Operating ambient temp Battery 0 to 45 C A charged battery The voltage level of a fully charged battery is approximately 8 4V and it provides about 5 8 hours working time Note that the battery voltage remains between 7 6V and 7 5V for a long time Therefore the battery voltage cannot be used to estimate the working time NOTE A charged battery is a concentrated energy source Never s...

Page 51: ...13 Locking and unlocking the con troller Locking the controller 1 Ensure that the stop button is pressed 2 Press both arrows on the toggle button at the same time while releasing the stop button 3 The four LEDs flash simultaneously about 5 seconds The controller can not be operated 4 Press the stop button Unlocking the controller 1 Ensure that the stop button is pressed 2 Press both arrows on the ...

Page 52: ...r button all levers must be in neutral NOTE The crane speed will depend upon the crane functions you are using and how many crane functions you operate at the same time Supervision of spools If a valve spool movement is greater than the equivalent lever movement on the controller a safety function is tripped and all crane move ments stops This occurs if a control lever on the valve is moved while ...

Page 53: ...it The VSL function detects the position of the stabiliser extensions and that the stabiliser legs are pressed to the ground This optimize the crane lifting capacity in relation to the vehicle s stabil ity NOTE VSL function is not available on cranes with manual stabiliser legs ...

Page 54: ...lination unintentional crane movements can occur Particular case Working with boom sys tem beyond 60 To avoid side deflection and in order to guarantee the safest operation when working with e g hoist applications the vehicle has to be completely levelled in any direction NOTE Operating the crane in to and out of parking position must also be done with the vehicle completely levelled Activate the ...

Page 55: ...ore start up To start the safety system press the On Off button The LED above the button lights up The system will check itself 2 4 seconds The warning lamps on the stabiliser legs light up XSDrive Start the remote control Fasten the controller 1 Fasten the controller to a waist belt or shoulder neck strap in the most comfort able operating position 2 Press the remote control button 3 Release the ...

Page 56: ...d without lifting the wheels off the ground NOTE For cranes with VSL the stabiliser leg downward movement is automatically stopped when pres sure to the ground is sufficient To operate the stabiliser legs further downward move the lever once again WARNING Take care not to lower the stabiliser leg to your foot DANGER Check that the support plates do not bend or sink into the ground WARNING Always e...

Page 57: ...tabiliser extension and lock with the handle Place the leg on the ground 1 Remove the locking pin and place it in one of the holes to get a suitable height 2 Turn the handle upwards to make small adjustment of the height Lock this position by turning the handle down Repeat for the the stabiliser extension and leg on the other side of the vehicle ...

Page 58: ...om transport position Unlock the stabilis er leg with the handle and make sure that you have full control of the movement to avoid risk of crushing 3 Lock the stabiliser leg with handle 4 Extend the stabiliser extension minimum 300 mm on crane side and lock with the handle 5 Place the stabiliser leg on the ground Repeat for the the stabiliser extension and leg on the other side of the vehicle NOTE...

Page 59: ... 3 5 3 Operate the crane out of parked position 1 Raise the first boom 2 Slew the crane to working position The crane is ready for use NOTE As soon as you have selected remote control operation it is impossible to operate the main control valve levers ...

Page 60: ...mp on the stabiliser leg will flash twice and the cylinder pressure LEDs will light continuous ly OLP stabiliser system If a stabiliser leg is overloaded slewing is stopped in the direction towards the stabiliser leg where the OLP occurs The crane stops The LED on the user panel for the overloaded stabiliser leg light red Move the levers to neutral and only operate permitted load reducing function...

Page 61: ...allowed function at a time can be operated Extension out cannot be operated The cylinder pressure LEDs and the lamp above the button flash red OLP End of stroke operation automatic OLP disconnect If a boom cylinder reaches its end position while lifting the cylinder may reach the OLP limit and SPACE will interpret this as an overload In this case SPACE will calculate the pressure increasement over...

Page 62: ...g the stop button 3 Turn the locking device 90 degrees clockwise and pull it out 4 Extend the manual extension fully by hand and secure it by turning the locking device back DANGER Make sure that the locking device is properly locked Each manual extension has a sign for the maximum load that can be handled Do not lift loads heavier than the values stated on the hook attachment To lift heavier load...

Page 63: ... device is properly locked Activate and de activate OLP for manual ex tensions WARNING You must switch the OLP on and off manually for additional manual extensions Activate Push buttons and on the controller or on the user panel The manual extensions are now included in the OLP protection The lifting capacity will be reduced automatically The lamp for lights up on the user panel De activate Push t...

Page 64: ...izontal position 1 Unwind the rope until the counterweight touch the ground and rope is without tension 2 Detach the sheave block from its bracket and the block bracket from the hook attachment 3 Open the sheave block and remove the rope 4 Store small parts secure in a safe place pins washers etc 5 Set up the rope using the roll ...

Page 65: ...ator s Manual GB 7 1 6 Wind the rope until the counterweight is about 30 cm from the role 7 Attach the shekel to the loop at the edge of the hoist 8 Wind the rope until it settles on the roll with slight tension 9 Install hook on last extension ...

Page 66: ...sions completely 2 Fold in the hook 3 Lower the first boom to parking position 8 2 Placing the stabiliser legs in the transport position Activate stabiliser leg operation DANGER Do not stand in the stabiliser legs tilting area WARNING Do not put your foot on the support plate DANGER Always ensure that the stabiliser legs and the stabiliser extensions are in transport position and securely locked ...

Page 67: ...leg 1 Turn the handle upwards and remove the locking pin 2 Rise the leg and lock it with the locking pin 3 Unlock the handle and retract the stabi liser extension 4 Lock the handle and check that the catcher is secured Repeat for the stabiliser extension and leg on the orher side of the vehicle ...

Page 68: ...3 Lock the stabiliser leg with the handle 4 Unlock the handle Retract the extension and lock with the handle Check that the catcher is secured Repeat for the stabiliser extension and leg on the other side of the vehicle 8 3 Switching off the safety system Switch off the safety system with the button If you are using the remote controller Press the stop button on the controller and switch off the s...

Page 69: ...seal wire has been broken 1 Break the security sealing on the dump valve 2 Press button and turn 90 degrees until it is blocked 3 Operate the crane to parking position using the levers on the main control valve 8 5 TWI Transport warning inter face WARNING If you switch off the control system when manual operated stabiliser extensions tiltable stabiliser legs are not locked in the transport positio...

Page 70: ... be silenced by an acknowledgement button option or by a signal indicating that the parking brake of the vehicle is engaged The vehicle must not be moved 1 Switch the system on and operate the crane into transport position 2 Switch off the system The vehicle may be moved DANGER After use always put the crane into the transport position When you have to park the boom on the load space or over the l...

Page 71: ...t drill into the crane yourself Drill ing work on the crane may only be carried out by or in close consultation with a HIAB service workshop Never try to reinstall the crane Only a HIAB Dealer may reinstall the crane Before carrying out any welding on the vehi cle Disconnect the power between the vehicle and the crane Contact the vehicle manufacturer After welding on the vehicle Connect the power ...

Page 72: ...n the power supply has been switched off Always contact a HIAB service workshop Deal with an oil leak as follows 1 Rest the crane on the floor or on the truck platform 2 Switch off the operating system 3 Disengage the PTO 4 Leaking coupling Tighten the coupling with a spanner If tightening does not help contact a HIAB service workshop 5 Small leak on a line or hose Determine if you can still park ...

Page 73: ...s WARNING Ensure that faults in the crane are cor rected immediately Never correct faults yourself that may only be corrected by a HIAB service workshop Carry out yourself only the service and maintenance work you have the requisite knowledge and experience of If the crane is not be used for 1 month or longer Lubricate the crane thoroughly according to the lubrication schedule Park the crane in th...

Page 74: ...lly from side to side while watching the shaft Demount the screws and the cover to check the play The worm shaft must not show any sign of axial movement If the worm shaft must be tightened the safety screw must be loosened before the nut can be tightened Tighten the nut to extinguish the play Check the worm drive at regular intervals Hoist At the regular inspection of the crane a test load has to...

Page 75: ...the Stop buttons are undamaged and working properly Hooks Before every lift Check general condition of the hook and parts of the hook for deformation and surface damages with significant depth Check for damage to the hook structure e g any formation of cracks Check that the latch closes entirely Check that the shaft and the locking pin are in place Check that the plane bearing or the swivel are in...

Page 76: ...oothly Check that the levers return to neutral posi tion Electronic components Check that these are in good condition LED test To do the test 1 Press the ON OFF button for at least 2 sec The test is activated and all the red LEDs are illuminated 2 Release the button After 3 sec all the green the LEDs are illuminated The test is finished when all LEDs is extinguished Crane structure Check for damag...

Page 77: ... tachment points Maintain all add on equipment auxiliary equipment etc according to the instructions supplied with it 9 3 2 Monthly inspection and mainte nance In addition to the daily inspection carry out the following each month Piston rods In cases where the cylinder piston rod is exposed to pollution due to the parking location the chromed surfaces must be cleaned and oiled to prevent corrosio...

Page 78: ...ion Lubrication schedule Carry out the lubrication according to the instructions Hydraulic system Check that the hydraulic pump attachment screws are tightened Check if the oil in the hydraulic system needs to be changed Add on equipment etc Maintain all add on equipment auxiliary equipment etc according to the instructions supplied with it Hoist Visual control of pressure roller ...

Page 79: ...y out the following maintenance at least once a year Hydraulic oil Change the hydraulic oil Or have it tested by a workshop or specialist Hydraulic system oil tank filler cap Change the oil tank filler cap Replace filters NOTE If the crane is being used in hot climates the oil might need to be changed more often Hoist Change the gear oil in the drum Inspect the braking system ...

Page 80: ...e nominal diameter by more than 10 corkscrew type deformation kinked rope contrac tioned rope flattening rope loop formation of wires on the rope knots on the rope splicing on the rope basket formation on the rope loose wires in the rope individual wire breakages WARNING A rope has to be discarded when there are number of ruptures in the outer layers according to DIN 15020 ISO 4309 2 ruptures on a...

Page 81: ...ting resistant rope cross lay to the right Always use HIAB original rope hoist type rope Ø mm possible hoisting force kN 1st layer 2nd layer 4th layer TC1 8 11 5 9 5 TC2 TC2L 10 24 18 TC3 14 12 39 39 30 xx TC5 14 16 54 54 43 xx BR05 6 5 7 4 9 NOTE When choosing a rope under all circumstances the standards of the country of the user have to be noted This applies especially for the permitted loading...

Page 82: ...ments keep at least 2m distance from the hoist drum Make sure to keep your fingers and cloth ing out of the way of the moving hoist parts Removal a Remove the load hook counterweight and damper from the hoist rope Pressure roller spring arm lock c Lock the spring arms of the pressure roller by pushing a pin into the two openings indicated d Spool of the old rope until the last 4 safety windings ar...

Page 83: ...ll the hoist rope from underneath the rope clamps g Pull the old rope completely away from the drum h Bundle it and discard Mounting a Lock the spring arms of the pressure roller by pushing a pin into the two openings indicated b Pass the end of the hoist rope outward through the slot on the drum plate c Pass the rope under the two clamps located by the two pins d Fix the rope with the two clamps ...

Page 84: ... rope is spooled evenly on the drum g Mount the counter weight and hook 9 4 Lubrication WARNING Follow the lubrication schedule exactly If you not do so there may be serious damage to the crane and to add on equipment Type of grease Use lithium based grease containing EP additives consistencies 2 and 3 are recommended depend ing on the climate Recommended greases BP LS EP 2 ESSO UNIWAY EP2 N AGIP ...

Page 85: ...GB 9 4 1 9 4 1 Lubrication schedule Lubricate after every 16 hours of use SG 02 94 p n 55135 Lubricate after every 50 hours of use Lubricate after every 50 hours of use If the loader is not to be used for some time all points should be lubricated ...

Page 86: ...t the person lubricating the bearings does not come into contact or get crushed by the crane If you are lubricating the column bearings without help Lubricate the bearings with a little grease Slew the crane a little Again lubricate with a little grease Repeat until the column has been slewed round completely 9 5 Hydraulics 9 5 1 Replacing the cartridge in return oil filter Return oil filter with ...

Page 87: ...er cartridge from the housing using the handle 6 Clean the filter housing and the cover 7 Replace the filter cartridge 8 Check the condition of the o rings and gaskets Replace if necessary 9 Put the filter housing and filter cartridge back in place 10 Attach the cover NOTE Check that the cover is properly fitted 9 5 2 Checking the oil tank level 1 Place the crane and stabiliser legs in the transpo...

Page 88: ...hing wash with soap and water In the event of high pressure injection of the product see a doctor without delay Eye contact Rinse eyes with plenty of water see a doctor if irritation persists 3 Drain the oil tank through the drain plug Make sure the system contains as little as possible Use a container with sufficient capacity NOTE Ensure the waste oil is disposed of safely and inaccordance with l...

Page 89: ...r 68 tells the viscosity of that oil at 40 C reference temperature Viscosity of oil at 40 C Temperature range 32 25 C to 75 C 46 15 C to 90 C 68 5 C to 90 C The recommended viscosity during normal work ing conditions is between 16 and 40cSt HIAB strongly recommend an oil working tem perature below 70 C If necessary consider an oil cooler or heater NOTE When working in artic condition consider an o...

Page 90: ...the crane to parking position 3 Check and top up the oil tank to max level on the tank gauge 4 Bleed the system 9 5 4 Hoist gear top up or exchange oil NOTE To remove any oil inside the reduction gear it must be stored in appropriate containers ready to be handed over to authorized waste disposal centres an accordance to the laws in force ...

Page 91: ...and out a number of times b Stop the crane with the boom system in horizontal posotion and switch off c Place an oil container under the hoist and remove plug d Drain all oil Discard according to local procedures e Mount plug again Fill top up a Get access to the fill opening on top and remove the plug Remove the filling level plugs b If the winch contains a small amount of protective oil place an...

Page 92: ...lowly or jerkily if your crane has not been used for a long time WARNING Air in the hydraulic system can lead to faults and damage To bleed air from the hydraulic system pro ceed as follows Move each crane cylinder and each hydraulically operated piece of add on equipment at least twice to its end positions slowly ...

Page 93: ...s well Blocked filter insert Replace the filter insert One remote control function does not work The remote control lever was not in neutral at start up 1 Push in the Stop but ton 2 Make sure that all lev ers are in neutral 3 Pull out the Stop but ton Description Components Fuse Location System main fuse Relay Box Standard Box Oil Cooler 40 A Located on the vehicle where the crane is mounted Fuse ...

Page 94: ... the hydraulic system The pump is faulty Go to a HIAB service work shop The stabiliser extensions do not slide out The extensions are still locked Unlock the extensions The slewing movements are irregular or cause abnormal noises Insufficient oil in the hy draulic system Top up the oil tank The column bearings are not properly lubricated Lubricate the bearings The column bearings are damaged Go to...

Page 95: ...es 1 Use time mode default 2 Error display mode 3 Config mode Use time mode default By default the display shows how many hours the crane has been used Levers not centred and oil not dumped Use time is shown on the display as USE Number of thousands of hours Number of hours and a dot Start over example use time 1526 hours Error display mode Press the button to switch to Error display mode Display ...

Page 96: ... yourself the faults that ac cording to the table you may rectify Follow the instructions exactly All other faults may be dealt with only by personnel in a HIAB service workshop Symptom Probable cause Action Hoist will not hoist pull rat ed load Inadequate hydraulic system supply pressure Verify hydraulic system supply pressure and correct as required Damaged hoist motor Go to a HIAB service work ...

Page 97: ...laced Hoist center line is distorted due to uneven mounting sur face Contact a HIAB service workshop Binding load carrying sheaves Inspect and repair or lubri cate sheaves as required Hoist will not hold the load The rope is wound onto the drum in the wrong direction Spool rope according to sec tion in this manual Course and requirements of the rope Clutch assembly is dam aged Verify and replace a...

Page 98: ...oned properly Most of the crane s raw materials can be recycled Follow the regulations of the local authorities Oil and grease must not be spilled on to the ground or released into the environment Drain the oil from hydraulic cylinders valves and hoses Sort the waste Deliver the metal parts for recycling for reuse as raw material These are load bearing struc tures manufactured from steel or cast i...

Page 99: ...on trol cables seat hydraulic cylinder seals lights small plastic and rubber parts Hazardous waste is delivered to a collection point for hazardous waste oils hydraulic oil transmission oil from the slewing system solid lubricants greases from the joints and journal bearings other waste containing oils and greases hy draulic oil filters Content ...

Page 100: ... GB 11 11 1 Load plate table The Installer must fill in the valid meters m and kilos kg in this table following instructions given in the Installation instructions The enclosed Technical Data must be stored together with this Operator s manual ...

Reviews: