background image

INPUT    OUTPUT               INPUT          LEVEL

           PHASE         REMOTE       BASS EQ          SONIC        LOW P

ASS

L

L

R

R

SUB

POWER

PROTECT

BALANCED

9V       0.2V      0        180                          0dB     10dB    15Hz    35Hz   35Hz   250Hz

SPEAKER OUTPUT

-            -             +           +

GND       REM    BA

TT+12V

POWER INPUT

FUSE

REMOTE TURN-ON

CHASSIS GROUND

TO B12v
       VIA FUSE

MONO

SUBWOOFER

1-OHM MINIMUM

POWER INPUT

GND      REM   BA

TT+12V

CH 1/2    SPEAKER OUTPUT    CH 3/4

RIGHT                      LEFT

RIGHT                      LEFT

-          +          -          +           -          +          -          +

BRIDGED

BRIDGED

FUSE

LINE INPUT

REMOTE

POWER

PROTECT

LINE OUT

HI  FULL

 LP/BP

HI  FULL

 LP/BP

6V   0.2V

10Hz-15KHz

30Hz-150Hz

0dB-10dB

HI P

ASS

LOW P

ASS

BASS EQ

LEVEL

X-OVER

1

/2 CH

6V   0.2V

10Hz-15KHz

30Hz-150Hz

0dB-10dB

X-OVER 3

/4 CH

HI P

ASS

LOW P

ASS

BASS EQ

LEVEL

MODE

CH2-CH4

L

R

L

R

L

R

CH1/2

CH3/4

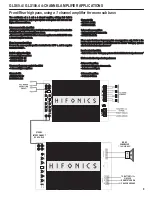
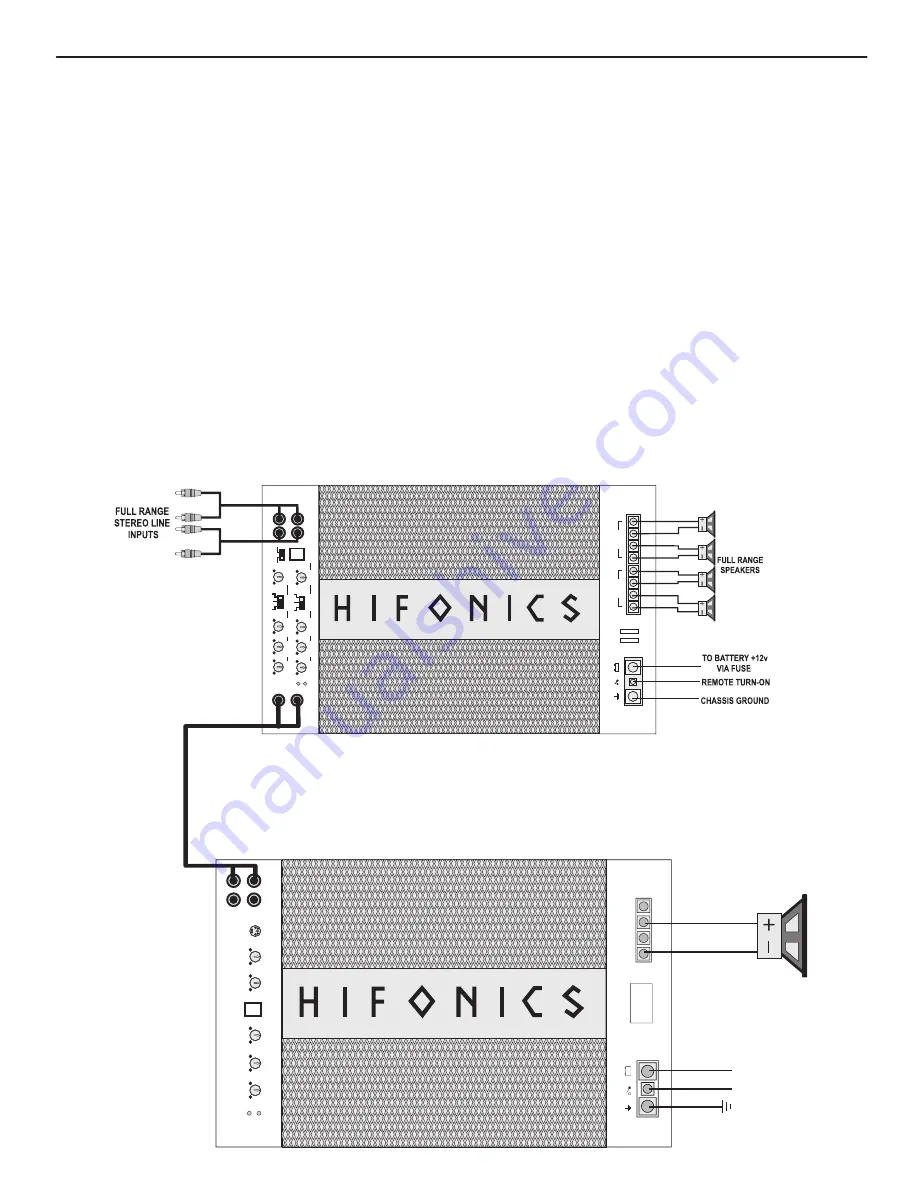
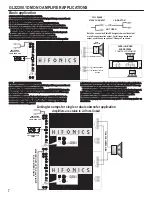
GLX60.4 / GLX100.4 4-CHANNEL AMPLIFIER APPLICATIONS

4

Front/Rear high pass, using a 1 channel amplifier for mono sub bass

The  combination  of  a  1  and  a  4  channel  amplifier,  utilizing  their  built  in 

Channels 3/4:

crossovers, makes it a snap to put together a full system with front and rear 
highs, with mono sub bass.

- HI PASS: 

100 Hz

- LOW PASS: 

N/A

Interconnect cable checklist:

- Using good quality RCA cables, feed the front and rear outputs of a head unit to 

1 channel bass amplifier:

the inputs of the 4 channel amplifier as shown. 

- Subsonic filter: 10 Hz to 40 Hz

- Also connect the 

LINE OUT

 of the 4 channel amplifier to the 

LINE INPUT

 of the 

- LOW PASS: 80 Hz

1 channel amplifier as shown.

Please  note  that  these  frequency  points  are  suggestions  only.  Refer  to  the 

Mono bass woofer wiring:

loudspeaker manufacturer specifications and the section

 “Setting up systems 

Connect the mono speaker positive terminal to the LEFT +, and its negative 

after installation for best performance”

terminal to RIGHT -.

Level control checklist:

Switch setting checklist:

- Refer to the section 

“Setting up systems after installation for best performance”

4 channel highs amplifier:
- 1/2CH X-OVER:


 HI

Minimum final loudspeaker impedances:

- 3/4CH X-OVER:


HI

4 Channel Amplifier:

Crossover frequency control checklist:

- 2 ohm per channel in stereo mode.

- 4 channel highs amplifier:

- 4 ohm mono bridged.

Channels 1/2:

1 Channel Amplifier:

- HI PASS: 100 Hz

- 1-Ohm to 4-Ohms

LOW PASS: N/A

STEREO

INTERCONNECT

RCA CABLE

Summary of Contents for Gladiator GLX100.4

Page 1: ...GLX60 4 GLX100 4 GLX1000 1D GLX1400 1D GLX1800 1D GLX2200 1D ...

Page 2: ...rted speaker leads low impedance dangerous high temperatures DC shorts and will shut down the amp to help prevent damage General Installation Procedure 1 AMPLIFIER FEATURE DESCRIPTIONS 2 GLX60 4 GLX100 4 GLX1000 1D GLX1400 1D GLX1800 1D GLX2200 1D GLX60 4 GLX100 4 Applications 3 4 GLX1000 1D GLX1400 1D Applications 5 GLX1800 1D Applications 6 GLX2200 1D Applications 7 Setting up systems after inst...

Page 3: ...ole in the chassis the same size as the lug hole and use a bolt spring washer and nut to securely fasten the ground lug Use petroleum jelly to coat the bolt lug connection to prevent oxidization with time TIP Use the same approach when installing head units equalizers or any audio equipment for that matter run short individual grounds from each piece directly to the vehicle chassis to minimize gro...

Page 4: ... alignment Acceptslinelevelbalancedinputfrom0 4vto18v The LINE INPUT signal is routed directly to the LINE OUT RCA jacks and not affected by the settingsontheamplifiersimplifyingdaisychainingofamplifiers The BRE2500 1D is a linkable amplifier and features a MASTER SLAVE selection switch and IN OUTRCAconnection Themonoampsarecapableof4 2 1 Ohm loads Operating the amp below 1 Ohm can cause damage to...

Page 5: ...fonicsamplifiers 3 4CHX OVER LP BP The following example shows how to create a 3 channel system by mono bridging channel pair 3 4 In order to create a 2 channel system simply follow Crossoverfrequencycontrolchecklist theexampletoalsomonobridgechannelpair1 2 Channels1 2 HIPASS N A Interconnectcablechecklist LOWPASS N A Connect the inputs of channel pair 1 2 to a suitable stereo source e g a head un...

Page 6: ...t together a full system with front and rear highs withmonosubbass HIPASS 100Hz LOWPASS N A Interconnectcablechecklist UsinggoodqualityRCAcables feedthefrontandrearoutputsofaheadunitto 1channelbassamplifier theinputsofthe4channelamplifierasshown Subsonicfilter 10Hzto40Hz AlsoconnecttheLINEOUTofthe4channelamplifiertotheLINEINPUTofthe LOWPASS 80Hz 1channelamplifierasshown Please note that these freq...

Page 7: ...se the Radio CD designated mono line output or a full range stereo line output For full range stereo line output you will need an optional Y Adaptor as shown INPUT OUTPUT INPUT LEVEL PHASE REMOTE BASS EQ SONIC LOW PASS L L R R SUB POWER PROTECT BALANCED 9V 0 2V 0 180 0dB 10dB 15Hz 35Hz 35Hz 250Hz SPEAKER OUTPUT GND REM BATT 12V POWER INPUT FUSE INPUT OUTPUT INPUT LEVEL PHASE REMOTE BASS EQ SONIC L...

Page 8: ...ing These amplifiers have dual speaker terminals simplifying the hookup of multiple speakers The 2 positivesarethesameandthe2negativesarethesame Crossoverfrequencycontrolchecklist LOWPASS 35Hzto250Hz SUBSONIC 15Hzto35Hz BASSEQ 0to10dB PHASE 0to180degrees Levelcontrolchecklist Refer to the section Setting up systems after installation for best performance FULL RANGE STEREO LINE INPUT NOT USED Y ADA...

Page 9: ...w Slave amp SLAVE INPUT Note This will link the amps so that the Master amp 8 Connect a 12 gauge jumper from Master amp speaker to Slave amp speaker as crossover switches will control both the Master and Slave amps The Slave amp shown below crossover switches will be bypassed SINGLEAMPINSTALLATIONPROCEDURE 1 Connect the amp LINE INPUTS to the Radio CD player full range or mono line out puts with g...

Page 10: ... amplifier will not play frequencies below 100Hz but will play frequencies from 100Hz to the highest frequency the amplifier is capable of reproducing When in Low Pass Bandpass operation this setting acts as a low frequency cut off for your system reproduction aka Subsonic Filter The point that you set it at cuts off any frequencies from reproduction beyond this point The 12 o clock position is a ...

Page 11: ...ecommended minimums will draw more current check 2 A short on the main 12 volt cable from the battery to the vehicle chassis will cause the main fuse to blow 3 If an amplifier fuse blows continually with only 12 volt ground and remote leads connected the amplifier may be faulty System does not turn on 1 Check all fuses 2 Check all connections 3 Measure the 12 volt and remote turn on voltages at th...

Page 12: ...10 ...

Page 13: ...name and address of the authorized reseller Any damage to the product as a result of misuse abuse accident incorrect wiring improper installation alteration of date code or bar code labels revolution natural disaster or any sneaky stuff because someone messed up repair or alteration out side of our factory or authorized service centers and any thing else you have done that you should not have done...

Page 14: ...UT LEVEL PHASE BOOST PARAMETRIC BASS EQ BANDWIDTH FREQUENCY 0 2V 180 10 dB 100Hz 9V 0 0dB 30Hz MAXX LINK MLX 100 SUBSONIC FILTER 24 dB OCT LOW PASS FILTER 24 dB OCT OUTPUT LEVEL MODE ON SLAVE OFF MASTER RED CLIP GREEN 9V TEST TONE 65Hz 35Hz 250Hz 1V 9V 5V 7V 3V 15Hz 35Hz ...

Page 15: ...res and activates the MX 2 As an option the module also offers a remote turn on wire Remote Output Driver circuit to turn on amplifier when module activates MX 3 Bass Controller Parametric Bass EQ Provides a wide array of subwoofer output signal shaping controls to enhance bass response and sound quality including Bass Boost adjustable Bandwidth wide and narrow Low Pass and Subsonic Filter Accepts...

Page 16: ...PART A1011 ...
Reviews: