12
W
H
C
C
M
F
I
The Model 1300 was not designed or tested for installa on into a
fi
replace. The top vent only con
fi
gura on of the
Model 1300 makes ven ng into most masonry
fi
replaces imprac cal.
M
H
I
-
U.S. ONLY
CAUTION: T S
I
M
H
F
, W
,
C
/R
M
M
.
The installa on must comply with all current HUD Regula-
ons.
Floor protector requirements and installa on, minimum
clearances, and installa on precau ons are the same as
those on Page 11 for conven onal residen al construc on.
The wood heater must be anchored to the
fl
oor with bolts
of su
ffi
cient size and length to penetrate the pedestal
mount,
fl
oor protector, home
fl
oor, and sub
fl
oor.
The wood heater must be properly grounded to the chas-
sis of the mobile home using #8 AWG copper wire or its
equivalent.
WARNING: D N
I
S
R
.
For mobile homes use 6 inch diameter Class “A” chimney
listed to UL 103 HT and/or ULC629, suitable for use with
solid fuels, installed from the
fl
ue collar to the termina on
point and
fi
ed with a Spark Arrestor and Rain Cap. The
chimney must be removable in the event the home is to
be transported.
An outside air inlet must be provided for combus on and
be unrestricted while the unit is in use. Use High Valley
outside air kit (P/N: AIRKIT). See Page 16.
The front loading door of the wood heater must be kept
closed at all mes except for star ng and refueling the
fi
re.
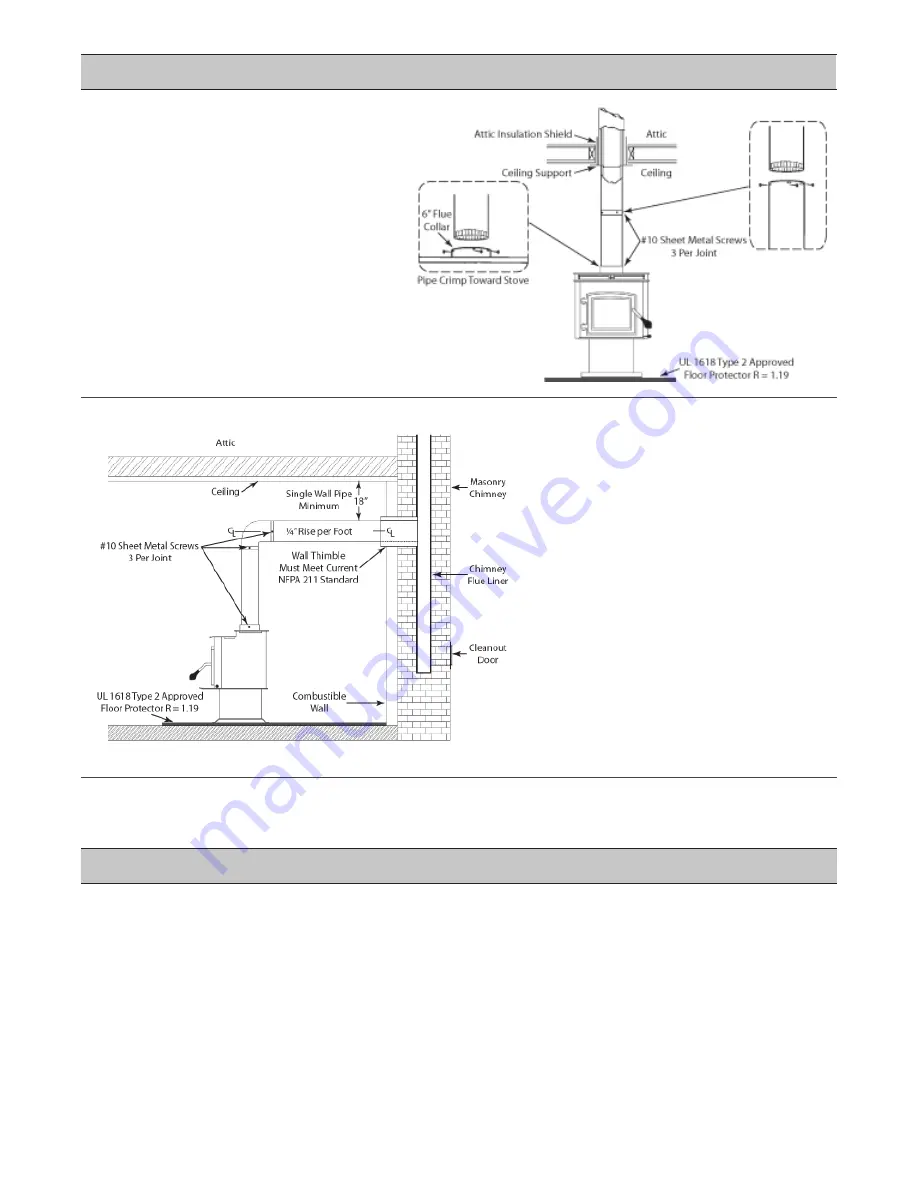
H
I
U
S
W
P
• Center the wood heater
fl
ue collar in-line with
the wall thimble if possible. All Clearances to
combus bles must be maintained.
• Con
fi
rm that the factory-built wall pass through
or masonry thimble meets manufacturer instruc-
ons and/or NFPA 211. (See Page 8)
• Limit the 90° bends to one (1) elbow and the 90°
bend where the thimble meets the flue.
• Maintain at least 18" clearance from single wall
connector to the ceiling.
• Floor protec on must extend under horizontal
sec on of connector pipe and at least two inches
(2”) to each side.
• Maintain 1/4” rise per foot in horizontal pipe.
• Crimped connector pipe ends must point toward
the wood heater
fl
ue collar.
• Secure each pipe sec on to each other and the
fl
ue collar using three (3) #10 sheet metal screws
(see Page 11).
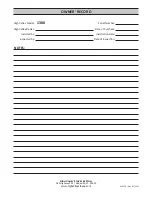
V
C
I
U
S
W
P
• Center the wood heater
fl
ue collar directly un-
der the chimney pipe if possible. All Clearances
to combus bles must be maintained.
• Con
fi
rm that any ceiling support, roof support,
fi
re-stops, insula on shields, etc. are installed
correctly and match the brand of Type HT 2100°
chimney being used.
• If the wood heater must be o
ff
set from the
chimney opening, use 15° or 45° pipe elbows to
make correc ons for the o
ff
set.
• Crimped connector pipe ends must point down-
ward toward the wood heater
fl
ue collar.
• Secure each pipe sec on to each other and
the
fl
ue collar using three (3) #10 sheet metal
screws (see Page 11).