


13
CAUTION: H
!
G
.
C
.
K
,
,
,
.
E
.
C
.
A
.
NOTICE:
Before ligh ng the wood heater for the
fi
rst
me ensure that any inspec on required has been com-
pleted and passed by the local Building O
ffi
cial, Fire Of-
fi
cial, or other Authority Having Jurisdic on (AHJ).
Smoke and CO detectors should be installed on every
fl
oor
of your home. A smoke detector installed in the same
room as the wood heater should be located as far away
from the heater as possible. See Page 2. Many states have
requirements manda ng the installa on of smoke and CO
detectors. Those regula ons take precedence.
Be sure you have no
fi
ed your homeowner's insurance
company that a wood heater has been installed in your
home.
We recommend that a "Type A B C"
fi
re ex nguisher be
on hand in close proximity to the wood heater should hot
embers escape the during the loading of fuel and removal
of ashes. Please use care when loading or servicing the
wood heater. Never throw water on a burning wood heat-
er. Thermal shock could break the door glass exacerbat-
ing the problem and hot steam could increase the risk of
burns or scalding.
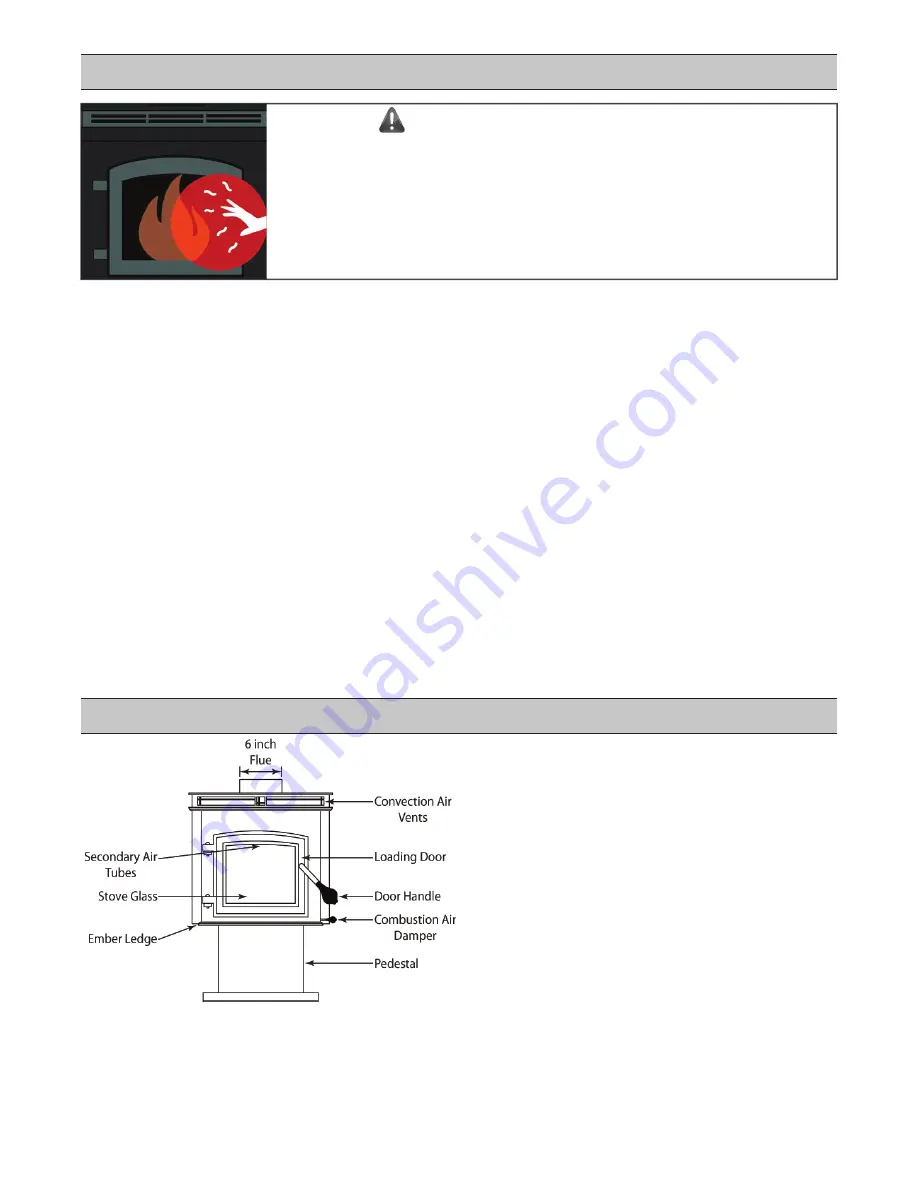
P -O
G
C
A V
:
Powered by the standard convec-
on blower to deliver heated air to the room.
S
A T
:
Introduce fresh combus on air
over the
fi
re to re-burn gasses. No adjustment necessary.
L
D
:
Allows access to the
fi
rebox for loading.
S
G
:
Ceramic material withstands high tempera-
tures and allows a view of the
fi
re.
D
H
:
Rotate to latch/unlatch the loading door.
Fi ed with a spring handle for safer handling.
E
L
:
Designed to catch ash spillage.
C
A D
:
Controls the amount of air fed
to the
fi
re and thereby regulates the burn rate. Pull out to
open and push in to close using the spring handle.
A
U S
B
P
:
B
.
This wood heater is
designed and approved for the burning of cord wood
fuel only. Never burn any type of coal in this heater.
Burning any type of fuel other than cord wood in this
wood heater is against all safety tes ng and will void all
warran es.
D
.
Never use gasoline, gasoline-type lantern fuel,
kerosene, charcoal lighter
fl
uid, or similar liquids to start
or “freshen up” a
fi
re in this wood heater. Keep all such
liquids well away from the heater at all mes. Storing
these or other
fl
ammable liquids near a wood heater
could cause a
fi
re.
B
F
.
Do not use grates,
andirons, or other methods to support fuel.
D
-
W
H
.
If any part of the
wood heater, the chimney, or the chimney connector
glows, you are over-
fi
ring. If over-
fi
ring occurs, close all
combus on air controls immediately. Over-
fi
ring can
cause damage to the wood heater and may cause a
fi
re.
ATTENTION:
Any tags or s ckers must be removed
and op onal plated loading doors and/or trim must be
cleaned with ammonia free glass cleaner and a so rag
BEFORE ligh ng the wood heater for the
fi
rst me. Failure
to clean the glass or plated
fi
nish properly to remove any
fi
ngerprints or oils may permanently mar the
fi
nish. Never
a empt to clean the door
fi
nish or door glass when hot.
ATTENTION:
Your new wood heater has been painted
with high temperature (1200°) stove paint. During the
fi
rst few
fi
rings the heater may give o
ff
slight smoke, odors
and/or vapors while the paint and oils used in manufactur-
ing cure. These odors may be irrita ng to suscep ble indi-
viduals. Open the windows in the room where the heater
is installed while the paint cures.
M
1300 F
C


