background image

16

NOTE:

  Use only OEM replacement parts or approved 

supplies. Do not subs  tute materials when purchasing 
parts or other materials.  Contact your High Valley dealer 
for assistance.

O

 A  K :  

Outside combus  on air is required in 

mobile home installa  ons and may be necessary in   ght 
homes to improve stove performance.  An outside air kit 
P/N AIRKIT) is available through your High Valley dealer.  

The O/A kit mounts to the back of the pedestal, with the 
four (4) #8 x ½" self-tapping screws provided, into pre-
punched holes.  A 4" (102 mm) collar is provided for at-
tachment of 4" diameter metal duct (supplied by others).  
Kits are available which include aluminum 

fl

 exible  duct, 

rain hood, and rodent screen as required by HUD regula-

 ons.  Consult your dealer.  The duct termina  on should 

be lower than the duct collar on the wood heater pedestal 
and in no case should the termina  on be higher than the 
wood heater itself.  The maximum length of the 4 inch (102 
mm) air intake duct should be no more than 12' (3.66 m)

Combus  on air may be drawn from outside of the home 
or from a ven  lated crawl space.  Combus  on air must 
not be drawn from an enclosed space such as a garage, or 
an unven  lated crawl space.  If the combus  on air duct 
is to pass through the 

fl

 oor of the home, do not make a 

hole in any 

fl

 oor protec  on within the minimum 

fl

 oor 

protector dimensions (8" [20.3 cm] to the sides and back 
of the wood heater.).  (See page 8)  Seal wall or 

fl

 oor pen-

etra  ons with waterproof 

fl

 exible sealer (not provided).
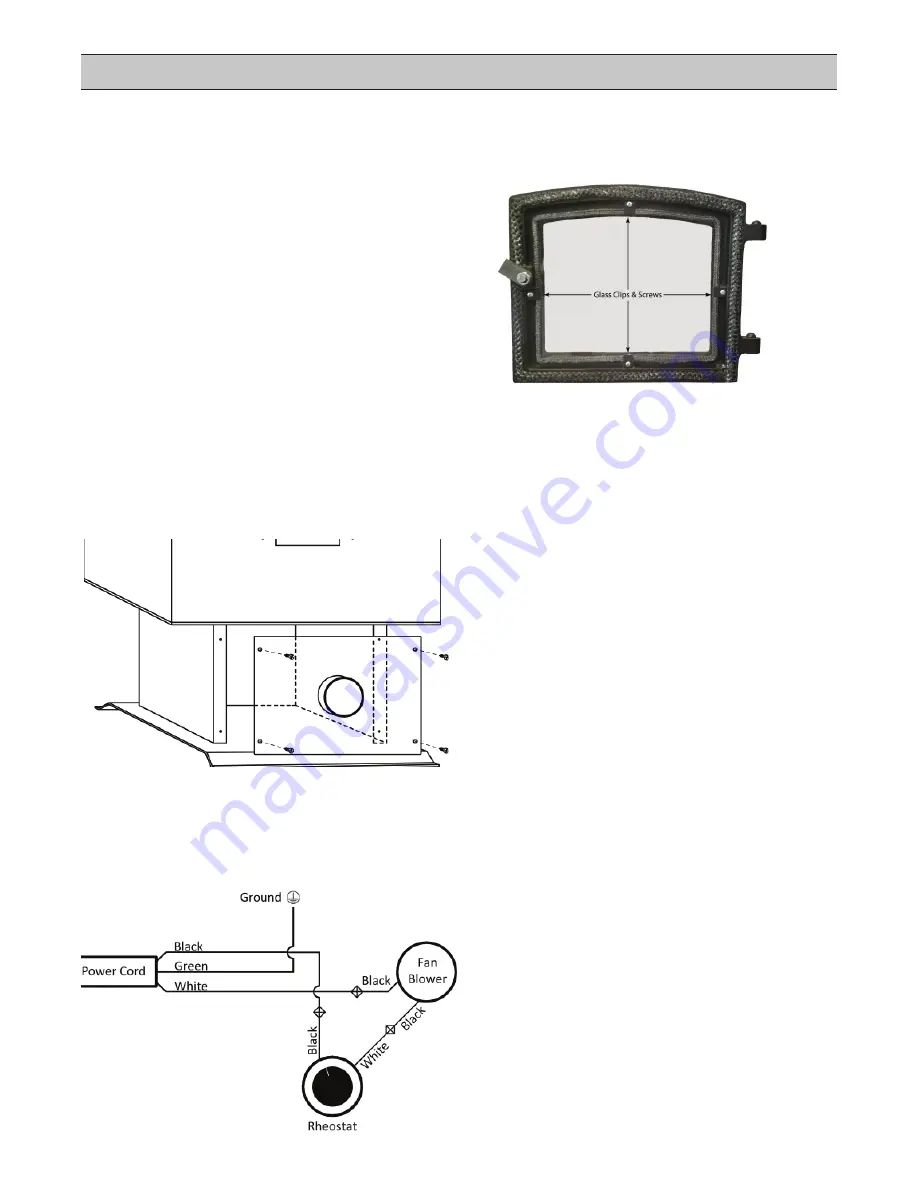
R

  C

  G

:  

Never operate the wood 

heater with damaged or broken ceramic glass.  Never sub-
s   tute window glass or tempered glass as a 

fi

 re may result.  

Replacement 5mm high temperature ceramic, complete 
with gasket, is available from your dealer. (P/N GLS1300)

• Remove the loading door from the wood heater and 

lay it 

fl

 at on a well padded work surface.

•  Remove the retaining screws from the door and, wear-

ing gloves, remove any remaining pieces of ceramic.

•  Remove a short sec  on of paper backing covering the 

gasket adhesive from the gasket.  Center gasket mate-
rial on the edge of the replacement ceramic and 

fi

 rmly 

press the gasket onto the edge.  Con  nue around all 
four sides of the ceramic.  Trim o

  any excess gasket.

• Center the ceramic in opening, posi  on  brackets  in 

place, insert screws, and   ghten evenly.

CAUTION: 

Screws should be snug but not overly   ght.

D

 G

 The Loading Door is equipped with 

fi

 berglass rope gasket.  Check the condi  on of the gasket 

on a regular basis for signs of wear.  Over   me the gasket 
will compress and the door may not seal   ghtly.  Replace 
as necessary.  A gasket kit (P/N GSKDOR) is available from 
your dealer and includes silicone adhesive.  Remove all old 
silicone before installing a new gasket.

S

  P

 Your High Valley wood heater has been 

painted with high temperature stove paint at the factory.  
Over   me the paint may lighten in color with heat expo-
sure or need touch-up. Stove Bright brand Sa  n Black # 
1900 spray paint (available from your dealer) is compat-
ible with the OEM paint.  It is most o  en imprac  cal to 
take the wood heater outside for pain  ng.  Open all win-
dows for ven  la  on and protect all exposed surfaces and 
furnishings with drop cloths and/or plas  c shee  ng.  Mask 
any areas not requiring paint.  Apply light coats and fol-
low all instruc  ons and precau  ons on the can.  Allow the 
paint to dry thoroughly before ligh  ng a 

fi

 re.  The fresh 

paint produces an acrid odor as it cures.  Open windows 
as necessary.

B

 W

:  

The Model 1300 comes with a stan-

dard convec  on blower pre-installed.  If it is necessary 
to remove the blower for service or replacement, follow 
the wiring diagram below when reconnec  ng wiring.  A 
replacement blower (P/N BLO1300) or a kit complete with 
a new rheostat (BLO1300KIT) are available.

O

 A    M

Summary of Contents for 1300

Page 1: ...pera ng this wood heater If you have ques ons please contact your High Valley Dealer for assistance SAVE THIS OWNER S MANUAL FOR FUTURE REFERENCE Safety No ce If this wood heater is not properly installed a house fire may result For your safety please carefully read and follow the installa on direc ons Contact the local Building or Fire Official or other Authority Having Jurisdic on AHJ about code r...

Page 2: ... paint thinners or asphalt products Materials containing asbestos Construc on or demoli on debris Railroad es or pressure treated wood Manure or animal remains Salt water dri wood or other previously salt water saturated materials Unseasoned wood or Paper products cardboard plywood or par cleboard The prohibi on against burning these materials does not prohibit the use of fire starters made from p...

Page 3: ...hroughout this manual you will find important safety no ces and other informa on may be repeated a number of mes The repe on is inten onal in an effort to reinforce safety instruc ons and to place them in context U S EPA E S T I P 2 T C Page 3 G S I S P Page 4 I P P 5 C P P 6 C R G P 7 C C D P 8 M 1300 S C P 9 P I A P 10 W H I P 11 C C P 12 M H I P 12 P O G P 13 M 1300 F C P 13 O G P 14 O A M P 16 ...

Page 4: ...r Keep all such liquids well away from the heater at all mes Storing these or other flam mable liquids near a wood heater could cause a fire DO NOT BURN GARBAGE OR FLAMMABLE FLUIDS SUCH AS GASOLINE NAPHTHA OR ENGINE OIL Cord wood is the only fuel approved for use in this wood heater DO NOT CONNECT THIS UNIT TO A CHIMNEY FLUE SERVICING ANOTHER APPLIANCE DO NOT CONNECT A WOOD HEATER TO OR USE IN CON...

Page 5: ... sized wood heaters throughout the space to be heated rather than a single large wood heater The number would depend on the size and layout of the home We do not recommend installing your wood heater in an uninsulated basement Much of the heat produced will be lost to the uninsulated walls of the basement NEVER cut holes or vents in a ceiling floor in an a empt to get warm air to rise to the rooms...

Page 6: ...uare considerably larger than the 6 flue recommended Consider that the cross sec onal area of a 6 flue is 28 sq in Area πr2 or A π32 or A 3 14 X 9 where Pi 3 14 enough for this purpose The cross sec onal area of an 8 round flue is 50 sq in the cross sec onal area of an 8 square masonry flue le is 64 sq in In addi on the masonry construc on tends to cool more quickly with cold outside temperatures ...

Page 7: ... ceiling supports insulation shields fire stops roof support packages roof flashings chimney caps etc must be installed exactly to the manufacturer s in structions Installation specification and clearances may vary from manufacturer to manufacturer and must be carefully adhered to according to the individual manufacturer s instructions If a new masonry chimney is to be constructed we strongly reco...

Page 8: ...m combus bles by a minimum of 6 inch 152mm of glass fiber insula on Opening shall be covered and thimble supported with a sheet steel support minimum 24 gauge 0 024 inch 0 61mm in thickness Supports shall be securely fastened to wall surfaces on all sides and shall be sized to fit and hold chimney sec on Fasteners used to secure chimney sec on shall not penetrate chimney flue liner Solid insulated...

Page 9: ...5mm w x 1092mm d CN F P Use UL 1618 Type 2 Floor Protector R 1 19 or con nuous non combus ble material equivalent to 1 thickness k 0 42 NOTE Clearances to combus ble materials may be reduced using shielding methods as described in the current edi on of NFPA 211 Standard for Chimneys Fireplaces Vents and Solid Fuel Burning Appliances Any reduc on of clearances must be approved by the local Authorit...

Page 10: ...ct your High Valley Dealer for assistance DO NOT proceed with installa on un l the stove has been inspected and replacement parts obtained P I If your Model 1300 was not assembled before delivery the stove body must be fastened to the pedestal base USE EXTREME CAUTION The wood heater is very heavy At least two strong individuals will be needed to li the stove body onto the pedestal base Personal i...

Page 11: ...heater Remove the cardboard before ligh ng the first fire in the wood heater The wood heater should be centered on the chimney if possible to allow for the shortest and most direct connec on The wood heater does not necessarily need to be centered on the floor protec on as long as the minimum side pro tec on requirement 8 is met An asymmetrical installa on may provide more usable space to one side...

Page 12: ...eater must be kept closed at all mes except for star ng and refueling the fire H I U S W P Center the wood heater flue collar in line with the wall thimble if possible All Clearances to combus bles must be maintained Confirm that the factory built wall pass through or masonry thimble meets manufacturer instruc ons and or NFPA 211 See Page 8 Limit the 90 bends to one 1 elbow and the 90 bend where t...

Page 13: ... of air fed to the fire and thereby regulates the burn rate Pull out to open and push in to close using the spring handle A U S B P B This wood heater is designed and approved for the burning of cord wood fuel only Never burn any type of coal in this heater Burning any type of fuel other than cord wood in this wood heater is against all safety tes ng and will void all warran es D Never use gasolin...

Page 14: ...er in a fully closed posi on If the fire seems uncontrollable consult your dealer A hand damper installed in the connector pipe will allow for manual control under high dra condi ons CAUTION Before ligh ng your wood heater please read and or re read the safety informa on on pages 2 4 13 and elsewhere throughout this manual Ensure that the wood heater has been installed according to the in struc on...

Page 15: ...curred Contact your High Valley dealer or local chimney sweep if you are uncertain how to inspect the system for any build up I C C F If your wood heater is op erated properly to maintain clean efficient combus on connected to a good chimney burning good dry wood and inspected as needed a chimney fire should be an un likely occurrence A chimney fire can create a loud rushing sound and perhaps bangin...

Page 16: ... the wood heater and lay it flat on a well padded work surface Remove the retaining screws from the door and wear ing gloves remove any remaining pieces of ceramic Remove a short sec on of paper backing covering the gasket adhesive from the gasket Center gasket mate rial on the edge of the replacement ceramic and firmly press the gasket onto the edge Con nue around all four sides of the ceramic Tr...

Page 17: ...ake 9 months for so woods and up to 24 months for hard woods to air dry thoroughly C Clean efficient combus on in your wood heater depends on good quality well seasoned fuel Buying seasoned wood during the burning season is most o en very disappoin ng The best advice is to get green wood in spring and air dry it yourself If you don t cut your own wood find a reputable reliable wood seller So wood sp...

Page 18: ...an dard 1618 the Standard for Wall Protectors Floor Protec tors and Hearth Extensions was adopted as a standard in 2011 UL 1618 categorizes floor and wall protectors as Type 1 or Type 2 protec on A seemingly minor change in UL 1618 calls for the actual thermal proper es of floor protec on to be specified in R value in place of k value In fact that change makes it one step simpler to calculate ther...

Page 19: ...of corrosive fuel etc Damage caused by unauthorized modifica on use or repair Damage caused by the use of non High Valley spare parts or accessories Damage caused by lack of regular maintenance and cleaning by the owner as outlined in the Opera ng Instruc ons or due to negligence or carelessness Damage caused by misuse accident neglect or willful abuse of the product damage caused by the use of an...

Page 20: ... 201 Abbeville SC 29620 www highvalleystoves com High Valley Model 1300 Serial Number High Valley Dealer Date of Purchase Installed by Installa on Date Inspected by Date of Inspec on NOTES OWNER RECORD HL1350 Rev 05 2015 ...

Reviews: