background image

DTS-60A / DTS-100A O

PERATORS

 M

ANUAL

2.3.1 Time/Date Dialog

The Time/Date dialog provides the ability to set the date and time. A step-by-step Time and Date
setup procedure is depicted in Figure 2.4. 

REGION

REGION

SETTINGS

OPERATOR

TIME/DATE

LCD CONTRAST

LANGUAGE

STEP 1

ENTER

Press the ENTER key while the selector points to 
the TIME/DATE item

STEP 2

The application highlights the hours

STEP 3

Use the UP and DOWN keys for selecting the 
appropriate hours. The setting can be 0-23.

UP

DOWN

STEP 4

Press the ENTER key to enter the hours in time 
and go to the minutes selection.

ENTER

STEP 5

Repeat the above for all the Time and Date tags. 
After entering the year tag, the time and date will 
be set. 
The Settings Menu will return, showing the 
updated time and date.

SETTINGS

OPERATOR

TIME/DATE

LCD CONTRAST

LANGUAGE

NOTE

If the BACK key is pressed when updating any of 
the time/date tags, the system discards any 
changes and return to the Settings menu.

BACK

REGION

REGION

UPDATE FIRMWARE

 12:10   01/08/16   65°F

ENTER > SET VALUE

UP   > INCREASE VALUE

DOWN > DECREASE VALUE

BACK > EXIT SETUP

 12:10   01/08/16   65°F

   TIME/DATE SETUP

 09:54
 12.02.16

 09:54
 12.02.16

 10:54
 12.02.16

 10:54
 12.02.16

09

10

54

   TIME/DATE SETUP

   TIME/DATE SETUP

   TIME/DATE SETUP

Figure 2.4 –

 Set-up Time and Date

19

Summary of Contents for DTS-100A

Page 1: ...DTS 60A DTS 100A Dielectric Oil Test Set Operator s Manual Manual Version 2 01 High Voltage INC ...

Page 2: ...g improvement are appreciated Since products are subject to continuous check and improvement High Voltage inc reserves the right to make changes in information contained in this manual without prior notification Manual Revision 4 6 2017 Version 2 01 Copyright 2016 High Voltage Inc USA HIGH VOLTAGE INC 31 County Route 7A Copake N Y 12516 Phone 518 329 3275 Fax 518 329 3271 Web http www hvinc com e ...

Page 3: ...DTS 60A DTS 100A OPERATORS MANUAL Icons Notation This icon indicates danger conditions Danger This icon indicates warnings Warning This icon indicates a hint or a tip Note ...

Page 4: ...of this equipment must use good judgement and follow all safety precautions noted in this guide to ensure the protection of themselves and others in close proximity to the test area Failure to follow the instruction could result in injury or death Proper grounding of the test set must be done prior to connecting this unit to a power source ...

Page 5: ...Menu Submenus and Settings 2 1 Main Operation Overview 2 2 Main Menu 2 3 Settings Submenu 2 3 1 Time Date Dialog 2 3 2 Operator Dialog 2 3 3 LCD Contrast Dialog 2 3 4 Language Dialog 2 3 5 Region Dialog 2 3 5 Update Firmware Dialog 3 Simple Test 3 1 Simple Test Operations 3 2 Simple Test Initialization 3 3 Simple Test Controls 3 4 Simple Test Execution 3 5 Simple Test Termination 3 6 Simple Test E...

Page 6: ...2 Changing the Paper Roll 7 3 Printout Description 8 Remote Operation 8 1 Remote Operation Description and Operation 8 2 System Commands and Parameters 8 2 1 ver 8 2 2 cls 8 2 3 time 8 2 4 date 8 2 5 operator 8 2 6 contrast 8 3 Test Commands 8 3 1 test list 8 3 2 test read 8 3 3 test delete 8 3 4 test erase 8 3 5 test download 8 4 Test Results Download Commands 8 4 1 history list 8 4 2 history rea...

Page 7: ...ectric Oil Test Sets Included in this section is a brief introduction about the equipment s set up and start up Features and Specifications 1 1 Control Panel 1 2 User Interface 1 3 Menu Overview 1 3 1 Keypad Operations 1 3 2 Warning Messages 1 3 3 Question Messages 1 3 4 Error Messages 1 3 5 Indicators 1 3 6 Setup the Equipment 1 4 Startup the Equipment 1 5 1 ...

Page 8: ...isplay 128x64 Compact 5 key keypad for operation User friendly menu driven functionalities Large output voltage display Functionalities Test Result storage and reporting Real Time Clock Ambient Temperature measurement International Standard Tests User Defined Tests Language selection Measurements and Control High accuracy of High Voltage measurement 0 5 Digitally selected Voltage rate of rise 0 1k...

Page 9: ...A resistive load between bushings Output Termination Dual Capacitively Graded Bushings Display Dot Matrix 128x64 Keypad 5 keys for equipment s functionalities Printer 40 column dot matrix Remote Operation RS 232 Serial Interface or USB HID Serial Interface Breakdown Shutdown Less than 5 ms Accuracy 0 5 Operating Temperature 14 F to 104 F 10 C to 40 C Case Size 14 75w x 14d x 11 5h in 36 88w x 35d ...

Page 10: ...r switch provides the power to the control and power circuits The neon lamp will light when power is on and voltage is available through the input line cord The Input Power Fuse located electrically before the Main Power switch provides line fault protection for the unit Fuse Socket LCD Display The Liquid Crystal Display guides the user to the system s functionalities Keypad Compact 5 key keypad f...

Page 11: ...nu Overview The equipment operation is based on a user friendly structure of menu submenu driven functions An overview of the menu submenu selections is summarized in Figure 1 3 Figure 1 3 DTS 60A DTS 100A User Interface 5 MENU SELECT TEST SETTINGS TEST HISTORY REMOTE OPERATION SETTINGS TIME DATE OPERATOR LCD CONTRAST LANGUAGE TEST HISTORY APP REMOTE OPERATION APP SELECT TEST APP SETUP TIME DATE A...

Page 12: ...s Standard and User Defined Test Operations MENU Proceed to the Main Menu before after test BACK Select No for prompt UP Pick Yes prompt DOWN Pick No prompt ENTER Execute Standard or User Defined Test Test Select Yes No prompt ANY After Starting the Test ANY key interrupts the process Main Menu and Submenu Operations BACK Exit from Main Menu to Test Operations Exit from Submenu to Main Menu UP Mov...

Page 13: ...ys for more than 3 seconds The character will be entered and the cursor will be displayed in the next possition STEP 2 STEP 3 STEP 4 ENTER UP DOWN OPERATOR CONTACT INFO OTHER INFO _ A mistake occured Press the BACK Key in order to delete the last entried character OPERATOR CONTACT INFO OTHER INFO P_ Select the correct character according STEP 3 instructions Then wait 3 seconds until the cursor is ...

Page 14: ...quipment is open while a test is running The current operation i e test execution will be restarted when the lid is closed Warning Message Lid is Open SYSTEM HALTED TEST ASTM D1816 84 12 10 01 08 16 65 F TIMER 00 00 00 Figure 1 5 Lid is open Warning Message for Standard Test ASTM D1816 84 If the Warning Message Lid is Open is depicted when the Lid is closed contact the distributor or the manufactu...

Page 15: ...ttings type spacing Figure 1 6a The user may proceed by pressing the ENTER key Warning Message TEST READY TIMER 00 00 00 TEST ASTM D1816 84 Electrodes Spacing 0 04in ENTER PROCEED TEST Figure 1 6a Electrodes Space Warning Message If the selected test is the Simple Test where the spacing and the type of the electrodes is not specified the message will remind the user to verify the desired electrode...

Page 16: ...roceed to the Print Results Question Message Press the ENTER key to make your choice Question Message Showing Yes Icon Selected TEST SIMPLE TEST VOLTAGE 0 5 kV s TIMER 00 00 00 12 10 01 08 16 65 F Continue Test YES Figure 1 7 Continue Test Question Message 2 Print Results Figure 1 8 This question message prompts the user for printing the test results after a test is finished Similar to the Continu...

Page 17: ...ges Figure 1 9 Error 100 Error 101 Error 102 Error 110 Error 111 Error 112 Error 113 Error 120 Error 121 Error 122 Error Code Error Message User Interface Help Message ERROR 102 Contact High Voltage Inc for more information 1 518 329 3275 12 10 01 08 16 65 F Figure 1 9 Error Message Whenever you see an ERROR message contact the distributor or High Voltage Inc 11 ...

Page 18: ... is ON 4 Breakdown Blinking Indicator After a test stage this blinking indicator notifies the user that a breakdown was detected TEST ASTM D1816 84 TIMER 00 00 02 kV STIR HV ON Stirrer on off indicator High Voltage On Off Indicator Current Stage Indicator STAGE 3 0 5kV s BREAKDOWN 01 0 12 10 01 08 16 65 F Figure 1 12 Indicators during a test stage high voltage ON stirrer ON test stage 3 TEST ASTM ...

Page 19: ...er source 6 Select the desired Test cell Fill in with sufficient oil for the testing to be performed 7 Clean the Test Cell and Electrodes thoroughly and adjust the electrodes to conform with the proper ASTM Specification Be sure the electrodes are securely tightened on the adjustment posts inside the oil vessel Use Isolation transformer 1 1 if the electrical installation has neutral earthing All t...

Page 20: ...GH VOLTAGE 12 10 01 08 16 65 F Figure 1 13 Startup and Self Test 4 After the self tests are completed the last selected test is presented Simple Test Standard Test or User Defined Test 5 The unit will display the Electrode Warning message and will wait for ENTER to be pressed to start the test see section 1 3 3 6 Before starting a test the user may open the lid check the electrodes type and spacin...

Page 21: ...ubmenus The interface supports a simple menu submenu structure in order to provide user friendly operation Menu Operation Overview 2 1 Main Menu 2 2 Settings Submenu 2 3 Time Date Dialog 2 3 1 Operator Dialog 2 3 2 LCD Contrast Dialog 2 3 3 Languages Dialog 2 3 4 Region Dialog 2 3 5 Update Firmware Dialog 2 3 6 15 ...

Page 22: ...simple with the BACK and ENTER keys BACK Exit from Main Menu to Test Operations Exit from Submenu to Main Menu UP Move Up to the previous selection DOWN Move Down to the next selection ENTER Proceed to the selection Finally the last line indicates the current time and date as well as the temperature MENU TITLE MENU ITEM 3 MENU ITEM 4 MENU ITEM 1 MENU ITEM 2 MENU ITEM 5 Following Lines Display the ...

Page 23: ...date Firmware Test History Run the Results History Application see section 6 This can be used for browsing the results of previously executed test programs Remote Operation Run the Remote Operation Application see section 8 This activates RS 232 operation and allows download of test results to a computer MENU TEST HISTORY REMOTE OPERATION SELECT TEST SETTINGS MENU BACK UP No operation Exit from Ma...

Page 24: ...g for adjusting the LCD Contrast Language Dialog for changing the User Interface s language Region Dialog for choosing the time date temp format European DD MM YY C American MM DD YY F Update Firmware Dialog for loading new firmware into the system Contact High Voltage to see if a new version is available SETTINGS LCD CONTRAST LANGUAGE TIME DATE OPERATOR MENU BACK DOWN UP ENTER No operation Return...

Page 25: ...ours in time and go to the minutes selection ENTER STEP 5 Repeat the above for all the Time and Date tags After entering the year tag the time and date will be set The Settings Menu will return showing the updated time and date SETTINGS OPERATOR TIME DATE LCD CONTRAST LANGUAGE NOTE If the BACK key is pressed when updating any of the time date tags the system discards any changes and return to the ...

Page 26: ... ENTER key while the selector points to the OPERATOR Submenu STEP 2 The Operator Submenu is shown Use the UP DOWN key to select a label to modify UP DOWN OPERATOR NAME COMPANY CONTACT INFO OTHER INFO STEP 3 Press the ENTER key in order to enable Operator String Edit mode for the selected label The string entry cursor is displayed at the line above time and date ENTER _ STEP 4 Enter the desired str...

Page 27: ...GUAGE STEP 1 ENTER Press the ENTER key while the selector points to the LCD CONTRAST item STEP 2 The system display a series of vertical indicating the current LCD Contrast stup STEP 3 Use the UP and DOWN keys in order to increase or decrease the contrast The system changes the current contrast according the selected setup UP DOWN STEP 4 Press the ENTER key in order to save the new LCD Contrast se...

Page 28: ...INGS TIME DATE LCD CONTAST OPERATOR LANGUAGE ENTER Press the ENTER key while the selector points to the LANGUAGE item The system will display the Language Setup application STEP 2 UP Use the UP and DOWN keys and move the selection within items DOWN LANGUAGES ENGLISH STEP 3 ENTER Press the ENTER key to enable the selected language The system will revert all messages to the selected language format ...

Page 29: ...NTAST OPERATOR LANGUAGE ENTER Press the ENTER key while the selector points to the REGION item The system will display the Region Setup application In this example the system is in AMERICAN mode MM DD YY F STEP 2 UP Use the UP and DOWN keys and move the selection within items DOWN REGION EUROPEAN STEP 3 ENTER Press the ENTER key to enable the selected region Here we have changed REGION to EUROPEAN...

Page 30: ...E LCD CONTAST OPERATOR LANGUAGE ENTER Press the ENTER key while the selector points to the UPDATE FIRMWARE item The system will display a Question Message asking to proceed STEP 2 UP Use the UP and DOWN keys to toggle the YES and NO icons DOWN Ready for New Firmware STEP 3 ENTER Press the ENTER key to prepare the system for the upgrade If no contact is made by the Upgrade Software running on a Com...

Page 31: ...mple Test This section describes the operations of the Simple Test procedure Simple Test Operations 3 1 Simple Test Initialization 3 2 Simple Test Controls 3 3 Simple Test Execution 3 4 Simple Test Termination 3 5 Simple Test Example 3 6 25 ...

Page 32: ...different rates can be tested efficiently The user may run up to 30 stages and may repeat the procedure for one insulator oil filling any number of times and that will be considered as a single test Before every new high voltage stage the operator can modify the voltage rate and turn the stirrer on or off At the end of the test the system will prompt the user for a printout and the test results wi...

Page 33: ...00 00 00 Verify Electrodes Figure 3 2 Simple Test Electrodes Spacing Warning Message If the electrodes are checked before starting the test the lid will be opened in order to have access to the electrodes in the oil cup If the lid is opened after the Simple Test has started a warning message is displayed Figure 3 3 Warning Message Lid is Open TEST SIMPLE TEST 12 10 01 08 16 65 F TIMER 00 00 00 VOL...

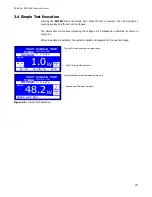
Page 34: ... Stirrer icon if enabled Last line Current time date and temperature or test messages 0 0kV STIR STAGE 1 Program Name is Simple Test Voltage Rate of Rise Setup Blinking Current High Voltage Output Stirrer Indicator System Messages Time Date Temperature etc Stage Indicator TEST SIMPLE TEST TIMER 00 00 00 VOLTAGE 0 5 kV s 12 10 01 08 16 65 F Figure 3 4 Simple Test Main Screen The following controls ...

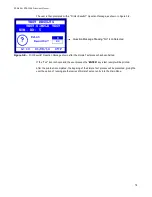
Page 35: ...is detected as shown in Figure 3 5 After a breakdown is detected the system is halted and prepared for the next test stage 1 0kV STIR STAGE 1 HN on 48 2 PRESS ANY KEY kV STIR STAGE 1 High Voltage ON indicator Breakdown Blinking Indicator TEST SIMPLE TEST TIMER 00 00 02 VOLTAGE 0 5 kV s TEST SIMPLE TEST TIMER 00 01 36 VOLTAGE 0 5 kV s 12 10 01 08 16 65 F Typical Screen during a voltage ramp Typical...

Page 36: ...N key to choose the No icon and press the ENTER key The user can also use the BACK to stop the Simple Test process Question Message Showing Yes Icon Selected TEST SIMPLE TEST VOLTAGE 0 5 kV s TIMER 00 00 00 12 10 01 08 16 65 F Continue Test YES Figure 3 6 Continue Test Question Message shown after a Simple Test stage If the Simple Test has been halted Test Results are shown on the LCD and the syst...

Page 37: ...0 01 08 16 65 F Print Results NO X Figure 3 8 Print Results Question Message shown after the Simple Test process has been halted If the Yes icon is chosen and the user presses the ENTER key a test receipt will be printed After the printout is completed the begining of the Simple Test process will be presented giving the user the option of running another series of Simple Tests or entry into the Ma...

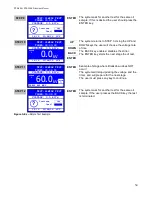
Page 38: ...lays the current warning message STEP 3 STEP 4 UP As soon as the user closes the LID the system will proceed the the Simple Test Main Screen The rate of rise selection is BLINKING which indicates that the user may set this item Use the UP and DOWN keys to select the desired output voltage rate of rise 0 0kV DOWN STAGE 1 STAGE 1 TEST SIMPLE TEST VOLTAGE 0 1 kV s TEST SIMPLE TEST VOLTAGE 0 1 kV s TE...

Page 39: ...running for two seconds The voltage measurement in kV is updated continuously STEP 8 Breakdown Detection occured The Breakdown icon is blinking The High Voltage On indicator is off The voltage at which breakdown occurred is shown STAGE 1 STAGE 1 STAGE 1 HN on STAGE 1 TEST SIMPLE TEST VOLTAGE 0 5 kV s TEST SIMPLE TEST VOLTAGE 0 5 kV s TEST SIMPLE TEST VOLTAGE 0 5 kV s TEST SIMPLE TEST VOLTAGE 0 5 k...

Page 40: ...down does NOT occur The system will stop updating the voltage and the timer and will prepare for the next stage The user must press any key to continue UP DOWN BACK ENTER ENTER STAGE 2 STAGE 2 The system ask for another test for the same oil sample If the user presses the BACK key the test is terminated ENTER TEST SIMPLE TEST TEST SIMPLE TEST TEST SIMPLE TEST TEST SIMPLE TEST TIMER 00 01 36 12 10 ...

Page 41: ...48 24kV STD 02 49kV VOLTAGE 0 5 kV s VOLTAGE 0 5 kV s TEST SIMPLE TEST The Simple Test Results are shown The number of breakdowns mean breakdown voltage and standard deviation are displayed A Question Message is shown asking if a printout is desired After the printout operation the system will return to STEP 1 to allow another Simple Test or entry into the Main Menu 12 10 01 08 16 65 F Print Resul...

Page 42: ... OPERATORS MANUAL 4 Standard Tests This section describes the operations of the Standard Tests procedure Standard Test Description 4 1 Select a Standard Test 4 2 Standard Test Execution 4 3 Standard Test Example 4 4 36 ...

Page 43: ...ation of electrode spacing and electrode type 2 Initial wait period to let oil settle Start Up Wait Time SWT 3 Initial stirrer active period during the initial wait period Start Up Stir Time SST 4 Individual Test Stage 1 Predefined increase of voltage 2 Breakdown Detection Enabled or time out with no breakdown at max voltage 3 After Breakdown Detect Wait Time period ABDWT 4 After Breakdown Detect ...

Page 44: ...6 95 ASTM D1816 12 ASTM D877 13 MENU SETTINGS SELECT TEST TEST HISTORY REMOTE OPERATION STEP 1 From the Main Menu point to SELECT TEST Then press the ENTER key STEP 2 The system displays all the available tests The default test is indicated with an arrow Use the UP and DOWN keys to select a test for execution UP DOWN STEP 3 Press the ENTER key to execute the selected test From now on this test wil...

Page 45: ...nd line indicates the Test Timer which is used as increasing timer seconds resolution during voltage rising as well as a decreasing timer for wait periods The 3rd line indicates the current Stage of execution as well as the desired Voltage value and Duration Obviously the large digits indicate the current high voltage output in kV and the left icon indicates the Stirrer State on off Finally the la...

Page 46: ... High Voltage ON Indicator TEST ASTM D1816 84 TIMER 00 00 30 12 10 01 08 16 65 F Figure 4 9 Test Stage during voltage ramp If the system detects a breakdown it will display the event Figure 4 10 and the test will proceed will proceed according to the chosen Standard AFTER BD WAIT TIMER 42 2 Test Program Name Count Down Timer for post breakdown wait System Messages kV Current Stage Number STAGE 1 B...

Page 47: ...d Test Completion After a key is pressed the user is shown the Test Results screen as shown in Figure 4 12 Figure 4 12 Standard Test Results After a key is pressed the user is given the option to print the results with a Question Message screen as shown in Figure 4 13 Figure 4 13 Standard Test Print Option 41 38 2 PRESS ANY KEY kV STIR STAGE 5 TEST ASTM D1816 84 TEST FINISHED TIMER 00 00 38 12 10 ...

Page 48: ... Message Test Program Name Test is finished System Messages Test Name Timer Information Test Ready to start Electrode Spacing Warning Message User Interface Help Message 1 0kV s BREAKDOWN 30 7 Test Program Name Count up Timer for current stage duration Rate of rise from 0kV to breakdown System Messages kV STAGE 1 HV on Current Stage High Voltage ON Indicator TEST ASTM D1816 84 TIMER 00 00 00 TEST ...

Page 49: ...procedure These tests follow the same structure as Standard Tests yet allow more flexibility in creating test sequences Test Description 5 1 Test Structure 5 1 1 Test Operations 5 1 2 Select Test Menu 5 2 Script Files for User Defined Tests 5 3 Script File Commands and Arguments 5 3 1 Script File Test Examples 5 3 2 43 ...

Page 50: ...ble parameters a Startup Wait Timer sec SWT b Startup Stirrer Timer sec SST The Main Session consists of a series of a maximum of 30 Stages Every stage includes a set of programmable parameters a Voltage Type kV or kV sec Two are the possible voltage types If a rated increase decrease is desired the type refers to kV s If a stable voltage is desired the type refers to kV b Voltage Value kV or Volt...

Page 51: ...ording to the desired rate for the specified duration It is noted that the Duration Parameter could take the value Breakdown which means no specified duration During both situations if a breakdown is detected the output voltage is immediately disconnected turned off and the Test Program proceeds with the After Breakdown Wait Timer ABDWT and the After Breakdown Stirrer Timer ABDST During the 1st of...

Page 52: ...oltage Wait for Breakdown Interrupt Wait for After Breakdown Time Enable Stirrer for After Breakdown Stirrer Time Print Report end continue Figure 5 1 Test Program Operation Flowchart 5 2 Select Test Menu From the MAIN MENU the user can select the SELECT TEST item The system displays the list of available test starting with Simple Test and followed by the Standard Tests Any User Defined Tests will...

Page 53: ...5 3 1 Script File Commands and Arguments The Script Test Program Files are based on the following command structure new Start a new Script Test Program File stage End of a new Script Test Program File end Start Test Program Information Session PRG program ID command command new program name electrode gap value electrode gap error electrode gap units electrode type startup IDLE timer startup STIRRE...

Page 54: ...owing information refers Integer value 0 29 2 Voltage Value Floating point value that indicates the desired Voltage 3 Voltage Type Options kV s kV 4 Voltage Duration hh mm ss hh hours mm minutes ss seconds 5 Stirrer Timer ST The time that the stirrer will be enabled in respect with the above timer hh mm ss hh hours mm minutes ss seconds 6 After Breakdown WAIT Timer ABDWT hh mm ss hh hours mm minut...

Page 55: ...DTS 60A DTS 100A OPERATORS MANUAL Command end End of the Test Script File Two examples follow in order to clarify the development of script files 49 ...

Page 56: ...kdown voltage and then it is desired to wait for 5 minutes with the stirrer enabled for 1 minute After every breakdown the test will proceed to the next stage Finally it is required for the system to print a results report The IEC 156 63 Standard should be described in a Script Test File as follows Script File 1 IEC_156 63 Standard prg 0 new IEC 156 95 2 5 0 05 mm type_I_II 00 05 00 00 05 00 06 pr...

Page 57: ...s given in the next page Voltage kV Time 10 min 20 min 30 min 40 min 50 min 10 kV 20 kV 30 kV 40 kV 50 kV 60 kV 10 sec 10 sec 10 sec to Breakdown Figure 22 Complicated Test Program Script File 2 Complicated Example prg 0 new TEST_100 2 5 0 05 mm type_I_II 00 10 00 00 00 00 07 prg 0 stage 00 001 0 kV s 00 00 10 00 00 00 00 00 00 00 00 00 end store prg 0 stage 01 010 0 kV 00 10 00 00 00 00 00 00 00 ...

Page 58: ...00 00 10 00 14 store prg 0 stage 09 002 0 kV s 00 00 10 00 00 00 00 10 00 00 10 00 14 store prg 0 stage 10 030 0 kV 00 10 00 00 00 00 00 10 00 00 10 00 14 store prg 0 stage 11 002 0 kV s 00 00 10 00 00 00 00 10 00 00 10 00 14 store prg 0 stage 12 050 0 kV 00 10 00 00 00 00 00 10 00 00 10 00 14 store prg 0 stage 13 003 0 kV s breakdown 00 00 00 00 10 00 00 10 00 next store prg 0 stage 14 001 0 kV s...

Page 59: ...DTS 60A DTS 100A OPERATORS MANUAL 6 History and Results This section describes the operations of the History and the Test Results History Results 6 1 Example Using History Results 6 2 53 ...

Page 60: ...16 01 000 0 058 4 kV BD MENU BACK DOWN UP ENTER Print Current Result Return to the Main Menu Decrease ID for Result or Stage Increase ID for Result or Stage Toggle Betwen Result ID and Stage ID Figure 6 1 History Application When the History Result ID is blinking the user can select history results by ID number Using the UP and DOWN keys the user selects a test id and results for that test ID will...

Page 61: ...ng among the stages in the selected test Now the blinking item is the stage id NAME DATE TIME BREAKDOWN SIMPLE_TEST 01 18 04 12 10 12 056 2kV 00 00 50 000 0 059 4 kV BD STEP 5 UP DOWN Use the UP and DOWN keys to select the desired stage id On every key press the system updates the information that corresponds to the selected stage NAME DATE TIME BREAKDOWN SIMPLE_TEST 01 18 04 12 10 12 056 2kV 00 0...

Page 62: ...TS 100A OPERATORS MANUAL 7 Printer Printouts This section describes the equipment s printer and the printout of the test s results Printer Description 7 2 Changing the Paper Roll 7 4 Printout Description 7 6 56 ...

Page 63: ...ra compact thermal line printer with the capability of printing forty characters per line Figure 7 1 is shows a front external view 1 Paper Roll Compartment 2 Cover Opening Levers 3 Status LED 4 Panel Key 5 Feed Key 6 Paper Outfeed Figure 7 1 External Front View of the Printer 57 ...

Page 64: ...vances the paper 2 Status LED The green status LED displays the printer operating status and this check is performed on line The operating status is as follows Always off Printer Off Always on Printer On no fault Slow Blinking Paper Out Message Fast Blinking Recoverable Error head over temperature supply voltage error Figure 7 2 Printer Control Panel 58 ...

Page 65: ...1 Open the printer cover Fig 7 3 2 Position the paper roll making sure it unrolls in the proper direction as shown in Fig 7 4 3 Tear off the paper as shown in Fig 7 5 and re close the cover 4 The printer is ready Fig 7 6 Figure 7 3 Changing the paper roll Step 1 Figure 7 4 Changing the paper roll Step 2 59 ...

Page 66: ...DTS 60A DTS 100A OPERATORS MANUAL Figure 7 5 Changing the paper roll Step 3 Figure 7 6 Changing the paper roll Step 4 60 ...

Page 67: ...oltages 10 Stages Starting Voltage Ending Voltage Duration Breakdown HighVoltage INC DTS 60A Test Report Version 1 00 Operator Company HighVoltage Name John Smith Contact 30 210 9319505 Info smith hvinc com Report ID 01018 Time 14 41 Date 12 05 2016 Temperature 70 F Test Name ASTM D1816 84 Electrodes Mushroom electrodes Num Breakdown 5 Mean Breakdown 50 61 Std Breakdown 6 24 Stage 1 0 5kV s 0 0 48...

Page 68: ...ration Description and Operation 8 1 System Commands and Parameters 8 2 ver 8 2 1 cls 8 2 2 time 8 2 3 date 8 2 4 operator 8 2 5 contrast 8 2 6 Test Commands 8 3 test list 8 3 1 test read 8 3 2 test delete 8 3 3 test erase 8 3 4 test download 8 3 5 Test Result Download 8 4 history list 8 4 1 history read 8 4 2 history erase 8 4 3 62 ...

Page 69: ... like the Open Source programs Qodem Terminal Emulator and Q Serial Terminal or older programs like Hyperterminal TeraTerm and Procomm Plus If the user selects Remote Operation in the Main Menu the system activates the communications link with the Personal Computer or other device The terminal emulator software must use the following serial port settings Baud Rate 115200 Data 8 bit Parity none Sto...

Page 70: ...system is ready to accept commands as follows High Voltage Inc DTS 60A AC Dielectric Oil Test Set Remote Management System DTS60A A quick method to enter remote operations from a Test Main Screen is to press the sequence MENU UP ENTER If no communications activity occurs after 60 seconds Remote Operation mode ends the communications link is deactivated and the LCD display returns to the Main Menu ...

Page 71: ...mmand is used for clearing the terminal screen DTS60A cls 8 2 3 time Command The time command is used for echoing or setting the system s time If no argument is given the system returns the current time to set the time use the following format time set hh mm ss Where hh hours 00 to 23 mm minutes 00 to 59 ss seconds 00 to 59 example DTS60A time Current Time 16 51 23 DTS60A time set 16 52 00 New Tim...

Page 72: ...e 04 12 16 DTS60A 8 2 5 operator Command The operator command is assigning the labels used in the Test Results Printout Receipt If no argument is given the system returns the current labels Note that all labels accept most Alphanumeric characters but the label cannot contain any spaces Instead of a space use _ These labels can also be assigned through the normal LCD Keypad User Interface DTS60A op...

Page 73: ... case of error as well as a command to clear all User Defined Tests This is also the command which allow creation of new user defined tests 8 3 1 test list The test list command lists all tests present in the system showing their test ID which is needed for the read and delete functions For all tests the number of stages is shown For User Defined Tests the Time Date when the test was created is sh...

Page 74: ... Stages 05 Start Up Wait Time 00 03 00 Stirrer During Start UP 00 03 00 Stage Voltage Duration Stirrer WaitTimer Stirrer GoTo Stage BD Store 00 000 5 kV s breakdown 00 10 00 00 01 00 00 01 00 next yes 01 000 5 kV s breakdown 00 10 00 00 01 00 00 01 00 next yes 02 000 5 kV s breakdown 00 10 00 00 01 00 00 01 00 next yes 03 000 5 kV s breakdown 00 10 00 00 01 00 00 01 00 next yes 04 000 5 kV s break...

Page 75: ... 34 02 09 20 2016 30 11 Eval_400v 20 38 39 09 20 2016 30 12 Eval_100v 20 39 42 09 20 2016 30 13 Eval mini 07 59 00 10 30 2016 03 DTS60A test delete 13 Are you sure you want to delete user test Y N y User Test deleted DTS60A test list Available Tests List ID Name Creation Time Date Stages 00 IEC 156 95 06 01 IEC 156 63 06 02 ASTM D1816 84 05 03 ASTM D877 87 05 04 UTE C27221 06 05 CEI 10 1 73 06 06 ...

Page 76: ...6 08 RVHP 1985 06 09 PN 77 06 10 Evaluation 20 34 02 09 20 2016 30 11 Eval_400v 20 38 39 09 20 2016 30 12 Eval_100v 20 39 42 09 20 2016 30 DTS60A test erase Are you sure you want to erase ALL user tests Y N y Erasing Programs Wait a moment All Programs are ERASED DTS60A test list Available Tests List ID Name Creation Time Date Stages 00 IEC 156 95 06 01 IEC 156 63 06 02 ASTM D1816 84 05 03 ASTM D8...

Page 77: ... the list Record the Test ID and issue test read Test ID to list the individual stages so that these can be verified Example DTS60A test download prg new Eval mini 2 5 0 25 mm type_I 00 00 05 00 00 05 3 prg stage 00 003 0 kV s breakdown 00 00 05 00 00 05 00 00 05 next store prg stage 01 003 0 kV s breakdown 00 00 05 00 00 05 00 00 05 next store prg stage 02 003 0 kV s breakdown 00 00 05 00 00 05 0...

Page 78: ...10 30 2016 10 34 02 19 Eval mini 10 30 2016 10 43 03 20 SIMPLE TEST 10 30 2016 10 45 03 21 SIMPLE TEST 10 30 2016 18 39 01 22 Eval mini 10 30 2016 18 40 03 23 Eval mini 10 30 2016 18 45 03 24 Eval mini 10 30 2016 18 52 03 25 Eval mini 10 30 2016 19 17 03 26 SIMPLE TEST 12 01 2016 22 12 00 27 SIMPLE TEST 12 01 2016 22 30 00 28 SIMPLE TEST 12 01 2016 22 31 00 29 SIMPLE TEST 12 01 2016 22 38 00 30 SI...

Page 79: ...00 0 0002 6kV BreakDown Stage 3 00 5kV s 0000 0 0002 6kV BreakDown Stage 4 00 5kV s 0000 0 0002 3kV BreakDown Stage 5 00 5kV s 0000 0 0002 6kV BreakDown DTS60A 8 4 3 history erase The history erase command clears out all Test Results from the DTS 60A DTS 100A s memory Example DTS60A history erase Are you sure you want to erase ALL history results Y N y Erasing History Results Wait a moment All His...

Page 80: ...DTS 60A DTS 100A OPERATORS MANUAL Appendix I Care and Maintenance 1 Clean the test vessel 2 Calibrate System Periodically contact High Voltage Inc at service hvinc com 74 ...

Page 81: ...00 00 01 00 next store prg 1 stage 05 002 0 kV s breakdown 00 10 00 00 05 00 00 01 00 end store prg 1 end mean_yes print_yes prg 2 new UTE_C27221 74 2 5 0 1 mm type_I_II 00 10 00 00 00 00 06 prg 2 stage 00 002 0 kV s breakdown 00 10 00 00 05 00 00 01 00 next prg 2 stage 01 002 0 kV s breakdown 00 10 00 00 05 00 00 01 00 next store prg 2 stage 02 002 0 kV s breakdown 00 10 00 00 05 00 00 01 00 next...

Page 82: ... 00 00 05 00 00 01 00 end store prg 8 end mean_yes print_yes prg 9 new OVE W7TEL2 86 2 5 0 05 mm type_II 00 10 00 00 00 00 06 prg 9 stage 00 002 0 kV s breakdown 00 00 00 00 05 00 00 01 00 next store prg 9 stage 01 002 0 kV s breakdown 00 00 00 00 05 00 00 01 00 next store prg 9 stage 03 002 0 kV s breakdown 00 00 00 00 05 00 00 01 00 next store prg 9 stage 04 002 0 kV s breakdown 00 00 00 00 05 0...

Page 83: ...ction 2 3 6 5 Execute the following command from a command prompt environment as shown in Figure AIII 1 isp pv hexfilename hex COM1 Note The above command assumes that the system is interfaced to the COM1 serial port of the personal computer or the USB Serial link is assigned to COM1 This program also supports COM2 COM3 COM4 If your COM port differs contact High Voltage Inc directly for assistance...

Page 84: ... companion desktop application that allows off line retrieval of previous test results DTSRO is compatable with both the DTS 60A and DTS 100A 1 Locate and run the install package located on the flash drive shipped with the system or contact High Voltage Inc for a copy a Click Next b Click Next c Click Next 78 ...

Page 85: ...DTS 60A DTS 100A OPERATORS MANUAL d Click Install e Click Finish The program will run if you leave the Run checkbox checked f The install package will also place a shortcut on the Desktop 79 ...

Page 86: ... Dialog will appear It will list available Serial Links choose the link that is attached to the system then click the Open Serial Link button c To download the list of test results from the system click the Download button d A message box will appear to remind the operator to activate Remote Operation mode of the system as described in section 8 1 of this manual Remote Operation Description and Op...

Page 87: ... will also be shown f Now we are ready to fetch Stage Data from an individual test To do this simply click on a result in the Test list box Stage Data should appear for that test g The operator now has the choice of sending the data to a printer or writing to file as text or comma separated variable format csv h To print the data click the Print button 81 ...

Page 88: ...ill appear allowing the operator to choose where they would like to store the file It will always start off pointing at the My Documents folder Note that the filename has the format product name current date current time which can be changed if required Click the Save button to save the file l A confirmation dialog will appear indicating where that data was saved to and with what filename 82 ...

Page 89: ... 25kV BreakDown Stage 3 3 0kV s 0 0 16 50kV BreakDown Stage 4 3 0kV s 0 0 15 00kV BreakDown Stage 5 3 0kV s 0 0 17 25kV BreakDown n To write the data as a csv file click the Write To File button with the csv output check box checked o A Save File dialog will appear as described above and the contents of the csv file for the above result will appear as follows DTS 60A_Test_Report ReportID 81 Time 1...

Page 90: ...icated If you are extracting data from a DTS 100A you must click on Help DTS 100A b After this item has been clicked a dialog will appear to confirm the choice and a check mark will appear next to the DTS 100A label the next time you click on Help c To restore DTSRO to DTS 60A mode click on Help DTS 100A a 2nd time or restart the program 84 ...

Page 91: ...f the equipment is appropriate If deemed appropriate a Return Authorization Number will be issued At that time the Purchaser will be instructed how to mark and return the equipment The above procedure must be adhered to in order to ensure prompt service No equipment should be returned without the prior knowledge and authorization of High Voltage Inc REPLACEMENT PARTS ORDERING To order replacement ...

Page 92: ......

Page 93: ...t in cash before shipment of goods c If Purchaser so requests and makes arrangements prior to shipment which meet High Voltage s full satisfaction High Voltage in its discretion may accept irrevocable letters of credit in its favor issued by a United States bank which is satisfactory to High Voltage 7 INFRINGEMENT ETC On goods manufactured to Purchaser s specifications Purchaser shall and does ind...

Page 94: ... claim that this document is voidable or void shall be submitted to final and binding arbitration before and in accordance with the Commercial Rules of the American Arbitration Association then in effect and judgment upon the award may be entered in any court have jurisdiction thereof provided however that this clause shall not be construed to limit any rights which High Voltage may have to apply ...

Page 95: ...ve 0 1 0 02 Hz to 2 75 uF 30 kVac 0 4 uF VLF Withstand VLF TD VLF PD VLF TD Pair VLF VLF Diagnostic Cable Testing Tan Delta Partial Discharge HV Dividers 150 kV AC DC 300 kV AC DC VLF Thumper 0 9 18 36 kV 3200J 400mA Burny TDR Radar TD 34E 0 34 kV TDB 60 0 60 kVac Capacitor Discharge Systems Thumpers Three Full Joule Outputs VLF Thumper Combo PRODUCT SUMMARY 100 kVac 10 kVA PD 10 pc Concentric Neu...

Reviews: