background image

6

HSL KVM Quick Setup Guide

oPERaTIon

SECTIONS

Table of Contents

1

2

3

Operating the KVM

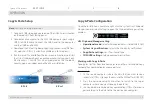
Front Panel Push-Buttons 


following power up, the default channel is #1.


Select any other channel by pressing the appropriate front panel 
push button. 


The mouse cursor will be positioned at the center of the selected 
computer display. 


The currently selected channel is indicated by the illumination of 
the appropriate push-button. 

Freeze USB


once switching between channels, for example from channel 
#1 to channel #3, the uSb and audio devices are automatically 
switched accordingly. This is indicated by channel #3 uSb and 
audio lEDs turning steady GREEn.


When switching to a channel that has no uSb connection, the 
uSb Port remains mapped to the last channel that had a uSb 
connection.


Press the freeze uSb button on the front panel to assign the uSb 
port to a specific computer. freeze uSb prevents switching the 
uSb port while the keyboard, video, mouse and audio peripherals 
are switched between computers. freeze uSb is useful for various 
scenarios, for instance, when a uSb disk-on-key must remain 
mapped to a certain computer.

Freeze Audio


Press the freeze audio button on the front panel to assign 
the audio port to a specific computer. freeze audio prevents 
switching the audio port while the keyboard, video, mouse and 
uSb peripherals are switched between computers. freeze audio 
is useful when a user has to listen to audio originating from one 
computer while working on another computer.

Summary of Contents for DK22 N Series

Page 1: ...21x N DK22x N 2 Port DVI I HDMI DP Video KVM Switch SX41x N DX42x N 4 Port DVI I HDMI DP Video KVM Switch SX81x N DX82x N 8 Port DVI I HDMI DP Video KVM Switch HDC15328 Rev 1 0 K VM SWITCHES QUICK SET...

Page 2: ...Contents 1 2 3 Introduction 2 HSL KVM Switches 2 Installation 3 Installing the KVM 3 Operation 6 Operating the KVM 6 Smoothly switch between computers Virtual Display Technology 7 Interchangeable KVM...

Page 3: ...N 2 Port 4K HDMI Video KVM Switch SK21P N 2 Port DP to HDMI Video KVM Switch DK22D N 2 Port DVI I Video DH KVM Switch DK22H N 2 Port 4K HDMI Video DH KVM Switch DK22P N 2 Port DP to HDMI Video DH KVM...

Page 4: ...ort group Computer port group numbers are represented by push buttons on the product s front panel Switch peripherals between computers by pressing the push buttons on the product s front panel Step 1...

Page 5: ...VGA HDMI DVI DP Computer audio connection Connect each computer to the KVM audio ports using an audio cable Connect one end of the cable to the computer s audio ports using the 1 8 3 5mm stereo plug C...

Page 6: ...Reset to Factory Defaults Reset to factory defaults clears the device settings and restores the device to its original configuration System reset clears behavioral characteristics such as mouse setti...

Page 7: ...When switching to a channel that has no USB connection the USB Port remains mapped to the last channel that had a USB connection Press the freeze USB button on the front panel to assign the USB port...

Page 8: ...m one computer to another Use cursor navigation switching VDT to automatically switch between computers by dragging the mouse cursor over the computer s display border Once the mouse is passing the di...

Page 9: ...s connected to a separate display while keyboard and mouse are shared To change from KVM to KM mode Disconnect the Display from the KVM Console Port Connect each computer directly to a separate displa...

Page 10: ...er the computer s display border Once the mouse is passing the display border shared peripherals Keyboard Audio USB switch to the next computer without having to press any buttons PC 1 PC 2 Screen bor...

Page 11: ...een mouse modes Absolute L CTRL L CTRL F11 c Relative L CTRL L CTRL F11 b 2 System Reset to factory defaults L CTRL L CTRL F11 r 3 Enter Terminal Mode L CTRL R CTRL t 4 Video Follow Mouse toggle ON OF...

Page 12: ...VM models that include USB 3 0 ports with external USB storage device support Copied data is stored on an external USB storage device connected to the KVM s USB port Both text and file copy paste oper...

Page 13: ...ation 4 Port 8 Port Copy Paste Configuration Once the installation is complete right click the system tray Clipboard Manger icon and select Setting to open the Clipboard Manager setting window HSL Cli...

Page 14: ...emonstration purposes only This document may contain confidential and or proprietary information of HSL Corporation and its receipt or possession does not convey any right to reproduce disclose its co...

Reviews: