background image

4

HSL Secure KVM Combiner Quick Setup Guide

InSTallaTIon

SECTIONS

Table of Contents

1

3

4

2

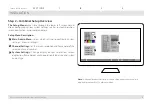
Step 2 – Combiner Setup Overview

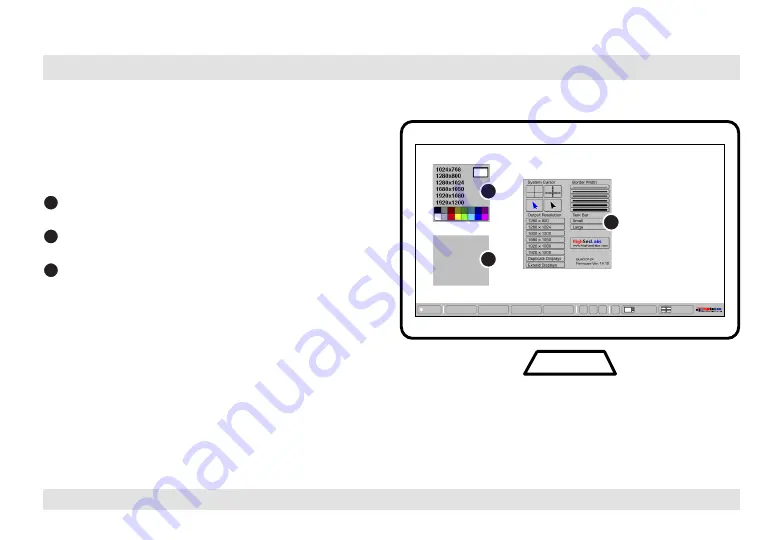
The Setup Menu:

 accessible through the lower left screen corner 

allows configuring various system settings, such as, output resolution, 
screen duplication, cursor color and more.

Setup Menu Description:

1

 Main Admin Menu:

 select which setting to configure (system 

settings / channel settings). 

2

 Channel Settings:

 set the screen resolution and frame color of the 

selected channel number. 

3

 System  Settings:

 Change display output resolution, screen 

duplication, frame border width, operation-taskbar size and system 
cursor type.

Channel 1

Setup

Channel 2 Channel 3 Channel 4

1 2 3

?

Scale

Tile

System
Channel 1
Channel 2
Channel 3
Channel 4

2

1

3

Note:

 4 channel product illustrations shown throughout this manual are 

applicable to other KVM Combiner models.

Summary of Contents for SC21H-3

Page 1: ...IDE Models SC21H 3 Secure 2 Port HDMI Video KVM Combiner PP 3 0 SC42DU 3 Secure 4P to 2P DVI Video KVM Combiner w fUSB SC42DHU 3 Secure 4P DVI to 2P HDMI Video KVM Combiner w fUSB SC42PHU 3 Secure 4P DP HDMI to 2P HDMI Video KVM Combiner w fUSB HDC14468 Rev 1 0 ...

Page 2: ...up Overview 4 Step 3 Power ON the Combiner 5 Step 4 Configure Display Output 6 Step 5 Working with Dual Displays 8 Step 6 Reset to Factory Defaults 9 Operation 10 Operating the Combiner 10 Step 1 Operation Modes Overview 10 Step 2 View Modes Overview 11 Step 3 Toggling Options 12 Step 4 Complete toggling options table 14 Step 5 Customize Channel Window Layout 20 Combiner Cascading 26 Introduction ...

Page 3: ...gle set of USB audio keyboard video and mouse peripherals The KVM Combiner switch offered by HSL provides increased productivity in challenging multi computer environments where users are required to view and interact with several computers at the same time while maintaining the highest isolation between computers and peripherals This guide instructs how to install configure and operate a HSL KVM ...

Page 4: ...rt to support user authentication across multiple isolated computers Note For optimum compatibility use the supplied 5 button mouse with the combiner s console port 2 Computer channel ports For each PC connect the video keyboard mouse fUSB and audio cables to the combiner s computer ports Smart Card Reader Computers CONSOLE PORTS COMPUTER SOURCE PORTS fUSB Cable Audio Cable Mouse Cable Display Cab...

Page 5: ...dmin Menu select which setting to configure system settings channel settings 2 Channel Settings set the screen resolution and frame color of the selected channel number 3 System Settings Change display output resolution screen duplication frame border width operation taskbar size and system cursor type Channel 1 Setup Channel 2 Channel 3 Channel 4 1 2 3 Scale Tile System Channel 1 Channel 2 Channe...

Page 6: ...here all sources are presented equally on the screen Note In case no picture is presented after powering ON the combiner connect an alternate display to the combiner s display console port or perform a reset to factory default Multiple Sources Speakers Single Keyboard Mouse SECURE KVM COMBINER SECURE KVM COMBINER PC 4 PC 3 PC 1 PC 2 Move mouse to switch PCs Note 4 channel product illustrations sho...

Page 7: ...c OS Screen Resolution Use the same screen resolution across all level 2 Selecting a resolution that is not supported by your screen will result in a blank display which might require connecting a monitor that supports the selected resolution or resetting the combiner to factory default 3 For working with dual displays please refer to the appendix View applications in Ultra High Definition UHD 4K ...

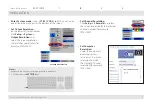
Page 8: ...keys are to be pressed sequentially 2 CTRL key refers to LEFT CTRL key 1 2 3 4 5 6 7 8 9 0 _ Tab Q W E R T Y U I O P Caps A S D F G H J K L Shift Ctrl Ctrl Alt Alt Delete Enter Shift Ctrl é ç ê è 0 1 2 3 4 5 6 7 8 9 Num Lock Enter Insert Delete Home End Page UP Page Down Z X C V B N M Set Channel Resolution Click Setup Channel and select the screen resolution for the selected channel number for ex...

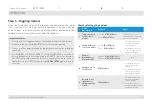
Page 9: ...y 2 Channel 1 Setup Channel 2 Channel 3 Channel 4 1 2 3 Scale Tile 3 4 1 2 Channel 1 Setup Channel 2 Channel 3 Channel 4 1 2 3 Scale Tile 3 4 1 Duplicate in Tile Mode Channel 1 Setup Channel 2 Channel 3 Channel 4 1 2 3 Scale Tile 1 2 3 4 Channel 1 Setup Channel 2 Channel 3 Channel 4 1 2 3 Scale Tile 1 2 3 4 Primary Secondary Duplicate in Scale Mode Set Screen Extending Mode click Setup System Outp...

Page 10: ...nts 1 3 4 2 Step 6 Reset to Factory Defaults Reset to factory defaults clears the device settings and restores the device to its original configuration System reset Clears behavioral characteristics such as mouse settings and display presets Type L CTRL L CTRL F11 r key combination ...

Page 11: ...onfiguring various system settings such as output resolution screen duplication cursor color and more Operation taskbar Toggle between channels by clicking on a channel number Toggle between view modes by clicking Scale Tile Custom menu buttons Save custom screen layouts as presets by long pressing the 1 2 3 buttons In User mode the user can simultaneously interact with multiple source computers a...

Page 12: ...ed and others are aligned vertically on the right screen side Switch between the enlarged sources by clicking on any of the aligned sources on the right Channel 1 Setup Channel 2 Channel 3 Channel 4 1 2 3 Scale Tile 1 2 3 4 Channel 1 Setup Channel 2 Channel 3 Channel 4 1 2 3 Scale Tile 2 1 3 4 Click to Enlarge Custom View mode Custom views allow rearranging positioning and saving screens as needed...

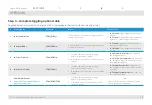
Page 13: ...board where the letter A is equivalent to the location of the letter Q on a QWERTY keyboard type CTRL CTRL a to switch to tile view Most useful toggling options Action Description Keyboard Mouse 1 Toggle between System User modes system CTRL CTRL o user CTRL CTRL u Click the side mouse button to toggle between System User modes 2 Switch between Tile Scale Views Tile CTRL CTRL q Scale CTRL CTRL s 1...

Page 14: ... instead of the numeric pad keys 1 Click to select a channel 2 Press and hold the side mouse button scroll the mouse wheel to reduce increase scaling 3 For fast scaling hold the left CTRL 7 System Reset to factory defaults CTRL CTRL F11 r Notes 1 Keyboard shortcut keys are to be pressed sequentially 2 CTRL key refers to LEFT CTRL key 1 2 3 4 5 6 7 8 9 0 _ Tab Q W E R T Y U I O P Caps A S D F G H J...

Page 15: ...o Tile View CTRL CTRL q 1 Click the side mouse button to toggle between System User modes 2 In System mode Click Tile on the operation taskbar 1 In Scale view User mode Tap 4 times on the enlarged window 2 In Scale view System mode Tap 4 times on the enlarged window to switch to User mode then tap 4 times again 4 Switch to Scale View CTRL CTRL s 1 Click the side mouse button to toggle between Syst...

Page 16: ... the channel s screen area 9 Enlarge a source to full screen CTRL CTRL f In System mode Tile view Double click any tile In System mode Scale view Double click on the enlarged window In User mode Tile view Tap 4 times on any tile In System mode tile view Tap 4 times on any tile to switch to User mode then tap 4 times again on any tile 10 Go back to last layout before enlarging to full screen CTRL C...

Page 17: ...g aspect ratio First resize channel CTRL CTRL w N A N A 13b Fit content to newly resized channel area without keeping aspect ratio First resize channel CTRL CTRL y N A N A 14 Resize channel content simultaneously5 2 First switch to System mode Tile view 1 Select a channel CTRL CTRL Channel 1 16 2 Reduce scaling CTRL CTRL 3 Increase scaling CTRL CTRL Note use the and keys instead of the numeric pad...

Page 18: ...On the operation taskbar long press the 1 or 2 or 3 button for 3 seconds to save your preset N A 17 View custom presets CTRL CTRL F1 F3 1 First switch to System mode Tile view 2 Click 1 2 3 buttons on the operation taskbar N A 18 Save a custom tile preset5 4 1 First switch to System mode Tile view 2 Rearrange channel windows layout N A On the operation taskbar long press the Tile button for 3 seco...

Page 19: ...reen Duplicate Primary Project primary display on both displays CTRL CTRL F11 j j N A N A 22 Dual Screen Duplicate Secondary Project secondary display on both displays CTRL CTRL F11 k k N A N A 23 Dual Screen Switch Positions Switch position between primary and secondary displays CTRL CTRL F11 k j CTRL CTRL F11 j k N A N A This action is explained in detail using a step by step description ahead ...

Page 20: ...eft screen side For example touch and hold the upper left screen corner to switch from Tile view user mode to Scale view 26 Enable Left CTRL Toggles between the right CTRL keys for system commands R CTRL R CTRL F11 i N A N A 27 Disable front panel and DCU Disable Enable the front panel push buttons and DCU functionality Once disabled switching channels is only functional through mouse and keyboard...

Page 21: ...ner of the screen for 4 seconds 2 Switch to Tile view CTRL CTRL q Click the side mouse button to toggle between System User modes In System mode Click Tile on the operation taskbar you should already be in Tile view 3 Resize channel Click to select a channel Place the mouse cursor at the channel s lower right corner Press and hold the right mouse button and drag the channel s screen to resize Tap ...

Page 22: ... System mode Click Tile on the operation taskbar you should already be in Tile view 3 Resize channel content Select a channel CTRL CTRL Channel 1 16 Reduce scaling CTRL CTRL Increase scaling CTRL CTRL Note use the and keys instead of the numeric pad keys Click to select a channel Press and hold the side mouse button scroll the mouse wheel to reduce increase scaling For fast scaling hold the left C...

Page 23: ...e screen for 4 seconds 2 Switch to Tile view CTRL CTRL q Click the side mouse button to toggle between System User modes In System mode Click Tile on the operation taskbar you should already be in Tile view 3 Drag channel window Click to select a channel Press and hold the left mouse button and drag the channel window Tap and hold the upper left corner of a channel and drag the window Note to reve...

Page 24: ...stem User modes In System mode Click Tile on the operation taskbar you should already be in Tile view 3 Rearrange channels as described in the previous steps 4 Save a custom preset to 1 2 3 button On the operation taskbar long press the 1 or 2 or 3 button for 3 seconds to save your preset 5 View custom presets CTRL CTRL F1 F3 Click 1 2 3 buttons on the operation taskbar 6 Save a custom Tile preset...

Page 25: ...le view Tap 4 times on the enlarged window In Tile view Touch and hold the uppermost right corner of the screen for 4 seconds 2 Switch to Tile view CTRL CTRL q Click the side mouse button to toggle between System User modes In System mode Click Tile on the operation taskbar you should already be in Tile view 3 Rearrange channels as described in the previous steps Example place the resized channel ...

Page 26: ...to toggle between System User modes In System mode Click Tile on the operation taskbar In Scale view User mode Tap 4 times on the enlarged window In Scale view System mode Tap 4 times on the enlarged window to switch to User mode then tap 4 times again 2 Presentation mode ON Enlarge each channel to full screen when changing active source using CTRL CTRL Channel 1 6 CTRL CTRL p N A N A 3 Change Act...

Page 27: ...oughout the cascaded chain View modes VDT etc Native touchscreen support across all sources Independently resize and rearrange the screen layouts of each source Expand any source to full screen Support RS232 commands for easy screen layout switching programming Child Combiner 2 Child Combiner 1 Child Combiner 3 Child Combiner 4 Child Combiner 2 Child Combiner 1 Child Combiner 3 Child Combiner 4 MA...

Page 28: ...TRL F11 i to enable RIGHT CTRL on the Root combiner Once done LEFT CTRL keyboard shortcuts will apply on Child Combiners while RIGHT CTRL shortcuts will apply on the Root Combiner Also touch screen gestures on the Root Combiner will switch to the LEFT Root Combiner Child Combiner Computers CONSOLE PORTS COMPUTER SOURCE PORTS fUSB Cable Audio Cable Mouse Cable Display Cable Keyboard Cable CONSOLE P...

Page 29: ...Child and Root Combiner s System Modes it is recommended to change the Root Combiner mouse cursor color through the operation taskbar setup system menu Step 6 Start working CONSOLE PORTS COMPUTER SOURCE PORTS 4 3 2 1 4 3 2 1 4 3 2 1 4 3 2 1 Child Combiner 4 Child Combiner 3 Root Combiner Child Combiner 2 Child Combiner 1 3 4 2 1 3 4 2 1 3 4 2 1 3 4 2 1 Child Combiner 1 Child Combiner 3 Child Combi...

Page 30: ...demonstration purposes only This document may contain confidential and or proprietary information of HSL Corporation and its receipt or possession does not convey any right to reproduce disclose its contents or to manufacture or sell anything that it may describe Reproduction disclosure or use without specific authorization from HSL Corporation is strictly prohibited Highseclabs com ...

Reviews: