background image

22

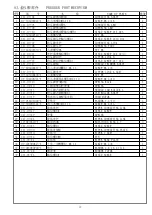
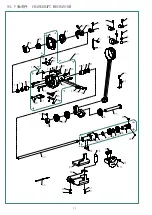
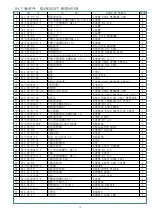
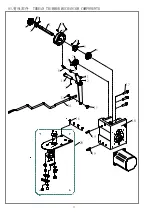
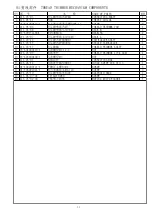
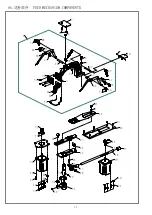
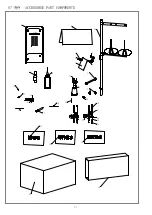
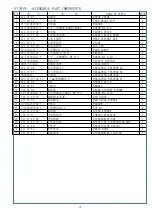
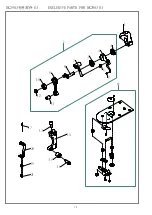
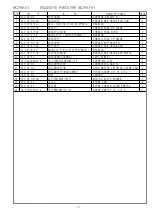
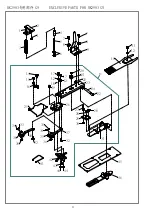
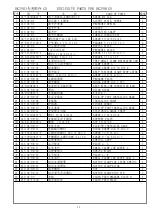
HK2903专用部件(2)     EXCLUSIVE PARTS FOR HK2903(2)

序号

图     号

名      称

NAME OF PARTS

数量

1

01-504000824-1

内六角圆柱头螺钉M4×8 

SCREW M4 L=8

2

2

419.02-01 

抬压脚上支撑架

ACCEPT PLATE, UPPER 

1

3

419.02-02 

调节杆弹簧

PRESSURE SPRING

1

4

419.02-03 

调节杆套

SLEEVE

1

5

419.02-04

调节杆

ADJUSTING SHAFT

1

6

419.02-05

调节杆螺帽

THREAD TENSION NUT

2

7

02-715281121-1

螺钉SM15-64×28 L=11

SCREW 15/64-40 L=11 

2

8

05-061251500-1

平垫圈6.1×15.0×2.5

WASHER 6.1×15.2×2.5 

2

9

419.02-06

抬压脚连动板

MOVING PLATE

1

10

419.02-07

Y向运动压板

PRESSURE PLATE

1

11

02-711400525-1

螺钉11×64-40 L=5.3

SCREW 11×64-40 L=5.3 

1

12

05-045101200-1

平垫圈5×10.5×1

WASHER 5×10.5×1 

3

13

419.02-08

夹紧纽扣组件

VERY SMALL CLAMP MECHANISM ASM

1

14

419.02-08-01 

纽扣大小调节螺钉

CLAMP SCREW A

1

15

419.02-08-02

锁紧螺钉

HINGE SCREW D=5.50 H=1.8

1

16

419.02-08-03

调节扳手

SNAP FASTENER CLAMP STOP LEVER

1

17

02-712321421-1

螺钉 3/16-32 L=13.5

SCREW 3/16-32 L=13.5

2

18

419.02-08-04

压脚锁紧板

PRESSER PLATE 

1

19

419.02-08-05

调节螺丝

HINGE SCREW D=5.5 H=3

1

20

06-0400809-1

安装板导向轴挡圈

SNAP RING,FOR CONNECTING ROD

1

21

419.02-08-06

滑块

SLIDE BLOCK

1

22

06-0600812-1

安装轴挡圈

E-RING 7

2

23

419.02-08-07

夹头安装板

PICK-UP FOOT INSTALLING BASE

1

24

419.02-08-08

安装轴

INSTALLING SHAFT

1

25

419.02-08-09

护指器

FINGER GUARD

1

26

419.02-08-10

夹头基座

PICK-UP FOOT INSTALLING BASE 

1

27

419.02-08-11

安装板导向轴

STATIONING BLOCK SHAFT

1

28

02-711400421-1

螺钉 11/64-40 L=4

SCREW 11/64-40 L=4

2

29

419.02-08-12

安装板导向支撑架

SUPPORT PLATE

1

30

04-615280300-1

螺帽  15/64-28

NUT 15/64-28

1

31

419.02-08-13

安装支架

PICK-UP INSTALLING BASE

1

32

419.02-08-14

连接轴位螺钉

HINGE SCREW D=6.35 H=3.9

2

33

02-106560321-1

压脚垫块螺钉 D=6.35 H=3.9

SCREW 3/32-56 L=3

2

34

02-509400421-1

开槽圆柱头螺钉SM9/64×40 

SCREW 9/64-40 L=3.5

2

35

419.02-08-15

右弹簧垫片

SPRING, LEFT

1

36

419.02-08-16

右平板夹

PLATE L, L

1

37

419.02-08-17

右夹紧杆

SMALL CLAMP JAW LEVER, L

1

38

419.02-08-18

左弹簧垫片

SPRING RIGHT

1

39

419.02-08-19

左平板夹

PLATE L, R 

1

40

419.02-08-20

左夹紧杆

SMALL CLAMP JAW LEVER ASM, L

1

41

419.02-08-21

纽扣夹紧弹簧

BUTTON CLAMP JAW LEVER SPRING

1

42

419.02-08-22

纽扣夹紧滑块

BUTTON CLAMP SLIDE

1

43

419.02-08-23

调节螺母

NUT

1

44

419.02-08-24

纽扣调节导向螺钉

BUTTON CLAMP STOP PIN

2

45

419.02-09

盖板

CLOTH FEED PRESSER PLATE B

1

46

419.02-10-00

摆动架组件

CLOTH FEED PLATE

1

A4

Summary of Contents for HK2900

Page 1: ......

Page 2: ...并将电源插头从插座上拔下后 等待至少 5 分钟后 再打开控制箱盖 触摸带有高电压的区域会造成人员受伤 使用环境 应避免在强电气干扰源 如高频焊机 的附近使用本缝纫机 强电气干扰源可能会影响缝纫机的正常操作 电源电压的波动应该在额定电压的 20 以内的环境下使用 电压大幅度的波动会影响缝纫机的正常操作 需配备稳压器 环境温度应在 5 35 的范围内使用 低温或高温会影响缝纫机的正常操作 相对湿度应在 45 85 的范围内 并且设备内不会形成结露的环境下使用 干燥 潮湿或结露的环境会影响缝纫机的正确操作 压缩空气的供气量应大于缝纫机所要求的总耗气量 压缩空气的供气量不足 会导致缝纫机的动作不正常 万一发生雷电暴风雨时 关闭电源开关 并将电源插头从插座上拔下 雷电 可能会影响缝纫机的正确操作 安装 请让受过培训的技术人员来安装缝纫机 安装完成前 请不要连接电源 如果误按启动开关 缝纫机动作会导致...

Page 3: ...致受伤 1 机针穿线时 2 更换机针时 3 缝纫机不使用或人离开缝纫机时 缝纫过程中 不要触摸任何运动部件或将物件靠在运动部件上 因为这会导 致人员受伤或缝纫机损坏 如果缝纫机操作中发生误动作 或听到异常的噪声或闻到异常的气味 应立 即切断电源 然后请与购买商店或受过培训的技术人员联系 如果缝纫机出现故障 请与购买商店或受过培训的技术人员联系 维护和检查 只有经过训练的技术人员才能进行缝纫机的维修 保养和检查 与电气有关的维修 保养和检查请及时与电控厂家的专业人员进行联系 发生下列情况时 请关闭电源并拔下电源插头 否则误按启动开关时 会导 致受伤 1 检查 调整和维修 2 更换弯针 切刀等易损零部件 在检查 调整和修理任何使用气动设备之前 请先断开气源 并等压力表指 针下降到 0 为止 在必须接上电源开关和气源开关进行调整时 务必十分小心遵守所有的安全 注意事项 未经授权而对缝纫机进行改装...

Page 4: ... 6 废油槽和机头支撑橡胶的安装 20 7 安全开关 20 8 缝纫机的放倒方法 21 9 操作盘的安装 21 10 电缆线的链接 22 11 马达护罩的安装 23 12 电线的处理 23 13 眼睛保护罩的安装 24 14 线架的安装 24 4 缝纫机的准备 25 1 加油方法 25 2 机针的安装方法 25 3 上线的穿线方法 26 4 梭壳的取下插入 26 5 旋梭的插入方法 27 6 线张力的调整方法 27 7 挑线弹簧的调节 27 5 缝纫机的操作 基础篇 28 1 项目数据的设定 28 2 图案形状的确定 30 3 缝制 30 4 变更为其它花样 31 5 绕线 31 6 底线计数器 31 7 暂停 32 8 图案线张力的设定 33 6 缝纫机的操作 应用篇 34 1 使用花样键 进行缝制 34 2 使用组合功能的缝制 36 ...

Page 5: ...旋梭 49 3 压脚的高度 50 4 移动刀和固定刀 51 5 挑线杆的调整 51 6 废油的处理 52 7 旋梭的加油量 52 8 向指定部位补充润滑 53 9 套结标准花样一览表 54 10 缝制时的故障 原因和对策 58 Ⅱ HK2903SS 301 高速电子平缝钉扣缝纫机的说明 60 1 规格 60 2 安装和运转准备 60 3 机针和机线 60 4 钉扣功能设定 61 5 钉扣标准花样一览表 61 6 爪脚张开拨杆的调整 63 7 钮扣爪脚上升量的调整 64 8 压脚压力的调整 64 9 钮扣挑起杆的安装 选购品 65 10 按钮扣尺寸分类的机种 65 Ⅲ 通过 U 盘升级花样 66 花样升级操作 66 Ⅳ 附录 1 70 异常信息一览表 70 Ⅴ 机台图纸 75 ...

Page 6: ...转抬针时 10 标准花样数 50 个 11 拨线方式 脉冲马达抬压脚连动 12 面线张力 夹线器 13 旋梭 半旋转标准旋梭或半旋转倍旋梭 14 加油方式 旋转部 微量加油 15 机油 缝纫机油 16 润滑脂 缝纫机用润滑脂 17 数据记忆 Flash Memory 18 放大缩小功能 X 方向 Y 方向各自独立缩放 20 200 1 单位 19 放大缩小方式 线迹长度增减方式 20 缝制速度限制 400 3000rpm 100rpm 单位 21 花样选择功能 花样号码指定方式 1 200 22 底线记数 上转 下转方式 0 9999 23 机械马达 500W 小型 AC 伺服马达 直接驱动方式 24 外形尺寸 263mm 153mm 212mm 25 控制箱重量 约为 10 Kg 26 消耗电力 600W 27 使用温度范围 5 35 28 使用湿度范围 35 85 无结露 29 电源电...

Page 7: ...6 缝纫机机头 布压脚 线架装置 操作盘 电源开关 控制箱 踏板开关 2 各部的名称 1 主机的名称 ...

Page 8: ...的缝制状态的变换键 缝制 LED 设定编程状态时为灭灯 缝制状态时为亮灯 通过准备键来切换 复位键 解除异常 将设定值返回到初期值时使用 方式键 设置参数或存储花样的开关键 前进传送键和 后退传送键 适用于花样号 扩大缩小率的变更 前进 后退送布 选择键 选择设定的项目 被选择项目的项目选择 LED 和设定值被显示 数据显示 LED 显示花样号 扩大缩小率等被选择项目的设定值 项目选择 LED 被选择的项目的 LED 亮灯 2 操作箱开关的名称和说明 ...

Page 9: ...行抓线动作 P 花样设置键 设置 P 花样并将其存储 存储后的 P 花样通过按此键就可立即进行缝制 主轴马达通过连接器Y连接到缝纫机的上轴X上 马达连接器由 4 个螺丝分别固定到缝纫机上轴及马 达主轴上 首先 将连接器第 1 螺丝 垂直于缝纫机上轴平面拧紧 然后拧紧连接器第 2 螺丝Z 连接器 第 3 螺丝 垂直于马达主轴平面拧紧 然后拧紧连接器第 4 螺丝 这样完成了主轴马达与缝纫机上轴的 连接 安装图示如下 主轴马达的外部线缆朝向 从缝纫机后部向前部看去 电机线缆朝向观察者的左手边 安装位置如 下图所示 3 主轴马达的安装 ...

Page 10: ... Z为主轴马达编码器信号线 为主轴马达电源线 通过启动该模式 可进行保养检查操作 1 在缝制灯熄灭的状态下 按 键 显示 然后同时 按下键 听到蜂鸣器响声后 在记忆开关的客户等级设定模式下可以进入调试模式 注意 不同时按 的话 就不能进入调试模式 2 按一次 键进入调试模式 屏幕显示 CP 如右图所示 3 按 键 开始进行显示输出测试 显示输出测试将循环检测每个 LED 显示模块及 LED 指示灯的亮灭 状态 具体流程如下图所示 P1 P3 P5 P1 P3 P5 4 调试模式 ...

Page 11: ...10 4 再次按下 键 结束显示输出测试 屏幕显示 CP 1 如右图所示 注 只有在显示输出测试结束之后才能进行其他功能的测试选择 5 按 键 可以变更功能测试程序号 每个序号代表的功能如下表所示 功能测试序号 功能 内容 输入信号检验 以灯亮提示开关 传感器输入的状态 ...

Page 12: ... 进入 CP 1 屏幕显示 1 即第 1 项测试内容 每个输入 No 的显示内容 XY 马达 原点传感器检验 显示 X Y 马达寸动操作 原点检索操作以 及 X Y 原点传感器的状态 连续运转 在设定连续运转条件后 移向连续运转模 式 主马达旋转数检验 设定旋转数 机器启动 显示实测旋转数 _________________ _________________ 压脚 切线马达 原点传感器检验 显示压脚 切线马达寸动操作 原点检索 操作 以及压脚原点 压脚传感器的状态 抓线马达 原点传感器检验 显示抓线马达的寸动操作 原点检索操 作 以及抓线原点 抓线传感器的状态 线张力电磁铁检测 检测线张力电磁铁是否可以正常吸合 夹 线动作是否正常 步进闭环误差检测 检测并显示步进闭环电机动作误差 ...

Page 13: ...档 踏板 2 档 5 压脚马达 原点传感 器 Y 马达原点 传感器 X 马达原点 传感器 抓线马达 原点传感 器 切线传感 器 抓线传感 器 6 主轴角度显示 7 主轴马达 Z 相 8 机头翻起 开关 2 CP 2 检验 X Y 马达 原点传感器 显示 XY 马达的寸动操作 原点检索操作 1 准备 首先按 键 进入 CP 2 屏幕显示 1 再按 键进行切线 压脚马达的原点检索 压 脚下降 缝制灯亮起 也可不按 键直接进行步骤 2 的操作 2 操作 R M No 1 2 3 X Y 1 2 3 P4 P3 P2 P1 P5 X Y 0 1 X Y X Y 0 1mm X Y X X Y Y ...

Page 14: ...连续运转模式 在设定了连续运转条件后 启动连续运 转模式 如果要解除连续运转模式请关闭电源 1 间隔时间的设定 按 键 设定两次运转的间隔时间 从 1800ms 至 9900ms 可以 100ms 为单位进行设定 默认值 2000ms 设定后 按 键 保存设定值 2 缝制结束有无原点检索的设定 按 键 设定缝制结束时有无原点检索 A0 无效 默认值 A1 有效 每次缝制结束后进行原点检索 设定完成后 按 键 进入普通缝制模式 3 连续操作 在普通缝制模式下 用户可以设定花样号码 X Y 缩放率 最高转速等条件然后开始缝制 缝制结束 之后 如果在第 2 步操作中设定有原点检索的话 则开始进行 X Y 压脚 切线 抓线的各个马达的原点检索 如果在第 1 步操作中设定的休止时间后 就会自动再次开始进行缝制 如果要中止连续缝制 请在缝纫停 止时 按 键停止 4 CP 4 检验主马达转速 设定机器的...

Page 15: ...14 2 操作 按 键 可以变更设定的主轴转速 然后按 键 机器以设定的转速开始运转 此时 按 键 可以切换设定转速显示和实际转速显示 如需再次变更设定转速 再次按 键 使用 键 设定转速值 然后按 键 机器以新设定的转速运转 如需停止运转 按 键 如需推出该模式 请按 键 ...

Page 16: ...显示两位传感器信号数字 再按 键 压脚电机进行原点检索 含原点微调量 缝制灯亮起 在缝制灯亮起的情况下 按 键可 以使压脚电机以最小单位单位寸动 新原点完成设定后再按一次 键保存微调值 按 退出 完成新原点的设置 2 检测原点微调位置和原点回复功能 在按照 1 中描述设置好新原点位置后 退出到显示 CP 6 界面 再按 键进入 CP 6 按 键压脚电机会按照新设置的原点位置进行原点检索 以检验 设置的新原点位置是否正确 如欲清除原点微调量 可以在缝制灯亮起的情况下踩踏板到 2 档两次清除原 点微调量并进行原点检索 此时压脚电机回到初始原点位置 不喊原点微调量 3 在设置新原点位置后压脚电机各位置检测 在进入 CP 6 模式后 按按 键压脚电机进行 原点检索 含原点微调量 缝制灯亮起 此时不要踩踏板到 2 档 以为这样操作会清除原点微调量 而 ...

Page 17: ...状态 1 准备 首先按 键 进入 CP 7 然后按 键 缝制灯亮起 踩踏板 进行原点检索后 屏幕显示 10 2 操作 按 键 抓线器可以以脉冲为单位进行寸动 按 键 抓线器向后驱动 按 键 抓线器向前驱动 R M No 1 2 3 X Y 1 2 3 P4 P3 P2 P1 P5 0 1 0 1 1 2 3 4 按 键 机器可以按上图所示 1 4 的步骤循环运作 如需退出该模式 请按 7 CP 8 夹线电磁铁检测 该模式用于检测夹线电磁铁的动作是否正常 在屏幕显示 CP 8 时按 键进入该模式 屏幕显示 CLAMP 按 或 键可以使电磁铁吸合 随后很快断电 观察夹线器可以看到夹线动作 并 能听到 咔嗒 的声音 表示电磁铁工作正常 ...

Page 18: ...按 P1 键 屏幕显示变为 d 0 数字 0 表示误差为 0 字母 d 表示当前误差 deviation 通过 P1 键可以切换显示动作位置和当前误差 注意 在显示误差的时候 是 无法通过按 或 键改变动作位置的 另外 在选定电机并进行原点检索后 缝制灯亮 如果 又按了 切换电机 缝制灯会熄灭 需要重新按 键进行原点检索 再执行后续操作 对于压脚电机 在压脚下降 LED 灯点亮的情况下 按 键进行原点检索 屏幕显示 P 1 压脚电 机处于抬起位置 然后按 键可以将压脚电机在 降下 位置 P 2 分线 位置 P 3 抬 起 位置 P 1 这 3 个位置循环切换 然后才踏板到 2 档 可以让压脚电机反复执行当前位置的后续动 作 如 在抬起位置 P 1 踩踏板到 2 档 压脚降下 再次踩踏板到 2 档 压脚抬起 如此反复 压 脚位置和测试动作的关系如下 P 1 位置踩踏板到 2 档 反复执行降下...

Page 19: ...8 3 安装 1 电气箱的安装 2 控速器的安装方法 3 机头部支杆的安装 把机头部支杆 插到机台孔 里 缝纫机机台上附属的圆头螺栓 平垫片 弹簧垫 片 螺母 按照图示的位置安装好 再把螺栓 弹 簧垫 平垫片 按照图示的位置安装好 1 把连接杆 用螺母 固定到踏板拉杆 的 安装孔 B 里 2 把连接杆 安装到安装孔 A 之后 踏板的 踩踏行程变大 3 把控速器用 4 个自攻螺钉 锁紧在台板合 适的位置 ...

Page 20: ...19 5 缝纫机机头的安装 1 把胶垫 插到机轴上 固定缝纫机主体 2 拧紧固定绞链橡胶 的螺母 时 请拧紧螺母 让弹簧垫 成为图中 B 所示的那样 然后用 螺母 进行固定 铰链橡胶 拧得过紧的话 就会妨 碍其功能的正常发挥 请注意 搬运缝纫机时 请手拿 A 部 4 电源开关的安装 1 电源开关的安装 请把电源开关 用木螺钉 固定到机台 下面 请根据使用状态 用附属的卡扣 固定好电缆线 ...

Page 21: ...20 请取下固定安全开关 的拨杆部的胶带 6 废油槽和机头支撑橡胶的安装 1 用固定螺丝 4 个 把废油槽 固定到 机台 的安装孔上 2 把废油瓶 拧进废油槽 3 把缝纫机废油管 插到废油瓶 里 4 把机头支撑橡胶 插进机台 1 放倒缝纫机机头后 废油管 应该不从废油瓶 脱落 牢牢 地插到最里面 2 请卸下固定废油管 的胶带 7 安全开关 ...

Page 22: ...然的起动发生意外的事故 请把电源关掉之后再进行操作 放倒缝纫机时 请轻轻地放 把缝纫机放在机 头支杆 上 1 放倒缝纫机前 请先确认 机台上是否安装有机头支 杆 2 抬起缝纫机时 请不要搬 马达外罩 来抬起缝纫 机 以免防止马达外罩 损坏 3 为了防止机器翻倒 请一 定在平坦的地方放倒缝纫 机 9 操作盘的安装 用木螺钉 将操作盘安装板 固定到机台上 把电缆线穿过机台孔 用附属的螺钉 把操作盘固定到操作盘安装 板 上 请把电缆线用附属的卡扣固定到机台 背面 在机台下面安装操作盘时请参照左图进行安装 ...

Page 23: ...22 外部线缆插头上有对应的编号 请仔细查看后对应接插 示意图 5 6 图 5 图 6 10 电缆线的链接 ...

Page 24: ...23 11 马达护罩的安装 把马达护罩 用附属的螺丝安装到缝纫机主体上 12 电线的处理 放倒缝纫机时 请确认机头支杆安装在机台上 在放倒缝纫机的状态 连接电线 如图所 示用线束夹 捆紧 ...

Page 25: ...24 请一定安装眼睛保护罩 用螺丝 安装到安 装部位 之后再使用缝纫机 14 线架的安装 1 如图所示那样把线架安装到机台孔上 2 用固定螺母 固定线架 3 顶线配线时 请把电源线从线架杆 中 穿过 13 眼睛保护罩的安装 ...

Page 26: ...的加油器进行加油 加油的油槽仅是向旋梭加油的 使用低转 速时 如果旋梭的油量过多 可以把油量 调小 请参照 7 维修 8 旋梭的加油量 1 请注意不要向油槽和下列注意 2 的 旋梭以外的部位加油 否则会发生零 件故障 2 初次使用缝纫机或较长时间没有使 用缝纫机时 请向旋梭加少量的机油 后再使用缝纫机 请参照 7 维修 2 机针与旋梭 2 机针的安装方法 为了防止突然的启动造成人身事故 请关掉电源后再进行操作 安装机针时 请拧松固定螺丝 把机 针 的长沟 朝向面前 插进针杆的深 处 然后拧紧固定螺丝 缝迹如 A 时 请把机针向 B 方向稍稍移动然后安装起 来 ...

Page 27: ...26 穿过机针的线应留出 4cm 左右 3 上线的穿线方法 4 梭壳的取下插入 1 打开旋梭外罩 2 拨起旋梭壳 的抓脚 取出梭壳 3 插入时 请把梭壳深深插入旋梭轴 并关 闭抓脚 ...

Page 28: ...从线孔约拉出 2 5cm 旋梭的旋转方向相反的话 底线 的拉出就不稳定 6 线张力的调整方法 把第一线张力旋钮 向右转动 切线后针尖 上的残线长度变短 向左转动后变长 请尽量在不脱线的情况下弄短残线 在操作盘上调整上线张力 用 调整底线张 力 7 挑线弹簧的调节 挑线弹簧 的标准移动量为 8 10mm 开始挑 线时的强度为 0 1 0 3N 1 移动量的调节 拧松固定螺钉 转动线张力结合体 向右转动之后 动作量变大 拉线量变多 2 强度的调节 改变挑线弹簧的强度时 请在螺丝 拧紧 的状态下 用手转动 调节 向右转动之 后 挑线弹簧的强度变强 向左转动之后 强度变弱 ...

Page 29: ...项目 2 1 打开电源开关 项目选择的花样号码亮灯 数据显示部分显示出花样号码 2 花样号码的设定 3 X 放大缩小率的设定 4 Y 放大缩小率的设定 1 按 键 进行花样号码选择设定 2 按 键 键 画面上显示出 14 设定为 14 号花样 1 按 键 进行 X 放大缩小率的 设定 2 按 键 键 让缝纫机 显示出 100 把 X 放大缩小率设定为 100 1 按 键 进行 Y 放大缩小率 的设定 2 按 键 键 让缝纫 机显示出 100 把 Y 放大缩小率设定为 100 ...

Page 30: ...以变更 线张力在缝制 LED 亮灯时也可以变更 踩下踏板时可以记忆 当花样号为 0 出厂设置 时 按下 键后 会显示错误 E 10 此时 按下复位键后请重新确定花 样号 不按 键 关掉电源后 花样号 XY 放大缩小率 最高转速 线张力的设定值均不能被记忆 1 按 键 进行转速的设定 2 按 键 键 让缝 纫机显示出 400 设定为 400rpm 3 按 R 键恢复系统默认值 即最 高转速 1 按 键 进行线张力的设定 2 按 键 键 让缝纫机 显示出 50 可以在 0 200 的范围内进行设定 1 按 键 2 压脚移动上升后 缝制 LED 亮灯 成为可以缝制的状态 3 如果再次按下 键 缝制 LED 灯熄灭 可重新设定各数 据项目 ...

Page 31: ... 障后 可以使用此方法进行补缝 注意 2 不要将注意 1 中的做法用作花样试缝操作 以免万一误将踏板开关踩至第二级 引起机器启动而 发生危险 花样的试缝操作必须严格按照 2 4 2 花样形状的确定 试缝 一节中的步骤进行操 作 1 按 键 缝制 LED 灯亮起 2 用 键选择压脚下降 屏幕显示 踩脚踏板让压脚下 降 屏幕显示 3 在压脚下降后的状态 按 键 4 用 键 键确认形状 确认 缝制的花 样在压脚允许的范围内 5 按 键让压脚上升 6 用 键 解除 选定 选定除 外 的其他数据项目 后 按 键 结束 试缝 缝制 LED 灯熄灭 缝制 1 把缝制品放到压脚部 2 踩踏板开关至第一级 压脚下降 松 开踏板后 压脚上升 3 踩踏板开关至第二级之后开始缝制 4 缝制结束后 压脚上升返回到起始缝的 位置 ...

Page 32: ...中缝制数量的设置 按 R 键可将 1 按 键 缝制 LED 灯灭 2 按 键 选择花样号设定项目 3 用 键 键设定花样号 4 同样地设定 XY 放大缩小率 转速等 5 按 键之后 缝制 LED 灯亮起 成为 可以缝制的状态 刚打开电源后 绕线不动作 请设定 1 次花样号后 按 键让缝制 LED 灯亮 起之后再进行如下操作 1 再按 键 缝制 LED 灯熄灭 2 按 键 选择绕线 屏幕显示 如果缝 制 LED 灯亮起时不能选择 3 按 键 压脚下降 缝制 LED 灯 亮起 4 踩踏板开关后 缝纫机开始转动 5 踩踏板开关之后 或者按 键之后 缝纫机停止转动 6 按 键之后 缝制 LED 灯熄灭 压脚上升 退出绕线模式 键 变为有效 ...

Page 33: ...的修改 必须先按 R 键后再按 按键方可进行缝制数量的设置 注意 计数器为生产计数器 加计数 时 缝制的数量达到 9999 后如再次进行缝制 计数器则会重新从 0 开始计数 计数器为底线计数器 减计数 时 当缝制的数量为 0 后面板自动显示为 0 同时数 码管闪烁 按 R 键恢复到设定值后才能继续进行缝制 7 暂停 1 踏板急停功能 新型脚踏板分为三档 1 档压脚下降 2 档正常缝制 3 档为急停档 2 面板急停 把 31 号参数设定为 1 之后 键可以作为暂停键来使用 1 按 键 设定为计数器显示 2 然后按 键 3 然后 按 键 键 设定一个旋梭可以缝制的次数 4 缝制后 每逢一次计数器减一 5 缝制完设定数后 蜂鸣器鸣响 同时显示屏闪烁提示计数器已归 零 6 更换底线 按 键 计数器值 返回到设定值 7 反复 4 6 的步骤 ...

Page 34: ... 键调整位置 按开始开关再次开始缝制 按 键 进行了切线之后 再次按 键返回到原点 8 图案线张力的设定 花样开始的 6 针和从下线曲折变换的部分以及缝制结束的加固部分的上线张力可以分别进行设定 1 缝制 LED 亮灯时 按 键 进行线张力 设定 2 踩脚踏板至第一级 压脚下降 如果把脚踏板踩到最后 缝纫 机会开始缝制 3 用 键 键移动送 布 4 在可以设定张力的位置 c 被显 示出来 5 一边按 键 一边用 键 键设定张力 6 反复 3 4 5 设定张力 7 设定结束之后 按 键 压脚 移动到原点然后上升 ...

Page 35: ...P9 P1 P5 P16 P1 P2 P3 P23 P2 P3 P5 P3 P3 P10 P2 P3 P17 P1 P2 P4 P24 P2 P4 P5 P4 P4 P11 P2 P4 P18 P1 P2 P5 P25 P3 P4 P5 P5 P5 P12 P2 P5 P19 P1 P3 P4 P6 P1 P2 P13 P3 P4 P20 P1 P3 P5 P7 P1 P3 P14 P3 P5 P21 P1 P4 P5 1 花样键上的登记 例 把花样 No 3 X 放大缩小 50 Y 放大缩小 80 最高速度限制 2000rpm 线张力 50 花样位置右 移 0 5mm 前移 1mm 的设定到 P2 1 打开电源 按 键 缝制 LED 应该灭 灯 进入方式设定 存储器开关设定 2 用 键 键显示出花样存储模 式 3 按 键 缝制 LED 灯亮起 进入花样 存储方式 4 按 键 选择存储的 ...

Page 36: ...率 50 Y 放大缩小率 80 最高速度 限制 2000 rpm 线张力 50 7 按 键后 变为 X 放大缩小率 显示为 0 0 X 方向的移动量可以以 0 1mm 为单位进行设定 用 键 键设定 0 5 按 Reset 键时 所 有参数均恢复原始设置 8 按 键后 变为 Y 放大缩小率 显示为 0 0 Y 方向的移动量可以以 0 1mm 为单位进行设定 用 键 键 设定 1 0 按 Reset 键时 所有参数均恢复 原始设置 9 按 键后 设定结束 10 按 键 结束花样存储方式 11 按 键 结束方式设定 返回通常方式 ...

Page 37: ...0 个花样 1 组合花样的存储 例 按 P1 P2 P3 的顺序组合进行存储 1 打开电源 2 按 键 3 按 键 缝制 LED 亮灯后 压脚移 动上升 4 确认花样形状 5 如果花样形状正确 则可以缝制 6 缝制结束后 按 键 压脚下降 检索原点后 移动到缝制起始点 然 后压脚上升 P 键在缝制 LED 亮灯时 也可以按键 变换花样 7 进行 4 5 项操作 1 打开电源 按 键 缝制 LED 应 该灭灯 进入方式设定 存储器参数 设定 2 用 键 键显示组合模式 3 按 键 缝制 LED 亮灯 进入组合花 样设定方式 用 键 键可以 选择 C1 C20 ...

Page 38: ...键 然后按 键 P1 被设定 到 C1 的第 1 个花样 用 键 键选择 P1 P50 5 按 键 然后按 键 P2 被设定 到 C1 的第 2 个花样 用 键 键选择 P1 P50 按 Reset 键可重新选择 6 按 键 然后按 键 P3 被设 定到 C1 的第 3 个花样 用 键 键选择 P1 P50 7 按 键结束存储 8 按 键结束组合花样存储模式 9 按 键结束方式设定 返回通常方式 按 Reset 键的话 可以重新使用 键 键选择 P1 P50 花样 ...

Page 39: ... C1 1 3 按 键 缝制 LED 亮灯 然后压 脚移动上升 4 如果花样形状良好 则可以缝制 5 按照每次缝制组合的顺序进行缝制 最后一个花样缝制结束后 返回第一 个花样 反复进行缝制 缝制后 如果想返回前面的图案或 跳到下一图案时 可以在缝制 LED 亮灯的状态按 键 键 图案显示变化 压脚移动到缝制起 始点 存储 C1 C20 后 若改变 P1 P50 的话 存储在 C1 C20 中的 P1 P50 的内容也改变 每种花样都应该确认花样形状 ...

Page 40: ...码选择状态 7 再次按 键 结束参数设定方式 返回通常状态 2 用户参数设置举例 1 缝制速度上限的设定 设定例 把缝制速度的上限设定到 1800rpm 1 缝制 LED 灭灯的状态下 按 键之后 进入用户参数设置模式 按 键之后 显式的 1 30 表示第一号参数的最高速度限制 为 3000rpm 2 参数号码可以用 键 键进行变更 3 按 键 调整想变更的参数号 码 缝制 LED 亮灯 1 在缝制 LED 灭灯的状态按 键 显示为参 数号 1 的内容 缝纫机的最高速度显示用参数 号 1 设定 2 在显示参数号 1 的状态下 按 键 缝制 LED 亮起 参数号 1 的内容被显示 ...

Page 41: ... 针 3000 400 3000 第 3 针 3000 400 3000 第 4 针 3000 400 3000 第 5 针 3000 400 3000 有抓线时 变更为第 1 针 1500 1000rpm 第 2 针 3000 2000rpm 设定举例 3 用 键 键设定为 1800 1 缝制 LED 灭灯的状态下 按 键 2 用 键 键选择参数号 2 这里 设定第 1 针的缝纫机速度 3 按 键 缝制 LED 亮灯 第 1 针的设定 值被显示出来 4 用 键 键设定其值为 1000 按 键则返回出厂设置 按 键后 当 前的操作全被取消 返回 2 的状态 5 按 键 缝制 LED 灯灭 第 1 针的设定 值被存储 6 用 键 键选定参数号 3 这里 设定第 2 针的缝纫机速度 ...

Page 42: ... 把 2 号花样和 3 号花样设定为不能读出 7 按 键 缝制 LED 亮灯 第 2 针的设定 值被显示出来 8 用 键 键设定其值为 2000 按 键则返回出厂设置 按 键后 当前的操作全被取消 返回 6 的状态 9 按 键 缝制 LED 灯灭 第 2 针的设定值 被存储 1 在缝制 LED 灭灯的状态下 按 键 2 用 键 键显示出参数号 201 3 按 键 缝制 LED 亮灯 图案 No 1 的 设定值被显示出来 设定值 1 可以读出 0 不能读出 4 用 键 键设定为花样 No 2 5 按 键 把设定值设定为 0 6 用 键 键设定为 No 3 ...

Page 43: ...3000 2 15 第 1 针的缝制速度 抓线 可以以 100rpm 为单位设定 400 1500 1500 3 30 第 2 针的缝制速度 抓线 可以以 100rpm 为单位设定 400 3000 3000 4 30 第 3 针的缝制速度 抓线 可以以 100rpm 为单位设定 400 3000 3000 5 30 第 4 针的缝制速度 抓线 可以以 100rpm 为单位设定 400 3000 3000 6 30 第 5 针的缝制速度 抓线 400 3000 3000 7 按 键 把设定值设定为 0 8 按 键 存储设定值 缝制 LED 灭灯 1 在缝制 LED 灭灯的状态下 按 键 2 用 键 键显示出参数号 18 3 按 键 缝制 LED 亮灯 计数器动作 的设定值被显示出来 4 按 键把设定值设定为 1 设定值 0 生产计数器 1 底线计数器 ...

Page 44: ... 3000 15 第 1 针的线张力 不抓线 0 200 0 16 缝制开始的线张力 不抓线 变 换同步时间 5 2 0 17 0 XY 扩大缩小率 最高转速限制的 显示 以及变更可否 0 可变更 1 不可变更 0 18 0 计数器动作 0 生产计数器 加 算 1 底线计数器 减 算 0 31 0 可以用操作键盘 清除键 停止 缝纫机动作 0 无效 1 操作盘复位键 0 32 1 可以禁止蜂鸣音响 0 不响蜂鸣音 1 操作盘操作音 1 33 2 设定抓线开放的针数 1 7 针 2 34 可以推迟抓线的同步时间 10 0 0 方向变慢 35 0 可以禁止上线抓线控制 0 通常 1 禁止 0 36 选择送布动作的同步时间 紧线不好时设定为 方向 8 16 12 向 侧 移 动 过多的话 有 断针的危险 缝 制 厚 料 时 请加以注意 37 0 缝制结束后的压脚状态 0 压脚直接抬起 1 踩踏板...

Page 45: ...44 参数号 功能 调整范围 初值 备注 1 上死点 时为上位置 停 车 后 反 转 停止 46 0 可以禁止切线 0 通常 1 禁止切线 0 49 16 可以设定卷线速度 800 2000 1600 201 设定是否可以读出图案数据 0 不能读出 1 可以读出 机型不 同则设 定不同 可 以 分 别 设 定 花 样 图 案 打开与否 P 进行图案登记 C 进行循环缝制登记 ...

Page 46: ...速度 100 4000pps 1500 设定上升过度的话会引起操 作不良 29 缝制结束时切线压脚上 升速度 100 4000pps 3000 设定上升过度的话会引起操 作不良 38 0 压脚不上升时 只通过启 动开关可进行缝制 0 普通 1 禁止抬压脚 0 43 1 切线时的机器旋转数选 择 0 400rpm 1 800rpm 1 动刀分线时的旋转数 切线 是在机器停止运转后进行的 44 1 切线时在易于切线的方 向选择有无送布的操作 0 无送布 1 有送布 1 45 16 切线时进行送布的针孔 导 向 直 径 可 设 定 以 0 2mm 为单位 16 40 1 6mm 4 0mm 16 50 5 剪线角度 0 9 5 345 15 52 电磁铁拨线器拨线时间 10 500ms 50 仅在选择电磁铁拨线器时才 有效 53 电磁铁拨线器返回时间 10 500ms 100 仅在选择电磁铁拨线...

Page 47: ...0 10 0 120 加润滑油报警针数 3000 12000 12000 单位 万针 121 0 计数器锁定设置 0 可清零可加减 1 可清零不可加 减 2 不可清零可加 减 3 不可清零不可加 减 0 需要输入解锁密码才能显示 并更改此参数 122 1 脚踏板灵敏度设置 0 普通模式 1 灵敏模式 1 123 0 剪刀位置传感器开启 0 开启 1 关闭 0 当出现 E307 错误时可以关 闭 124 0 步进控制方式设置 0 DSP1 闭环 DSP2 闭环 1 DSP1 开环 DSP2 闭环 2 DSP1 闭环 DSP2 开环 3 DSP1 开环 DSP2 开环 0 需重启生效 123 0 剪刀位置传感器开启 0 开启 1 关闭 0 当出现 E307 错误时可以关 闭 125 步进驱动软件版本 1 XXX 表示 DSP1 2 XXX 表示 DSP2 按 键 切换 DSP 133 电子拨线...

Page 48: ...可以 无效 0 普通 1 机头翻起安全形 状无效 0 160 0 脚踏板反踩急停功能使 能 0 无效 1 有效 0 241 0 功能选择 0 套结 加固 7 钉扣 0 注 以上参数只供维修人员使用 用户不能轻易改动 3 恢复出厂默认设置 当用户无意中修改了某些出厂时设置好的参数或者电控系统出现故障时 可以尝试使用 恢复出厂默 认设置 功能 进行系统恢复 注意 恢复出厂默认设置 用户以前设定的数据参数将会被覆盖 使用此功能时 请慎重考虑 如不 清楚 应及时联系厂家技术人员 在其指导下进行操作 具体操作步骤如下 1 在缝制灯熄灭的状态下 按 键 显示 然后同时按键 听到蜂鸣器响声后 即 开启了服务参数变更 2 按 键 选择 67 号参数 3 按 键 缝制灯亮起 然后按 键 可以选择要恢复成的软件版本号 ...

Page 49: ...号 缝制灯灭 1 按 键 退出服务参数设置模式 返回到普通缝制模式 2 然后关断电源 约 1 分钟后打开电源 给系统上电 操作面板数码管显示为 EEP 大约 20 秒钟 后 操作面板恢复正常显示 注意 这是正常现象 系统需要一定的时间完成出厂软件恢复 3 恢复完成之后 系统自动将当前软件版本号定为最高版本 比如 系统中的默认版本有 0 1 两个版本 那么恢复完成后的版本号自动为 2 注意 在再次打开电源 给系统上电 系统进行恢复过程中 如果断电 恢复过程将被迫中断 将不能完 成恢复出厂默认设置 返回到恢复之前的软件状态 ...

Page 50: ...针杆 设到最下点 拧松针杆紧固螺丝 把针杆上刻线 和针杆下挡块 的下端调节成一致 仅 F 规格 请调整到针杆上刻线 中心下降 0 8mm 1mm 的位置 有的缝制条件发生跳针时 请从针杆上刻线 往下调节 0 5mm 1mm 9 维修 1 针杆高度 2 机针与旋梭 1 用手转动皮带轮 针杆 上升时 把下刻线 对准针杆下档块前端 2 拧松驱动器固定螺丝 左右打开中旋梭压片 卸下中旋梭压脚 此时请注意不要脱落中旋梭 ...

Page 51: ...和中 旋梭 的梭尖的间隙调整为 0 05 0 1mm 5 调节完大旋梭的前位置后 机针和大旋梭的 间隙应为 7 5mm 然后拧紧大旋梭固定螺 丝 较长时间没有使用缝纫机或清扫过旋 梭周围之后等时 请往轨道部 和油 芯 加少量的机油后再使用 3 压脚的高度 1 在停止状态 卸下6 根机架外罩固定螺丝 然后卸下机架外罩 2 把 L 形扳手插入中央的紧固筒的六角孔螺栓 把它拧松 3 把 L 形扳手 向下压布压脚升高 向上抬布 压脚降低 4 调整后 把六脚孔螺栓 确实拧紧 5 左右压脚不一致时 拧松固定螺丝 调节 布压脚拨杆挡板 调整高度 此时 请不要让步压脚拨杆挡板 与送布台 相碰 如果和挑线杆相 碰 请用挑线杆安装台固定螺丝 调节挑线杆高度 ...

Page 52: ... 拧松调节螺丝 向箭头方向移动活动刀 把从针板前端到切线小拨杆 前端的距离调 整为 18 5mm 2 拧松固定螺丝 移动固定刀 把针孔导线 器 和固定刀 之间的间隙调整为 0 5mm 5 挑线杆的调整 1 拧松螺丝 把挑线杆和机针的间隙调 整为 1 5 以上 此时的跳线杆和机针的距离大约为 23 25mm 通过较宽的调整 在压脚下降 时可以防止压到缝纫机线 特别是使用 细线时 请调宽到 23mm 左右 机针为缝制结束停止的位置 ...

Page 53: ...52 6 废油的处理 积油杯 里积满了油之后 请卸下机油杯 排放 出废油 7 旋梭的加油量 1 拧松固定螺丝 卸下固定螺丝 2 拧紧调整螺丝 之后 加油管左 的油量 被弄小 3 调整后 拧紧固定螺丝 固定好 1 在标准出货状态 轻轻拧紧 回转 4 圈的位置 2 弄小油量时 不要一次拧紧 拧紧 回转 2 圈 待半日左右 观看一下 拧得过紧的话会磨 损旋梭 ...

Page 54: ...No E221 按复位键后即不能解除异常 同时缝纫 机变成不能动作 因此 显示出异常 No E221 之后 请一定向下列部位补充润滑脂 然后启动存储器开关 No 245 用复位键 复位到 0 1 向偏心凸轮部加润滑脂 2 向大摆动销部加润滑脂 1 补充润滑剂之后 如果不把存储器开关 No 245 变更为 0 异常 No E220 或 No E221 会被再次显示 2 下列指定部位补充润滑脂时 请使用附属的润滑脂软管 货号 40013640 如果补充 了制定以外的润滑脂的话 有可能造成零部件损坏 1 打开上面护罩 卸下润滑脂护罩 2 卸下偏心凸轮 侧面的橡胶盖 然后补充 润滑脂 1 放倒缝纫机 卸下润滑脂护罩 2 卸下大摆动齿轮 的固定螺丝 把安装 的附属接头 的润滑脂软管拧到螺丝孔 然后补充润滑脂 3 补充了润滑脂之后 请把卸下的固定螺丝 拧紧固定 8 向指定部位补充润滑 ...

Page 55: ... 针 数 长 宽 mm 1 16 1 2 1 16 2 4 7 10 1 2 5 10 1 2 5 24 3 0 6 1 2 4 5 6 1 2 4 0 8 2 0 10 0 7 25 2 0 0 25 2 0 7 4 20 1 4 20 7 0 20 54 NO 2 4 6 8 10 12 14 16 18 20 22 24 26 28 缝 缝纫图案 针 数 41 41 27 35 63 27 14 27 27 35 43 35 55 20 长 宽 mm 10 2 2 24 3 16 2 4 16 2 4 24 3 6 2 2 4 8 2 8 2 10 0 24 8 0 35 0 4 20 4 20 0 10 ...

Page 56: ...10 1 7 3 10 2 6 7 7 10 9 24 3 5 11 8 12 8 2 4 20 8 2 4 25 5 2 4 30 9 8 8 47 8 8 0 7 9 7 9 0 7 9 7 9 0 12 4 10 2 7 21 6 55 NO 30 32 34 36 38 2 40 42 44 46 48 50 52 54 56 58 缝 缝纫图案 针 数 27 62 30 47 27 45 38 57 41 98 163 120 51 52 102 长 宽 mm 0 20 12 1 7 12 6 7 10 8 2 12 12 2 4 25 2 4 30 2 4 30 8 8 8 8 7 9 7 9 12 4 10 2 21 6 19 3 ...

Page 57: ... 8 6 25 8 40 30 4 40 30 6 30 30 2 40 30 2 40 30 6 30 30 0 40 30 6 40 30 4 30 30 7 40 30 9 40 30 5 30 30 45 16 2 16 2 56 NO 60 62 64 66 68 70 72 74 76 78 80 82 84 86 88 缝 缝纫图案 针 数 115 257 80 96 60 40 44 28 48 56 36 51 55 42 153 长 宽 mm 40 5 6 20 40 30 30 30 30 30 40 30 30 30 30 30 40 30 30 30 30 30 40 30 30 30 30 30 12 12 4 ...

Page 58: ... 89 91 93 95 97 99 缝纫图案 案 针 数 74 65 39 51 42 27 针 数 长 宽 mm 4 20 24 5 20 20 9 20 20 1 25 20 2 25 20 7 25 20 57 NO 90 92 94 96 98 100 缝 缝纫图案 针 数 54 49 63 45 33 88 长 宽 mm 20 24 20 20 25 20 25 20 25 20 30 25 ...

Page 59: ... 38 16 15 34 2 老断线 化纤线拉断 旋梭 驱动器上有伤 针孔导向器上有伤 机针碰布压脚 线头进入大旋梭的沟里 上线张力过强 挑线弹簧过强 化纤线摩热而断 卸下用细磨时或锉刀磨平 用锉刀磨 或换新 调节布压脚的位置 卸下中旋梭 清除线头 减弱上线张力 减弱挑线弹簧 使用硅油 33 15 16 14 3 常断线 针弯了 针碰布压脚 针过粗 驱动器把针弄得过弯 在缝制开始时压脚压住缝纫 机线 机针弯曲 更换机针 调节布压脚 根据缝制物选用适当的机针 调整针和旋梭的位置 弄宽机针和挑线杆的距离 23 25mm 13 33 33 35 4 线切不断 固定刀不锋利 针孔导向器和固定刀高低差 小 动刀位置不好 最终针跳线 底线张力低 更换固定刀 把固定刀再弄弯一些 调整动刀位置 调整针和旋梭的同步 提高底线张力 34 33 5 常跳线 针和旋梭调整不好 针和中旋梭的间隙过大 针弯了 驱动器...

Page 60: ...定为 OFF 把抓线装置设定为 OFF 使用暗缝式下板 15 15 7 切线时断线 动刀位置不正确 调节动刀位置 34 8 上线缠结在抓 线装置上 缝制开始的上线长 拧紧第 1 线张力器 把机线长度调 整 为 33 36mm 9 机线长度不一 致 挑线弹簧的张力低 提高挑线弹簧的张力 10 机线长度不 能弄短 挑线弹簧的张力低 挑线弹簧张力过强 因为挑线弹簧的张力过低 所 以动作不稳定 增强第 1 线张力器的张力 降低挑线弹簧的张力 增强挑线弹簧的张力 行程也变长 11 缝制开始第 2 针的底线结线 部露出表面 梭芯的空转大 底线张力低 第 1 针的上线张力过强 调整活动刀位置 增强底线张力 下降第 1 针的上线张力 把抓线装置设定为 OFF ...

Page 61: ...P 17 14 3 压脚提升方式 伺服马达 4 压脚上升量 最大 13mm 5 记忆数据数量 50 种 6 拨线方式 伺服马达压脚提升连动 2 安装和运转准备 3 机针和机线 机针 上线 底线 DP 17 14 60 80 60 60 50 60 40 60 1 机头 电气箱的安装与 HK2900SS 相同 请参 考 HK2900SS 使用说明书 2 附属品安装在纽扣盘架上 请安装到容易作 业的位置 3 操作方法与 HK2900SS 相同 运转前请转动手轮确认机针是 否与纽扣相碰 机针和机线 因缝制条件不同而不同 使用时请参考 左表选择 最好使用棉线 聚脂短纤维线 ...

Page 62: ... 0 7 3 按 键 缝制灯亮起 然后按 键 将功能号变更为 7 再次按 键确认功能 号 缝制灯灭 4 按 键 退出服务参数设置模式 返回到普通缝制模式 断电并再次上电后 机器功能变更为钉扣 功能 5 钉扣标准花样一览表 图案号 缝 制 图 案 缝线 根 标准缝 制长度 X mm 标准缝 制长度 Y mm 图案号 缝 制 图 案 缝线 根 标准缝 制长度 X mm 标准缝 制长度 Y mm 1 34 6 6 3 4 3 4 18 44 6 3 4 0 2 35 8 8 19 45 8 3 10 10 20 10 4 12 12 21 12 5 36 6 6 22 16 6 37 8 8 23 46 6 0 3 4 P1 P3 P5 ...

Page 63: ...4 3 4 10 39 8 8 27 10 10 11 10 10 28 48 6 6 12 40 6 6 29 10 10 13 41 8 8 30 49 5 5 5 3 0 2 5 14 10 10 31 8 8 8 15 42 6 6 32 50 5 5 5 16 43 8 8 33 8 8 8 17 10 10 2 关于缝制图案的选定和缝制宽度 缝制图案的选定方法与 HK2900SS 相同 缝制图案号的标准缝纫宽与使用钮扣的钮孔不合时 请利用扩大 缩小功能进行 调整 扩大 缩小方法与 HK2900SS 相同 变更了缝制图案号和缝纫宽度之后 请一定确认落针位置 确认方法请参考 HK2900SS 使用说明书图案形状的确认 根据缝制宽度调整 X Y 扩大 缩小率一览表 ...

Page 64: ...2 4 2 6 2 8 3 3 2 3 4 3 6 4 4 3 4 5 4 7 5 2 5 6 6 6 2 6 4 71 76 82 88 94 100 106 118 126 132 138 153 165 176 182 188 6 爪脚张开拨杆的调整 在让停止位置的爪脚 上升的状态 拧松打开 爪脚拨杆固定螺丝 让钮扣设定到爪脚 把爪脚打开拨杆 和塔形螺丝 之间的间隙为 0 5 1mm 然后拧紧打开爪脚拨杆固定螺丝 ...

Page 65: ...64 7 钮扣爪脚上升量的调整 把压脚提升动作板 向 A 方向移动后 提升量变低 向 B 方向移动后 则变高 后把 固定螺丝确实拧紧固定 请拧松 2 个固定螺丝 前后调整压脚提升动作板 进行整 8 压脚压力的调整 拧松调整螺丝 转动调节螺丝 使布料运转中尽量不要偏斜 ...

Page 66: ... 4 5 横 0 3 5 0 4 5 钮扣爪脚 厚度 mm 2 2 2 7 2 7 2 2 货号 右 MAZ155070B0 B MAZ156070B0 C MAZ156070B0 C MAZ155070B0 B 左 MAZ155080B0 B MAZ156080B0 C MAZ156080B0 C MAZ155080B0 B 针孔导板 MAZ15501000 MAZ15601000 布压脚底板 MAZ15502000 MAZ15601000 为特别订制品 刻印 1 用六脚螺丝 把钮扣挑起杆 安装到爪脚 安装台 上 2 把挑起杆移动到钮扣中心位置 让钮扣中心 到挑起杆前端的距离为 3 5 4mm 3 请拧松螺丝 上下移动挑线杆 调节挑线 量 ...

Page 67: ...择 62 号参数 R M No 1 2 3 X Y 1 2 3 P4 P3 P2 P1 P5 62 0 1 3 按 键 缝制灯亮起 然后按 键 将功能号变更为 1 再次按 键确认功能号 缝制灯灭 4 请您注意以下操作中的区别 i 当您使用的是老式 USB 升级模块的话 即面板上不带有 USB 插口的情况 请按照下面的方法 进行升级 1 关闭电源 拔下电脑控制器 X7 接口上的操作面板插头 将花样升级器的插头插入 X7 接口 花样升级器如下图所示 1 将用户花样文件命名为 DH 文件类型为 bin 并保存在 U 盘根目录下的 DH 文件夹 P1 P3 P5 ...

Page 68: ...2 关闭电源 拔下花样升级器 重新插上操作面板 打开电源 按 键 显示 然后按 键 选择参数号为 201 的用户参数 ii 当您使用的电脑面板上右侧配有 USB 插口时 即说明您使用的是新式带 USB 功能的面板 请您按以下操作进行升级 1 如果您使用的是新式带 USB 功能的面板 则无需升级模块 亦无需关闭电源 2 只需将用户花样文件命名为 DH 文件类型为 bin 并保存在 U 盘根目录下您所创建的 DH 文件夹中 然后将 U 盘插入到操作面板的 USB 接口 3 在您进行 5 1 中 3 的操作后 面板将自动跳变到 usb 并进行花样升级 当您听到 电脑控制器的蜂鸣器鸣响一声后 则升级成功 同时会将客户曾升级过的花样备份到 U 盘 的 DH 文件夹下名为 DHBAK bin 的文件中 无需操作面板会自动跳转到花样号选择界面 4 按 键 显示 然后按 键 选择参数号为 201 的用 户...

Page 69: ...68 No 1 2 3 X Y 1 2 3 0 1 6 按 键 选择你想变更的花样号码 例如 101 号花样 R M No 1 2 3 X Y 1 2 3 P4 P3 P2 P1 P5 0 1 7 按 键 显示由 101 0 变更为 101 1 即 101 号花样图案被开打 ...

Page 70: ...69 8 按 键 缝制灯熄灭 保存设置的参数 并退回到步骤 6 的界面 用户可以反复操作步骤 6 10 将 所需的全部花样打开或者锁定 9 按 键 退回到正常缝制模式 10 用 键选中花样号码图标 参照 2 4 1 项目数据的设定 然后按 键 可以检 索到解除锁定的 101 号花样图案 并开始缝制作业 ...

Page 71: ... 确认图案和 X Y 放大率 E 45 图案数据异常 这是不能对应的图案数据 关闭电源 确认数据 ROM E 50 暂停 缝纫机运转中按了复位开 关 暂停 按复位开关切线后 再次开始或 返回原点 E 221 补充润滑油告警异 常 机器运转到了向指定位置 补充润滑油的时期 所以 缝纫机停止了 重新上电 进入参数 245 按复 位键清零后 重现上电 E 302 机头翻倒异常 机头翻倒检测开关被设定 为 ON 在放倒机头的状态不能运转 请 返回到正常的位置 技术人员可 直接用短路块将 SC202B 上的 2P 蓝色插头短路 E 303 24V 电源异常 24V 电压过低 关闭电源 稍待一些时间后再次 打开电源 E 305 压脚位置异常 压脚不在正确位置 关闭电源开关 确认机头信号电 路板上的 CZ025 是否松动脱落 若未松动 检查该路光藕 E 306 抓线位置异常 抓线装置不在正确位置 关闭电...

Page 72: ...馈信号检测 到电机转速异常时报此错 误 检查方法同检查超差错误 E685 步进闭环 DSP1 第 二路 X25 过流 硬件检测到有大电流出 现 首先检查电机是否正常 可测量 电阻 电感值是否在正常范围 内 如果电机正常 则需确认步 进板硬件是否正常 E686 步进闭环 DSP1 第 二路 X25 超差 检测到的编码器反馈位置 与程序中的指令位置不 符 将步进电机改成开环模式运行 如果可以正常动作 则电机正 常 如果电机不能正常动作 则 需要排查步进板驱动部分及电 机本体 做完上述工作后 排查 编码器部分 看编码器线缆是否 插错 是否插牢 是否有编码器 信号线损坏以及步进板信号反 馈部分及编码器本体是否正常 E687 步进闭环 DSP1 第 二路 X25 超速 通过编码器反馈信号检测 到电机转速异常时报此错 误 检查方法同检查超差错误 E690 步进闭环 DSP2 X21 X23 通 信错误...

Page 73: ...与程序中的指令位置不 符 将步进电机改成开环模式运行 如果可以正常动作 则电机正 常 如果电机不能正常动作 则 需要排查步进板驱动部分及电 机本体 做完上述工作后 排查 编码器部分 看编码器线缆是否 插错 是否插牢 是否有编码器 信号线损坏以及步进板信号反 馈部分及编码器本体是否正常 E697 步进闭环 DSP2 第 二路 X21 超速 通过编码器反馈信号检测 到电机转速异常时报此错 误 检查方法同检查超差错误 E 730 编码器未接 不能检测 ADTC 信号 关闭电源开关 确认 X5 插头是 否插紧 E 731 主板与步进通讯异 常 通讯冲突 关闭电源开关 排除故障 检查 编码器信号是否正常 E 733 主轴过流 马达停转 在机械不卡的情况下 检查主轴 编码器是否连接良好 E 735 停车电流异常 主轴停车过程中出现过 流 关闭电源 稍待一些时间后再次 打开电源 更换主轴电机确认电 机是...

Page 74: ...过流 关闭电源 稍待一些时间后再次 打开电源 E 904 24V 电源异常 24V 过流 关闭电源 稍待一些时间后再次 打开电源 E 906 主轴失控 主轴电机失去控制 关闭电源 稍待一些时间后再次 打开电源 E 907 X 原点检索异常 X 原点传感器不变化 关闭电源开关 确认机头信号电 路板 CZ021 控制箱 X9 是否松 动 脱落 E 908 Y 原点检索异常 Y 原点传感器不变化 关闭电源开关 确认机头信号电 路板 CZ022 控制箱 X9 是否松 动 脱落 E 910 压脚原点检索异常 压脚原点传感器不变化 关闭电源开关 确认机头信号电 路板 CZ025 控制箱 X9 是否松 动 脱落 E 911 X 向步进电机忙碌 中 X 电机在动作中主控再次 发送动作命令 关闭电源 稍待一些时间后再次 打开电源 如果问题不能解决 请更换步进板 E 912 Y 向步进电机忙碌 中 Y 电机在...

Page 75: ...发送动作命令 关闭电源 稍待一些时间后再次 打开电源 如果问题不能解决 请更换步进板 E 919 步进驱动类型错误 步进板软件不是套结机类 型驱动 更换套结机使用的步进板或更 新步进办程序 E 920 步进软件版本错误 步进板软件版本错误 更换套结机使用的步进板或更 新步进办程序 E 921 X 向步进动作步数 校验异常 完成一次缝纫后主控检测 到步进板在 X 方向接收的 命令与主控发送的命令步 数不符 关闭电源 稍待一些时间后再次 打开电源 如果问题不能解决 请更换步进板 E 922 Y 向步进动作步数 校验异常 完成一次缝纫后主控检测 到步进板在 X 方向接收的 命令与主控发送的命令步 数不符 关闭电源 稍待一些时间后再次 打开电源 如果问题不能解决 请更换步进板 ...

Page 76: ...75 机台台板 ...

Page 77: ... 2 safety precautions DANGER Wait at least 5 minutes after turning off the power switch and disconnecting the power cord from the wall outlet before opening the face plate of the control box Touching areas where high voltages are present can result in severe injury caution Environmental requirements Use the sewing machine in an area which is free from sources of strong electrical noise such as hig...

Page 78: ...h staples otherwise there is the danger that fire or electric shocks could occur Install the safety covers to the machine head and motor Sewing This sewing machine should only be used by operators who have received the necessary training in safe use beforehand The sewing machine should not be used for any applications other than sewing Be sure to wear protective goggles when using the machine If g...

Page 79: ...if the foot switch is depressed by mistake which could result in injury 1 When carrying out inspection adjustment and maintenance 2 When replacing consumable parts such as the rotary hook Before carrying out inspection adjustment and maintenance please turn off air source until the pointer of gas pressure meter drop to 0 position If the power switch needs to be left on when carrying out some adjus...

Page 80: ...ne head 21 9 Installation of operation panel 21 10 Connecting the cables 22 11 Installation of motor protection cove 23 12 Installation of cables 23 13 Installation of eye protection cover 24 14 Installation of thread stand 24 4 PREPARATION OF SEWING MACHINE 24 1 Lubrication 24 2 Installation of needle 25 3 Threading the machine head 26 4 Installing and removing the bobbin case 26 5 Installing the...

Page 81: ...60 8 Put grease to some point places 61 9 Table of the standard patterns 65 10 Troubles and corrective measures sewing conditions 68 Ⅱ EXPLANATION HK2903 H IGH SPEED electronical LOCKSTITCH Buttoning SEWING MACHINE 70 1 Specification 70 2 Installation of the sewing machine and preparation of the operation 70 3 Needle and thread 70 4 Setting button sewing function 71 5 Table of button sewing standa...

Page 82: ... clamp 13 Rotary hook Shuttle hook or shuttle hook 2 14 Lubricating mode Revolving part micro lubrication 15 Engine oil Sewing engine oil 16 grease Grease for sewing machine 17 Data memory Flash Memory 18 Enlarging Reducing facility 20 to 200 1 step in X direction and Y direction respectively 19 Enlarging Reducing method Pattern enlargement reduction can be done by increasing decreasing the stitch...

Page 83: ...2 Reduce the max sewing speed in accordance with the sewing conditions Machine head Work clamp feet Thread stand Operation panel Power switch Control box Pedal switch 2 CONFIGURATION 1 Name of main unit ...

Page 84: ...rror traveling the feed mechanism to its initial position Counter resetting etc 4 Mode key this key is used for setting parameter and storing pattern 5 forward transfer key and backward transfer key The key is used for changing pattern number Expanding decreasing rate and feed forward backword 6 Selection key his key is used to select the data No select LED and value of selected item are displayed...

Page 85: ...and make sure that it is vertical towards the Flat Section and then screw No 2 screwZ Fix the coupling to the main motor with No 3 screw and make sure it is vertical to the flat section of the main motor Then screw the No 4 screw to finish the assembling task The following diagram shows you the details This following diagram shows you the position of the main motor look from back and the line is o...

Page 86: ...l check for maintenance work 1 Press key while the Sewing LED is not illuminated and then the Panel display Press P1 P3 P5 simultaneously you would hear the ring of the buzzer and then you are able to enter the test mode Note If you failed to press P1 P3 P5 simultaneously then you cannot enter the test mode 2 Press key to enter the test mode and the screen displays CP as shown following ...

Page 87: ...6 3 Press key to start the Display Test It automatically examine every 8 bit segment LED Display Module and the LED light illuminated or not in a cycle process The process is shown following ...

Page 88: ...ditions will be performed and the mode will move to the continuous aging mode Number of revolutions of main shaft check Output of the specified number of revolutions will be made and the actual number of revolutions will be indicated _________________ _________________ Presser and Trimming Original Retrieval check Indicate the presser trimming motor to move step by step indicate original retrieval...

Page 89: ...turn On the power again in accordance with the starting way of the test mode 2 3 1 CP 1 Input Signal Check Status of input of switches and sensors is indicated o the 8 LEDs The table below is the list of LED indication and you can understand to which LED each switch or each sensor is assigned When CP 1 is indicated on the screen press key to enter into the mode and then number 1 is indicated ...

Page 90: ...ng sensor Thread Clamp Sensor 6 Main shaft angle indication 7 Z phrase of Main motor 8 Safety Switch 2 3 2 CP 2 check the X Y Motor Origin Retrieval For origin adjustment sensor adjustment of X Y motor The state of origin sensor and X Y motor sensor will be indicated 1 Prepare Press key to enter CP 2 1 is displayed and then press to start origin retrieval Meanwhile the presser goes down and the Se...

Page 91: ...ll display 0 or 1 at this moment Press again Then step the pedal to search the origin lower the presser and activate the Sewing LED When the Sewing LED is on user can press or to move the X Y motor in direction at 0 1mm as each step After setting the new origin user can press to quit 2 Return to Origin At first press to have access to status of CP 2 the screen will display 0 or 1 at this moment Pr...

Page 92: ...matic origin retrieval setting 2 Origin retrieval setting Press the key to set A0 Ineffective A1 Every time Press the key to finish setting and move to Pattern No setting 3 Continuous Operation In the Ordinary Sewing Mode you can change the Pattern No X Y scale Enlarge Reduce setting the Max speed and so on The continuous operation can be stopped at the time of pause by depressing the key 2 3 4 CP...

Page 93: ...12 2 Operation ...

Page 94: ... to 10 the trimming sensor woks well if not please make proper adjustment No 1 2 3 X Y 1 2 3 Indicate the state of trimming sensor 0 or 1 Indicate the state of presser sensor 0 or 1 Press key to drive the presser and trimming motor to its respective position 1 Presser UP position 2 Presser Down position Pedal down 3 Trimming position 4 Presser Down position After trimming 5 Position of wiper Press...

Page 95: ...lamp sensor 1 Prepare Press key to enter CP 7 then press key for origin retrieval and the Sewing LED lights up Press the pedal switch to perform the origin retrieval and 10 is indicated on the screen 2 Operation Press key to make the thread clamp motor move step by step by single pulse Press key to move the thread clamp backward press key to move the thread clamp forward ...

Page 96: ...ion step by step by single pulse Press key to perform the functions above in a cycle And press key to exit this mode 2 3 6 CP 8 Test Thread tension Solenoid This mode is to test the action of the thread tension solenoid When the screen displays CP 8 user can press to have access to this mode At this moment the screen will display the CLAMP Press or to have the solenoid close then the power is off ...

Page 97: ...th the machine and using bolt having hexagonal indentation on the head spring washer and plain washer supplied with the machine 3 2 Attaching the speed controller 1 Fix connecting rod to installing hole B of pedal lever with nut 2 when connecting rod is installed in installing hole A the depressing stroke of the pedal is increased 3 install the controller in right place of the table using 4 tappin...

Page 98: ...r switch Fix power switch under the machine table with wood screws Fix the cable with staples supplied with the machine as accessories in accordance with the forms of use 5 Installation of the sewing machine head WARNING To prevent possible accidents caused by the full of the sewing machine perform the work by two persons or more when the machine is moved ...

Page 99: ...ht to the state as illustrated in Fig B and fix the spring washer on hinge rubber with nut Be aware that the hinge rubber fails to function properly if nuts and are excessively tightened When carrying the sewing machine hold sections A 6 Installing the drain receiver and the head support rubber ...

Page 100: ...iler in waste oil reservoir 3 Insert sewing machine waste oil pipe into poly oiler 4 Insert head support rubber into table 1 Insert drain pipe until it will go no further so that it does not come off drain bin when tilting the machine head 2 Remove the tape fixing drain pipe 7 Safety switch ...

Page 101: ...aking care not to allow your fngers to be caught in the head Turn OFF the power before starting the work so as to prevent accidents caused by abrupt start of the sewing machine 8 Tilting the sewing machine head When tilting the sewing machine head tilt the head gently until it comes in contact with head support rod 1 before tilting the sewing machine head make sure that head support rod is Attache...

Page 102: ...plate on the machine table with wood screws and pass the cable through hole in the machine table Fix the operation panel on panel installing plate with screws supplied as accessories Fix the cable on the bottom surface of the table with the staples supplied with the machine as accessories Refer to the figure on the left side when installing the panel under the table 10 Connecting the cord ...

Page 103: ...22 Main Servo Motor X4 Main Servo Motor Encoder X5 Thread Clamp Step Motor X13 Y Direction Step Motor X14 X Direction Step Motor X15 GND Presser Step Motor X12 Active Tension Solenoid X11 ...

Page 104: ...over 12 Handling the cords Fix the motor cover on the sewing machine body with screws supplied as accessories 1 In the state that the sewing machine is tilted connect the cords and bundle them with clip band as shown in the figure ...

Page 105: ...rse of needle breakage 13 Installing the eye protection cover WARNING Be sure to use eye protection cover after installing it on installing section with screws 14 Installing the thread stand 1 Assemble the thread stand unit and insert it in the hole in the machine table 2 Tighten locknut to fx the thread stand 3 For ceiling wiring pass the power cord through spool rest rod ...

Page 106: ...h oil is only for lubricating to the hook portion It is possible to reduce the oil amount when the number of rotation used is low and the oil amount in the hook portion is excessive Refer to 7 8 Amount of oil supplied to the hook 1 Do not lubricate to the places other than the oil tank and the hook of Caution2 below Trouble of components will be caused 2 When using the sewing machine for the first...

Page 107: ... work so as to prevent accidents caused by abrupt start of the sewing machine 2 Attaching the needle Loosen setscrew and hold needle with the long groove facing toward you Then fully insert it into the hole in the needle bar and tighten setscrew If the stitches are made as shown in A attach the needle facing to the direction B to a small extent 3 Threading the machine head ...

Page 108: ...on oil is used thread through thread guide for silicon Optional 2 For thick thread pass the thread through one hole only of needle bar thread guide WARNING Turn OFF the power before starting the work so as to prevent accidents caused by abrupt start of the sewing machine 4 Installing and removing the bobbin case ...

Page 109: ...ing 5 Installing the bobbin 1 Set the bobbin into bobbin case in the direction shown in the figure 2 Pass the thread through thread slit of bobbin case and pull the thread as it is By so doing the thread will pass under the tension spring and be pulled out from thread hole 3 Pass the thread through thread hole of the horn section and pull out the thread by 25mmfrom the thread hole If the bobbin is...

Page 110: ... Adjusting the thread take up spring The standard stroke of thread take up spring is 8 to 10 mm and the pressure at the start is 0 1 to 0 3N 1 Adjusting the stroke Loosen setscrew and turn thread tension asm Turning it clockwise will increase the moving amount and the thread drawing amount will increase 2 Adjusting the pressure To change the pressure of the thread take up spring insert a thin scre...

Page 111: ...f the pattern No 3 Setting of the X scale Setting of the pattern No Setting of the X scale Setting of the Y scale Setting of the max Sewing speed Setting the thread tension 1 Press the key to indicate the item Pattern NO 2 Press the or key to indicate 14 on the display Pattern No is set to 14 1 Press the key to indicate the item X Scale 2 Press the or key to indicate 100 Set X scale to 100 ...

Page 112: ...tem Y Scale 2 Press the or key to indicate 100 1 Press the key to indicate the item Speed 2 Press or key to indicate 400 Setting of 400 sti min 1 Press key to indicate the item THREAD TENSION 2 Press or key to indicate 50 0 to200 can be set 1 Press the key 2 After the work clamp feet have moved and gone up the sewing LED lights up and the sewing is ready ...

Page 113: ... error display E 10 appears At this time re set the pattern No When turning OFF the power without pressing key the set values of pattern No X Y scale number of max Rotation and thread tension are not memorized 2 Checking the contour of a sewing pattern Make sure without fail of the contour of the sewing pattern after selection of the sewing pattern If the sewing pattern extends outside the work cl...

Page 114: ... to the second step after descending the work clamp feet at the first step and the sewing machine will start sewing 4 After the sewing machine completes sewing the work clamp feet will go up and return to the sewing start position 1 Make the Sewing LED go off with key 2 Press key and select the item of pattern No 3 Set the pattern No with key or key 4 Similarly setting of X Y scale speed etc is pe...

Page 115: ...ern No or the like once pressing the key and making the sewing LED light up 1 Press key to make the SEWING LED go off 2 Select the bobbin winder with key Selection cannot be performed when the Sewing LED is lit up 3 Press key The work clamp feet come down and the Sewing LED lights up 4 When the pedal switch is depressed the sewing machine rotates 5 When the pedal is depressed again or key is press...

Page 116: ...ad tension for 6 stitches at the sewing start the portion which is changed over from basting stitch to zigzag stitch and the portion of tie stitch at the sewing end can be individually set 1 Press key to indicate the Counter 2 Then press the key 3 Then press the or key and set the specified number of times that can be sewn with a bobbin 4 Every time the sewing machine finishes a sewing cycle count...

Page 117: ...ous pressing of keys as shown in the table below P No Selection key P No Selection key P No Selection key P No Selection key P1 P1 P8 P1 P4 P15 P4 P5 P22 P2 P3 P4 P2 P2 P9 P1 P5 P16 P1 P2 P3 P23 P2 P3 P5 P3 P3 P10 P2 P3 P17 P1 P2 P4 P24 P2 P4 P5 1 While the sewing LED lights up press key to indicate the needle thread tension 2 Lower the presser with the foot pedal When the foot pedal is depressed ...

Page 118: ...in Thread tension 50 Pattern position 0 5mm to the right and 1 mm to the front 1 Turn ON the power switch and press key to enter mode setting memory switch setting Sewing LED should be put out 2 Indicate the pattern register mode with or key 3 Press key Enter the pattern register mode 4 Press key Select P No to be registered Selection can be performed with or key 5 Press key to indicate the Patter...

Page 119: ... Y Scale rate indication becomes 0 0 Traveling amount in Y direction can be set in 0 1 mm unit Set 1 0 with or key 9 Press key to finalize the setting 10 Press key Pattern register mode is finalized 11 Press key Mode setting is finalized and t he mode returns to the normal mode 2 Sewing operation Operation example After performing sewing with the contents of the registered P2 perform sewing with t...

Page 120: ...the sewing pattern 5 If the contour of the sewing pattern is acceptable the sewing can be made 6 Press key after completion of sewing and the presser comes down The presser moves to the sewing start point after origin retrieval and goes up The P keys can operate the pattern change by one touch even when the sewing LED is lighting up 7 Perform the above items 4 and 5 ...

Page 121: ...shes the sewing Every one combination No can be registered up to the m 1 Register of the combination Setting example Combine in the order of P1 P2 and P3 and register them in the C1 maximum 30 patterns 1 Turn ON the power switch and press key to enter the mode setting memory switch setting Sewing LED should be put out 2 Indicate the combination mode with or key 3 Press key Sewing LED lights up to ...

Page 122: ...ter sewing if want to back to the front pattern or skip to the next press and when LED light is on the pattern changes and presser foot move to the initial position After saving C1 C20 the P1 P50 contents will change if the P1 P50 is changed Each pattern should confirm pattern shape 7 Memory switches 1 User parameter settings 1 Press when LED light is off enter into user parameter setting mode Pre...

Page 123: ...e 2 example for user parameter settings 1 set top sewing speed For example set the top sewing speed as 1800rpm 3 press to set it as 1800 2 Change parameter number by pressing 3 Press adjust parameter number when LED is on 1 Press when LED is off the display shows the content of parameter 1 the top sewing speed display is set by parameter 1 2 Press in parameter 1 the LED light is on the content of ...

Page 124: ...Third stitch 3000 400 3000 Forth stitch 3000 400 3000 Fifth stitch 3000 400 3000 With thread clip factory settings for first stitch is 1000rpm second 2000rpm For exmaple 1 Press when the LED light is off 2 Press to choose paramter2 set the first stitch speed 3 Press the LED light is on the data of first stitch is displayed 4 Press to set it as 1000 Press to factory settings press The previous oper...

Page 125: ...xample set pattern 2 and pattern 3 as cannot be read 8 Press to set it to 2000 press and back to factory settings Press cancel the operation and back to state 6 9 Press the LED light is off the data of the second stitch is saved 1 When the light is off Press 2 Press display number 201 3 Press the LED light is on the data of Pattern No 1 is displayed Setting data 1 can be read 0 cannot be read 6 Pr...

Page 126: ...ction mode 7 Press set the data to 0 8 Press save the data The LED is off 1 Press when LED light is off 2 press to display parameter 18 3 Press the setting value is displayed when LED light is on 4 Press to set the set value to 1 Set value 0 production counter 1 bobbin thread counter 4 Press to set it as pattern No 2 5 Press set the data as 0 6 Press set it as pattern No 3 ...

Page 127: ...500 3 30 Sewing speed for the second stitch with needle thread clamp setting with the unit of 100 rpm 400 3000 3000 4 30 Sewing speed for the third stitch with needle thread clamp setting with the unit of 100 rpm 400 3000 3000 5 30 Sewing speed for the 4th stitch with needle thread clamp setting with the unit of 100 rpm 400 3000 3000 6 30 Sewing speed for the 5th stitch with needle thread clamp se...

Page 128: ...3 30 Sewing speed for the 4th stitch without needle thread clamp setting with the unit of 100rpm 400 3000 3000 14 30 Sewing speed for the 5th stitch without needle thread clamp setting possible in the unit of 100rpm 400 3000 3000 15 Thread tension for the first stitch without needle thread clamp 0 200 0 16 Changeover timing of thread tension at the sewing start with needle thread clamp 5 2 0 17 0 ...

Page 129: ... tightness of stitches is adverse 8 16 12 If set at extreme negative there is a danger of needle breakage Significant when handling heavy materials 37 0 State of work clamp foot after completion of sewing can be selected 0 clamp foot goes up directly 1 clamp foot goes up by pedal operation 0 39 0 Each time sewing is finished origin retrieval is possible except for the cycle sewing 0 no origin retr...

Page 130: ...e 0 calling inoperative 1 calling operative Setting depends on the model used Patterns can be individually set P Pattern registration is carried out C Cycle sewing registration is carried out 8 Service parameter settings Service parameter is different with normal parameter it is forbidden for users to change usually needs o supply to the technicians when they adjust the machine 1 Start and change ...

Page 131: ...wering speed during pedal operation 100 4000pps 4000 28 Clamp rising speed during pedal operation 100 4000pps 1500 Too much rise in the setting level may result in malfunction 29 Thread trimmer clamp rising speed at the end of sewing 100 4000pps 3000 Too much rise in the setting level may result in malfunction 38 0 Sewing is possible only with the start switch without raising the work clamp foot 0...

Page 132: ...tern for button sewing can be prohibited 0 the stitching effective 1 the stitching ineffective 0 Effective only when parameter 241 set to 7 56 Moving limit range in X direction right side 20 20mm 20 In the state of shipment no clamp configuration is considered 57 moving limit range in X direction left side 20 20mm 20 In the state of shipment no clamp configuration is considered 58 Moving limit ran...

Page 133: ...usand stitches 121 0 counter lock settings 0 zero clearing and add subtract available 1 Zero clearing available add subtract unavailable 2 Zero clearing unavailable add subtract available 3 zero clearing or add subtract unavailable 0 need to input unlock code to display this parameter 122 1 pedal sensitivity setting 0 normal mode 1 sensitive mode 1 123 0 cutter position sensor on off 0 on 1 off 0 ...

Page 134: ...ation 1 500mS 0 1000mS 1 1500mS 0 138 0 thread tension control mode 0 Juki type clamp mode 1 thread holding mode 0 Need to restart to take effect 144 0 thread spreading timing adjust 6 10 0 146 clamp foot motor full flow 0 15 14 Need to restart to take effect 147 clamp foot motor half flow 0 15 5 Need to restart to take effect 150 0 safety switch invalid when machine head turn over 0 normal 1 inva...

Page 135: ...fault settings all the data set by users will be covered carefully consider when use this function if not clear should contact technicians from the manufacturer operate as their instruction Specific steps are as follows 1 When LED light is off press display then press simultaneously after hearing the buzzer sound that means the service parameter change starts 2 Press to choose parameter 67 3 press...

Page 136: ...ower about 1 minute later turning on the power to the system the control panel digital display as EEP After about 20 seconds the control panel returns to normal display note that this is a normal phenomenon the system take some time to complete factory software recovery 3 After the recovery is complete the system will automatically set the current software version to the highest version number for...

Page 137: ...ystem during system recovery process if power failure the recovery process will be forced to interrupt will not be completed to restore the factory default settings return to the previous software state before recovery 1 Needle bar height 9 Maintenance ...

Page 138: ...e front side of needle bar under stopper 2 Loosen drive screws open the tablet remove the hook presser be careful not to fall off the hook 3 In order to allow the hook point and the center of the needle consistent while preventing the front end of drive collide needle to curve it make sure there is no gap between them and then tighten drive screws 4 Loosen the big hook turning hook adjustment shaf...

Page 139: ...se L shaped wrench to loosen bolt 3 down the L shaped wrench to rise cloth presser foot up to reduce it 4 After the adjustment tighten the bolt indeed 5 When the left and right presser feet are inconsistent loosen the screws adjust the presser foot lever baffle to adjust the height At this point do not let the presser foot lever baffle collide with the feed base and if collide with the take up lev...

Page 140: ...late to front end of small shifting lever to 18 5mm 2 Unscrew set screw removing fixed knife leave the gap between needle hole guide line and fixing knife to 0 5mm 6 Waste oil treatment 5 Thread take up bar adjustment 1 Unscrew bolt to leave gap between thread take up bar and machine needle above1 5mm At this moment the gap between thread take up bar and needle is about 23 25mm through wide gap ad...

Page 141: ...tscrew 2 After tightening up adjust screw to make small the amount of oil at left side of oil pipe 1 At standards shipping status slightly tighten up rotate to 4 circle position 2 when to make small the amount of oil please do not tighten once tighten rotate 2 circle and to be observe half of a day if too tight will wear shuttle ...

Page 142: ...on in order to prevent a human injury due to machine sudden movement please operation machine after turn Off power 1 Add grease to eccentric cam 2 Add grease to big swing pin 1 After adding grease change No 245 memory switch to 0 otherwise the error codeNo E220 or No E221will appear again 2 In supplementary lubrication process please use attached grease hose no 40013640 If added unspecified grease...

Page 143: ...0 ndards patt ch length width mm 16 1 2 16 2 4 10 1 2 10 1 2 24 3 6 1 2 4 6 1 2 4 8 2 10 0 25 2 0 25 2 0 tern 62 h NO 2 4 6 8 10 4 12 4 14 16 18 20 22 Sewing pattern s stitch Le wid 41 1 41 27 1 35 1 63 27 6 14 27 27 35 2 43 ngth dth mm 10 2 2 24 3 16 2 4 16 2 4 24 3 6 2 2 4 8 2 8 2 10 0 24 8 0 35 0 ...

Page 144: ...89 25 28 38 ch length width mm 4 20 4 20 0 20 0 20 10 1 7 10 2 6 7 10 24 3 11 8 12 2 4 20 2 4 25 63 h NO 24 26 28 30 32 34 36 38 2 40 42 44 Sewing pattern s stitch Le wid 35 55 20 27 62 1 30 47 27 45 38 2 57 2 ngth dth mm 4 20 4 20 0 10 0 20 12 1 7 12 6 7 10 8 2 12 12 2 4 25 2 4 30 ...

Page 145: ... ch length width mm 2 4 30 8 8 7 8 8 0 7 9 7 9 0 7 9 7 9 12 4 10 2 21 6 5 40 5 8 6 25 8 40 30 40 30 64 h NO 46 48 50 9 52 9 54 0 56 58 60 62 64 66 Sewing pattern s stitch Le wid 41 2 98 163 120 7 51 12 52 102 115 257 80 96 ngth dth mm 2 4 30 8 8 8 8 7 9 7 9 2 4 10 2 21 6 19 3 40 5 6 20 40 30 30 30 ...

Page 146: ...35 145 ch length width mm 30 30 40 30 40 30 30 30 40 30 40 30 30 30 40 30 40 30 30 30 5 16 2 16 2 65 h NO 68 70 72 74 76 78 80 82 84 86 6 88 Sewing pattern s stitch Le wid 60 40 44 28 48 56 36 51 55 42 153 1 ngth dth mm 30 30 40 30 30 30 30 30 40 30 30 30 30 30 40 30 30 30 30 30 12 12 4 ...

Page 147: ...9 Sewing patte ern Stitc 74 65 39 51 42 27 ch length width mm 20 24 20 20 20 20 25 20 25 20 25 20 66 h NO 90 92 94 96 98 100 Sewing pattern s stitch Le wid 54 49 63 45 33 88 ngth dth mm 20 24 20 20 25 20 25 20 25 20 30 25 ...

Page 148: ...rease space between needle hole and fixed knife put down first stitch tension slow down start running speed to about 600 1000rpm increase catch thread stitch to 3 4 increase first stitch space put down first stitch upper thread tension 33 38 16 15 34 2 Thread easy to broken even polyester thread Check damage of hook and drive Check damage of needle hole guide Machine needle touch presser foot Thre...

Page 149: ...3 35 4 bad trimming fixed knife not sharp the hight different between needle guide and fixed knife too small moving knife position not perfect needle skipped bottom thread tension too low replace knife make moving knife more bended adjust moving knife position adjust needle and hook synchronous take high bottom thread tension 34 33 5 Thread easily jumps needle and hook setting is not good the gap ...

Page 150: ... thread too long when start sewing tighten first thread tensioner adjust thread length to 33 36mm 9 machine thread length is different thread take up spring bounce is too low take up bounce of thread take up spring 10 can not take short the length of machine thread thread take up spring bounce is too low thread take up spring bounce is too high because thread take up spring bounce is too low the m...

Page 151: ...ration 3 Caution there should be a 2 person when moving sewing machine 3 机针和机线 4 Buttoning function setting 1 press button when light is off display then press button simultaneously after buzzer sound to start parameter change Needle Upper thread Bottom thread DP 17 14 60 80 60 60 50 60 40 60 1 Install machine head and electric box is same withHK2900SS please refer to HK2900SS instruction manual 2...

Page 152: ...press button exit from parameter set mode back to normal sewing mode restarts machine machine function changed to buttoning function 5 List for standards buttoning pattern Patter n no Sewin g patter n threa d piec e Standar ds Length X mm Standar ds Length Y mm Patter n no Sewin g patter n threa d piec e Standar ds Length X mm Standar ds Length Y mm 1 34 6 6 3 4 3 4 18 44 6 3 4 0 ...

Page 153: ...ds Length Y mm Patter n no Sewin g patter n threa d piec e Standar ds Length X mm Standar ds Length Y mm 2 35 8 8 19 45 8 3 10 10 20 10 4 12 12 21 12 5 36 6 6 22 16 6 37 8 8 23 46 6 0 3 4 7 10 10 24 10 8 12 12 25 12 9 38 6 6 26 47 6 6 3 4 3 4 10 39 8 8 27 10 10 11 10 10 28 48 6 6 ...

Page 154: ... 8 8 8 17 10 10 2 Option for sewing pattern and sewing width method for option of sewing pattern is same asHK2900SS use enlarge and reduce function to adjust when sewing pattern standards sewing width is inappropriate with button hole Way enlarge and reduce is same as HK2900SS after changed sewing pattern number must be check needle down position Check way please refer HK2900SS operating manual an...

Page 155: ...on in order to prevent a human injury due to machine sudden movement please operation work after power turn OFF 在让停止位置的爪脚 上升的状态 拧松打开 爪脚拨杆固定螺丝 让钮扣设定到爪脚 把爪脚打开拨杆 和塔形螺丝 之间的间隙为 0 5 1mm 然后拧紧打开爪脚拨杆固定螺丝 4 Install machine head and electric box is same withHK2900SS please refer to HK2900SS instruction manual 5 Install appendix on the plate please install to the place easy for operation ...

Page 156: ...ingthe height of button clamp Loosen set screws move the lifting actuating plate in direction A to lower the height of button clamp to lift it up move it in direction B 8 Adjusting the pressure of pressure foot ...

Page 157: ...e mm Y 0 3 5 0 4 5 X 0 3 5 0 4 5 utton Thickness mm 2 2 2 7 2 7 2 2 Parts right MAZ155070B0 B MAZ156070B0 C MAZ156070B0 C MAZ155070B0 B 1 Setting the button rising bar on the pick up foot installing base by using the set screw 2 Move the button rising bar to the center of the button and make the clearance between the center of the button and the point of button rising bar is 3 5 4mm as left figure...

Page 158: ...77 clamp No left MAZ155080B0 B MAZ156080B0 C MAZ156080B0 C MAZ155080B0 B Needle hole plate MAZ15501000 MAZ15601000 Feed plate MAZ15502000 MAZ15601000 special order parts mark ...

Page 159: ...ssing key later press keys to make the mode to 1 press key again to confirm it and the indicator will be OFF 3 Please be well noted the difference of below operation i If you use the previous version of controller which doesn t have the USB interface on the operation panel you may follow the instructions as below for updating 1 Turn off the power take off the panel cable from the interface X7 on t...

Page 160: ...lly updated 2 Turn off the power Take off the sewing pattern updating device and plug on the panel again turn on the power press key show press keys select No 201 ii If the operation panel is equipped with USB interface the new generation you may follow the instructions for updating as below 1 If the panel is equipped with the USB interface there is no need the sewing pattern updating device and n...

Page 161: ...attern selection Mode with any operation 4 press key show and then press keys select the No 201 4 press key the sewing indicator light ON and will be placed in pattern switch mode and show 1 1 5 press keys for changing the pattern No you need take No 101 for example ...

Page 162: ...cator off to save the setting and back to the interface of steps 6 you may lock unlock the patterns you need by alternating step 6 9 press key back to sewing mode 10 press key to select the pattern No refer to 2 4 1 data setting and then press keys to choose the unlocked pattern No 101 and start sewing ...

Page 163: ...area The pattern size exceed the sewing area 1 Press reset key 2 Please check the X and Y size setting Triggering condition pattern computing error E 43 Expanding is abnormal Stitch length is over 10 mm 1 Press reset key 2 Please check the X and Y size setting E 45 Pattern data is abnormal Pattern doesn t exist Turn off the power and check the data ROM E 50 Pause The reset key has been pressed whi...

Page 164: ...well or not E681 Stepping closed loop DSP1 X27 is overload Overcurrent is detected Please check if the motor is in good condition through checking its resistance and inductance if it is well please check the stepping driving board E682 Stepping closed loop DSP1X27 is out of track The position detected by the encoder isn t accord with the one in the program The stepper motor to open loop mode if ca...

Page 165: ...s in good condition through checking its resistance and inductance if it is well please check the stepping driving board E692 Stepping closed loop DSP2 first X23 is overloaded The position detected by feedback of encoder doesn t conform to instruction of the procedure The stepper motor to open loop mode if can be normal work the motor is normal If the machine can t normally work you may need to tr...

Page 166: ...of no mechanical stuck Check whether the main shaft encoder is connected well E 735 stopping current abnormal Over current appears during principal axis stopping Turn off the power wait for a while turn on again Change the principal axis motor and check if damaged if unresolved change the main board E 736 Main board IPM instantaneous over current An over current in short time in the main board IPM...

Page 167: ...tion does not alter Turn off power check if head signal circuit board CZ021 control box X9 is loose or fall off E 908 Ymotor home position searching is abnormal Y motor home position do not alter Turn off power check if head signal circuit board CZ022 control box X9 is loose or fall off E 910 Pressure foot motor home position searching is abnormal Pressure foot motor home position transducer do no...

Page 168: ...Change the stepping plate used in bar tacking machine or update the stepping procedure E 920 Stepping software version error Wrong Stepping software version Change the stepping plate used in bar tacking machine or update the stepping procedure E 921 X scale stepping movement step verification error After one sewing main control detect the order received by stepping plate in X Scale does not confor...

Page 169: ...88 Table diagram ...

Page 170: ......

Page 171: ...脚部件 9 PRESSER FOOT MECHNISM 4 下轴部件 11 CRANKSHAFT MECHANISM 5 剪线部件 13 THREAD TRIMMER MECHANISM COMPONENTS 6 送料部件 15 FEED MECHANISM COMPONENTS 7 附件 17 ACCESSORIE PART COMPONENTS 8 HK2903 专用件 19 EXCLUSIVE PARTS FOR HK2903 9 HK2903 专用附件 23 EXCLUSIVE ACCESSORIE PARTS FOR HK2903 ...

Page 172: ... 15 11 41 43 42 15 39 36 19 23 18 21 17 12 20 16 30 27 28 10 25 9 14 44 64 11 9 37 43 83 22 11 7 11 7 11 20 11 42 61 40 37 42 38 01 机壳部件 FRAME ASSEMBLY 57 6 29 51 56 15 53 42 1 45 26 35 50 49 48 60 19 46 47 54 65 13 37 66 67 68 75 76 37 74 71 73 70 69 24 63 81 33 88 ...

Page 173: ...OID 1 26 411 01 04 松线电磁铁安装板 AT_PLATE 1 27 411 01 17 防震垫圈 WASHER 2 28 03 604000220 1 六角螺母M4 NUT 1 29 03 603000240 3 六角螺母M3 NUT 2 30 411 01 19 松线电磁铁顶杆螺母 NUT 1 31 411 01 12 松线顶杆 TENSION RELEASING 1 32 06 0400809 1 E型挡圈4 E RING 4 1 33 05 053101001 5 平垫圈 WASHER 2 34 411 01 13 复位簧 SPRING 1 35 411 01 09 松线电磁铁盖 COVER PLANK 1 36 411 01 10 面板 FACE COVER 1 37 01 404001023 1 十字一字槽螺钉 M4 10 SCREW M4 L 10 9 38 H...

Page 174: ...1 43 42 39 36 19 23 42 18 17 12 20 61 16 30 28 10 25 15 9 14 15 11 9 67 43 29 19 22 52 7 11 7 11 20 11 42 40 37 38 13 37 57 01 机壳部件 FRAME ASSEMBLY 6 84 85 42 53 21 1 45 27 26 35 50 49 48 60 44 46 47 54 65 70 37 66 37 68 75 76 74 71 13 11 69 24 63 81 82 73 83 33 88 ...

Page 175: ...ING PLATE 1 68 421 12 19 M4螺柱 BOLT M4 4 69 421 12 08 01 安全开关安装板 SAFETY SWITCH BASE 1 70 421 12 08 05 安全开关固定板 SAFETY SWITCH NUT 1 71 421 12 08 02 安全开关板簧 SAFETY SWITCH ARM 1 72 421 12 08 03 安全开关板簧螺钉 SAFETY SWITCH SPRING SCREW 1 73 421 12 08 06 安全开关 SAFETY SWITCH 1 74 421 12 08 04 安全开关扭簧 SAFETY SWITCH SPRING 1 75 01 402001222 3 十字槽盘头螺钉 M2X12 SCREW M2 12 2 76 01 405000823 1 十字一字盘头螺钉 M5 8 SCREW M5 8 1 ...

Page 176: ...0 68 73 10 75 69 61 62 12 56 44 18 24 10 73 63 43 61 34 47 59 39 71 72 47 64 63 62 55 51 57 5 52 54 30 53 8 23 30 25 26 27 32 28 37 31 6 60 76 70 75 67 74 65 11 18 7 40 41 15 33 36 35 19 15 16 13 20 21 46 45 48 58 56 22 49 50 3 2 14 1 66 18 18 29 38 10 9 ...

Page 177: ...CREW 1 24 421 08 01 手轮 PULLEY 1 25 15 1401405 1 弹性圆柱销4 14 SPRING PIN 4 14 1 26 411 02 04 手轮轴 HAND PULLEY SHAFT 1 27 421 08 03 手轮复位簧 SPRING 1 28 421 08 05 00 上轴手动离合齿轮 GEAR A 1 29 01 805000814 1 内六角平端紧定螺钉M5X8 SCREW M5 L 8 2 30 01 804000414 1 凹端紧定螺钉 M4 4 SCREW M4 L 4 4 31 421 13 02 绕线驱动轮 BTW_DRIVING_WHEEL 1 32 421 08 04 00 手轮轴齿轮 GEAR B 1 33 411 02 05 上轴 MAIN SHAFT 1 34 411 02 07 上轴中轴套 BEARING_BUSH 1 ...

Page 178: ...4 10 39 18 30 14 68 73 69 15 42 18 56 55 30 66 75 10 10 18 61 34 62 47 59 22 6 71 72 47 73 63 62 55 51 57 5 52 54 7 53 8 23 24 25 26 27 32 28 37 31 61 60 76 70 75 67 74 65 73 63 38 40 41 44 33 36 35 19 15 16 13 20 18 46 45 58 12 43 49 56 50 3 2 21 1 10 9 ...

Page 179: ...LUG D 6 7 2 62 421 02 27 送料凸轮油毡 UNDER CAM FELT 2 63 421 02 29 送料连杆轴承垫圈 WASHER 4 64 421 02 28 01 送料连杆 LINK 1 65 421 02 28 02 送料连杆销衬套 BUSHING 1 66 421 02 26 送料凸轮盖板 CRANK_ROD_SUPPORT_PLATE 1 67 14 K384313 送料连杆滚针轴承 BEARING 1 68 01 103000621 1 十字沉头螺钉M3 6 SCREW M3 L 6 3 69 421 02 30 摆动齿轮 OSCILLATOR 1 70 421 02 31 送料连杆销 PIN 1 71 421 02 33 送料连杆销垫圈 WASHER 1 72 06 0801016 1 E型挡圈8 E RING 1 73 01 806750514 1 ...

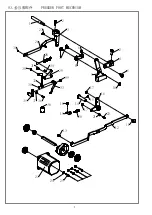
Page 180: ...1 2 3 8 6 9 10 5 4 2 12 11 13 15 14 16 17 19 18 20 17 21 22 23 25 7 24 26 27 39 33 38 36 35 37 30 32 28 29 31 30 30 34 9 03 抬压脚部件 PRESSER FOOT MECHNISM ...

Page 181: ... LIFTER LINK A ASM 1 17 03 605000400 1 六角螺母M5 NUT M5 2 18 01 504001024 1 内六角圆柱头螺钉M4 10 SCREW M4 L 10 1 19 411 03 13 抬压脚弹簧拉板 SPRING RACK 1 20 421 04 10 压脚调整拉杆弹簧 SPRING 1 21 411 03 15 抬压脚凸轮销滚柱 NEEDLE CAM ROLLER A 1 22 411 03 14 抬压脚凸轮销螺钉 CAM ROLLER SHAFT 1 23 411 03 19 剪线抬压脚伺服电机 FEED MOTOR 1 24 05 056101000 4 平垫片 WASHER 5 6 10 4 25 01 504001624 1 内六角螺钉M4 16 SCREW M4 L 16 4 26 411 03 23 拨线连杆 WIPER CON...

Page 182: ... 9 11 12 13 29 30 31 32 35 50 46 45 47 54 43 34 36 33 26 27 25 24 23 22 16 17 19 18 20 15 14 55 3 3 42 10 3 14 28 11 12 34 19 49 4 8 53 47 3 51 48 13 3 6 3 37 38 39 38 39 40 41 44 44 56 23 04 下轴部件 CRANKSHAFT MECHANISM 11 ...

Page 183: ...IL FELT 1 26 421 05 05 06 油毡夹 ONCE THROUGH OIL GELT PRESSER 1 27 421 05 05 04 摆梭润滑盘 SHUTTLE LUBRICATING PLATE 1 28 01 403000423 1 十字盘头螺钉M3x4 SCREW M3 L 4 2 29 421 05 05 14 摆梭锁紧螺钉 SHUTTLE_ASM_SCREW 1 30 421 05 05 11 偏心销轴 SHURRLE_RACE_ADJUSTING_SHAFT 1 31 01 604000621 1 一字薄帽圆柱头螺钉M4 6 SCREW 1 32 411 04 06 油管固定架 TUBE_CLAMP 1 33 01 805000614 1 内六角凹端螺钉M5 6 SCREW M5 L 6 2 34 14 6000 2LSNR 带挡圈轴承6000 2LSNR...

Page 184: ...1 4 5 3 6 3 8 9 10 12 11 15 13 14 18 7 16 17 6 19 19 05 剪线部件 THREAD TRIMMER MECHANISM COMPONENTS 2 3 3 3 20 13 ...

Page 185: ...轮 GEAR A 1 8 411 03 14 抬压脚凸轮销螺钉 CAM ROLLER SHAFT 1 9 411 03 15 抬压脚凸轮销滚柱 NEEDLE CAM ROLLER 1 10 411 03 17 抬压脚轴 THREAD TRIMMER SHAFT 1 11 03 604000220 1 六角螺母M4 2 2 NUT 1 12 411 05 09 剪线连杆 THREAD TRIMMER LINK ASM 1 13 03 605000400 1 六角螺母M5 NUT 1 14 411 05 01 剪线拉杆 CONNECTING BAR 1 15 421 06 14 切线连杆轴位螺钉 HINGE SCREW D 8 H 3 3 1 16 01 104000721 1 开槽沉头螺钉M4 SCREW 4 17 01 506002024 1 内六角圆柱头M6 20 SCREW 3 18 ...

Page 186: ... 4 10 9 37 47 44 51 11 5 13 14 16 15 17 18 21 28 17 27 32 29 35 20 21 30 26 34 25 24 23 22 15 33 12 50 40 53 41 38 3 52 42 43 45 51 54 48 46 5 54 43 19 20 29 20 1 49 46 21 20 31 15 06 送料部件 FEED MECHANISM COMPONENTS ...

Page 187: ...PPORT PLATE 1 26 411 06 07 04 送料轴连杆螺钉 HINGE STUD 1 27 411 06 13 Y送料轴连杆 Y FEED ARM 1 28 02 816400514 1 内六角凹端紧定螺钉SM1 4 40 5 SM1 4 40 L 5 2 29 01 806000814 1 内六角凹端螺钉 M6 8 SCREW M6 L 8 2 30 411 06 14 摆动架销 FEED DRIVING ARM SHAFT 1 31 411 06 15 X向扇形齿轮 X SECTOR GEAR 1 32 411 06 07 06 滑块 SQUARE BLOCK 1 33 411 06 17 X向驱动齿轮 X FEED GEAR 1 34 411 06 21 X向伺服电机 FEED MOTOR 1 35 01 504001024 1 内六角圆柱头螺钉M4 10 SCREW...

Page 188: ...6 11 20 27 24 26 31 32 33 30 17 14 18 15 13 16 12 19 9 10 8 7 3 1 4 2 4 5 21 22 23 25 28 29 17 07 附件 ACCESSORIE PART COMPONENTS ...

Page 189: ...扳手4 HEXAGONAL SPANNER S4 1 16 411 07 09 内六角扳手5 HEXAGONAL SPANNER S5 1 17 30016226 注射器 INJECTING SYRINGE 1 18 201 22 07 06 16 1 5mm带柄螺丝刀 HEXAGONAL SPANNER S1 5 1 19 419 01 04 机针 NEEDLE DP 17 5 20 411 04 12 小梭芯 BOBBIN 1 21 411 07 04 橡胶垫 FRAME SUPPORT RUBBER 2 22 01 506006024 1 内六角圆柱头螺钉 M6 60 SCREW M6 L 60 4 23 421 12 20 03 翻转脚夹紧圈 BED HINGE 2 24 411 07 05 翻转脚垫 BED HINGE RUBBER 2 25 05 064151902 5 平垫片...

Page 190: ...17 12 11 10 9 7 6 4 5 1 3 14 16 15 8 3 2 13 18 20 19 21 19 HK2903专用部件 1 EXCLUSIVE PARTS FOR HK2903 1 ...

Page 191: ...LE ROD CRANK B 1 9 421 02 17 01 针杆连杆 NEEDLE BAR CRANK ROD 1 10 14 619 8 2Z 轴承619 8 2Z 针杆连杆轴承 BEARING 1 11 421 02 17 02 针杆连杆轴套 NEEDLE BAR CRANK ROD METAL 1 12 421 02 16 挑线曲柄左旋螺钉 LEFT SCREW 1 13 01 506001824 1 内六角圆柱头螺钉M6 18 SCREW M6 L 18 1 14 419 01 05 抬压脚摆动臂 CONNECTING ARM B 1 15 419 01 06 抬压脚连杆套 STOP MOTION TRIPPING LEVER CAM 1 16 419 01 07 抬压脚连杆套轴位螺钉 HINGE SCREW D 7 94 H 12 7 1 17 419 01 04 机针 NE...

Page 192: ...3 1 4 5 6 7 8 9 14 15 16 19 17 12 18 21 23 24 12 10 27 29 30 31 45 26 25 33 34 38 40 32 33 34 35 37 36 42 43 44 13 41 46 28 1 7 8 17 12 44 28 39 20 22 22 11 32 21 HK2903专用部件 2 EXCLUSIVE PARTS FOR HK2903 2 ...

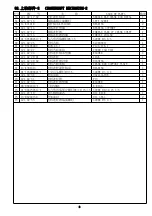
Page 193: ... CONNECTING ROD 1 21 419 02 08 06 滑块 SLIDE BLOCK 1 22 06 0600812 1 安装轴挡圈 E RING 7 2 23 419 02 08 07 夹头安装板 PICK UP FOOT INSTALLING BASE 1 24 419 02 08 08 安装轴 INSTALLING SHAFT 1 25 419 02 08 09 护指器 FINGER GUARD 1 26 419 02 08 10 夹头基座 PICK UP FOOT INSTALLING BASE 1 27 419 02 08 11 安装板导向轴 STATIONING BLOCK SHAFT 1 28 02 711400421 1 螺钉 11 64 40 L 4 SCREW 11 64 40 L 4 2 29 419 02 08 12 安装板导向支撑架 SUPPORT P...

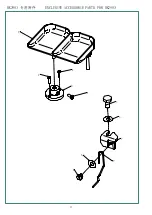
Page 194: ...2 4 5 6 7 9 2 3 6 8 1 23 HK2903 专用附件 EXCLUSIVE ACCESSORIE PARTS FOR HK2903 ...
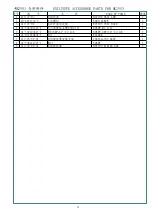
Page 195: ...座 BUTTON TRAY BASE 1 4 01 506001224 1 内六角圆柱头螺钉M6 12 SCREW M6 L 12 1 5 02 709400825 1 螺钉SM9 64 40 L 8 SCREW SM9 64 40 L 8 1 6 05 037030801 1 垫片 WASHER 2 7 419 03 02 01 钮扣挑线簧安装支架 INSTALLING BASE 1 8 02 508442921 1 螺钉 SCREW 1 9 419 03 02 02 钮扣挑线簧 BUTTON RISING BAR 1 24 HK2903 专用附件 EXCLUSIVE ACCESSORIE PARTS FOR HK2903 ...
Reviews: