background image

English

27

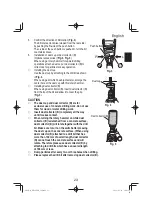
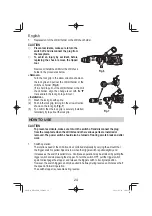
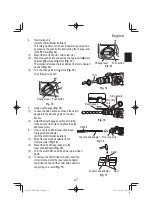
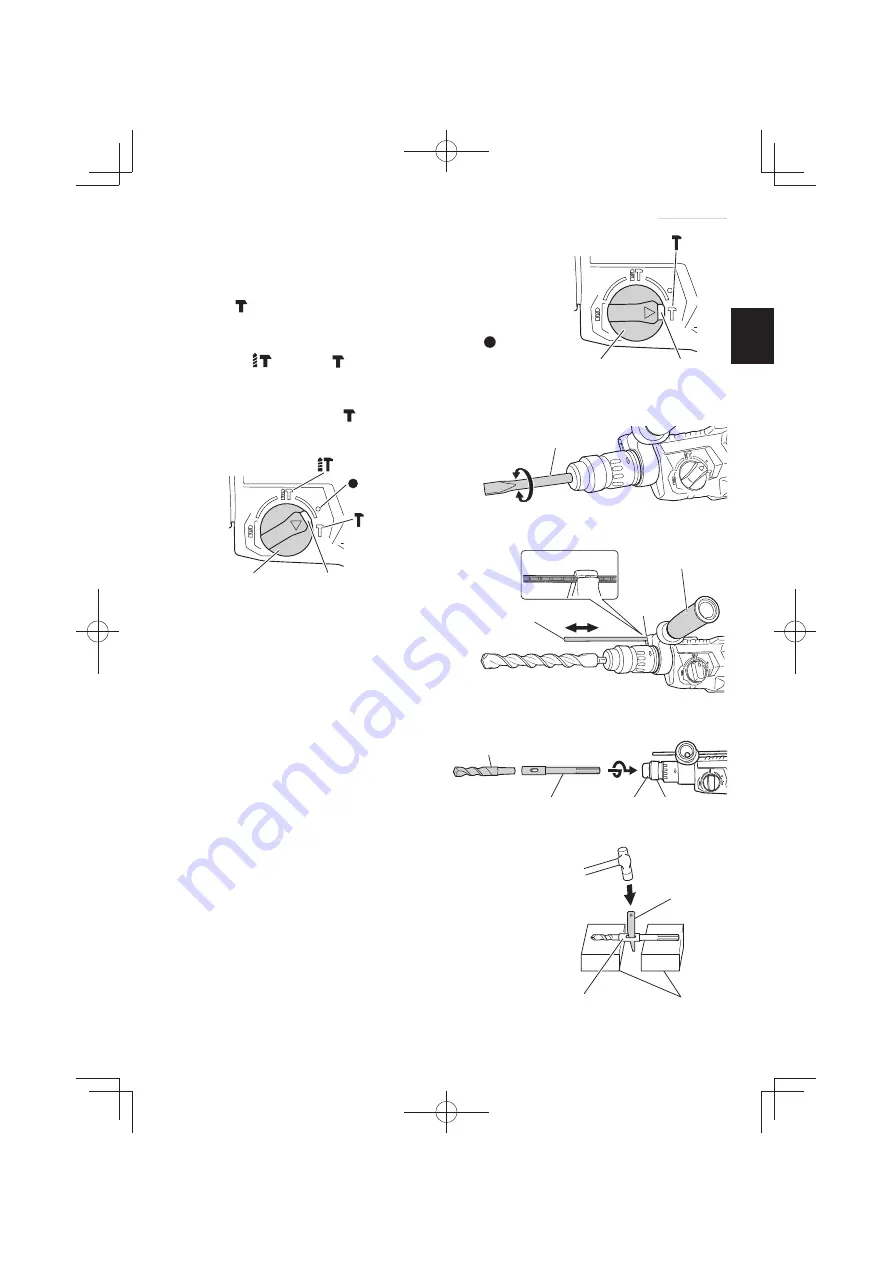
4. Hammering 

only


(with the drill bit holder installed)


This rotary hammer can be set to hammering only mode 

by pressing the push button and turning the change lever 

to the   mark (

Fig. 12

).

(1)  Mount the tool (bull point, cold chisel etc.)

(2)  Press the push button and set the change lever to   mark 

between   mark and   mark (

Fig. 13

).


The rotation is released, turn and adjust the tool to desired 

position (

Fig. 14

).

(3)  Turn the change lever to   mark (

Fig. 12

).


Then the tool is locked.

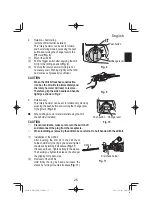
5.  Using depth gauge (

Fig. 15

)

(1)  Loosen the side handle, and insert the depth 

gauge into the mounting hole on the side 

handle.

(2)  Adjust the depth gauge position according 

to the depth of the hole and tighten the side 

handle securely.

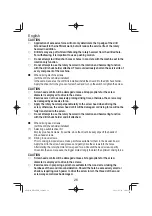
6.  How to use the drill bit (taper shank) and 

the taper shank adapter


(with the drill bit holder installed)

(1)  Mount the taper shank adapter to the 

rotary hammer (

Fig. 16

).

(2)  Mount the drill bit (taper shank) to the 

taper shank adapter (

Fig. 16

).

(3)  Turn the switch ON, and drill a hole in prescribed 

depth.

(4)  To remove the drill bit (taper shank), insert the 

cotter into the slot of the taper shank adapter 

and strike the head of the cotter with a hammer 

supporting on a rests (

Fig. 17

).

Fig. 12

Change lever

Push button

Fig. 14

Tool

Change lever Push button

Fig. 13

Fig. 15

Side handle

Mounting 

hole

Depth gauge

Fig. 16

Drill bit

Front cap Grip

Taper shank adapter

Fig. 17

Taper shank adapter

Cotter

Rest

000Book̲DH26PMC̲ChS.indb   27

000Book̲DH26PMC̲ChS.indb   27

2021/05/14   10:03:18

2021/05/14   10:03:18

Summary of Contents for DH 26PMC

Page 1: ...中 文 English DH 26PMC 锤钻 Rotary Hammer 使用说明书 Handling instructions 保留备用 Keep for future reference 000Book DH26PMC ChS indb 1 000Book DH26PMC ChS indb 1 2021 05 14 10 03 11 2021 05 14 10 03 11 ...

Page 2: ...者失去对工具的控制 2 电气安全 a 电动工具插头必须与插座相配 绝不能以任何方式改装插头 需接地的 电动工具不能使用任何转换插头 未经改装的插头和相配的插座将减少电击危险 b 避免人体接触接地表面 如管道 散热片和冰箱 如果你身体接地会增加电击危险 c 不得将电动工具暴露在雨中或潮湿环境中 水进入电动工具将增加电击危险 d 不得滥用电线 绝不能用电线搬运 拉动电动工具或拔出其插头 使电 线远离热源 油 锐边或运动部件 受损或缠绕的软线会增加电击危险 目次 电动工具通用安全警告 2 锤钻安全警告 4 符号 4 规格 5 标准附件 5 选购附件 分开销售 6 用途 8 作业之前 8 使用方法 10 怎么样使用取心钻具 轻载用 安装有钻头固定器 14 润滑 15 维护和检查 15 000Book DH26PMC ChS indb 2 000Book DH26PMC ChS indb 2 202...

Page 3: ... 拿掉所有调节钥匙或扳手 遗留在电动工具旋转零件上的扳手或钥匙会导致人身伤害 e 手不要伸展得太长 时刻注意立足点和身体平衡 这样在意外情况下能很好地控制电动工具 f 着装适当 不要穿宽松衣服或佩戴饰品 让衣服 手套和头发远离运动 部件 宽松衣服 佩饰或长发可能会卷入运动部件中 g 如果提供了与排屑 集尘设备连接用的装置 要确保它们连接完好且使 用得当 使用这些装置可减少尘屑引起的危险 4 电动工具使用和注意事项 a 不要滥用电动工具 根据用途使用适当的电动工具 选用适当设计的电动工具会使你工作更有效 更安全 b 如果开关不能接通或关断工具电源 则不能使用该电动工具 不能用开关来控制的电动工具是危险的且必须进行修理 c 在进行任何调节 更换附件或贮存电动工具之前 必须从电源上拔掉插 头和 或使电池盒与工具脱开 这种防护性措施将减少工具意外起动的危险 d 将闲置不用的电动工具贮存在儿童所及范...

Page 4: ...不使用的工具存放在儿童和体弱人士接触不到的地方 锤钻安全警告 1 请佩戴护耳罩 暴露在噪声中会引起听力损伤 2 如果随工具提供辅助手柄 请使用 操作失手会引起人身伤害 3 在切削附件可能触及暗线或其自身软线之处进行操作时 要通过绝缘握持面 来握持工具 切削附件碰到带电导线会使工具外露的金属零件带电从而使操 作者受到电击 4 作业之后的钻头仍处在高热状态下 切不可摸触 以免灼伤 5 对墙壁 天花板和地板进行钻孔或钻碎作业时 应彻底查明里面是否敷设电 缆或导管 6 使用锤钻时 应牢牢握住工具的操作柄和侧柄 否则 所产生的反作用力会 将孔钻歪 甚至会造成危险 7 佩戴防尘口罩 不要吸入在钻凿操作过程中产生的有害粉尘 粉尘会危机到自身和旁观者的 身体健康 符号 警告 如下所示的符号用于本机 使用前请务必理解其含意 为降低伤害风险 用户必须阅读使用说明书 000Book DH26PMC ChS in...

Page 5: ...空载转速 0 1100 min 满载冲击率 0 4300 min 能力 混凝土 钢铁 木材 3 4 26mm 13mm 32mm 重量 不含线缆 3 0kg 标准附件 除了主机 1 台 外 产品包中还包括表中所列的附件 DH26PMC 塑料盒 1 侧柄 1 深度计 1 钻头卡盘固定器 1 000Book DH26PMC ChS indb 5 000Book DH26PMC ChS indb 5 2021 05 14 10 03 13 2021 05 14 10 03 13 ...

Page 6: ...导螺杆 在刚材或木材上钻孔 化学锚栓的螺栓固定作业 用具 转接器 钻头 钻头 钻头 钻头 锥柄 锚栓安装转接器 六角套筒 钢材专用钻头 木材专用钻头 专用 螺丝 卡盘 转接器 钻头卡盘 13 VLRB D 化学锚栓转接器 尖钻头 圆形 锥柄转接器 引导盘 钻心轴 中央销 钻心 扁销 旋钻 捶击 仅旋钻 用于面朝上的作业 集尘器 集尘器 B 仅捶击 377959 375010 000Book DH26PMC ChS indb 6 000Book DH26PMC ChS indb 6 2021 05 14 10 03 13 2021 05 14 10 03 13 ...

Page 7: ...3mm 160mm 87mm 260mm 186mm 14 5mm 160mm 87mm 260mm 186mm 15 0mm 160mm 85mm 16 0mm 160mm 85mm 260mm 186mm 16 5mm 160mm 85mm 17 0mm 160mm 85mm 260mm 185mm SDS plus 钻头 外径 全长 有效长度 17 5mm 160mm 90mm 260mm 185mm 18 0mm 160mm 90mm 19 0mm 260mm 185mm 20 0mm 260mm 175mm 22 0mm 260mm 175mm 25 0mm 450mm 375mm 在混凝土或瓷砖上钻孔 钻锚孔 锥柄转接器 锥度模式 1 号莫尔斯锥度 2 号莫尔斯锥度 A 锥柄 B 锥柄 大孔钻 钻心 外径 中央销 钻心柄全长 25mm 不适用 105mm 300mm 29mm ...

Page 8: ...不意地立刻转动 从而招致严重事故 3 延伸线缆 若作业场所移到离开电源的地点 应使用容量足够 装合适的延伸线缆 并 且要尽可能地短些 4 安装工具 图 1 注意 为避免意外事故 请务必关闭开关 并拔下电源插头 注 当使用尖钻 钻头等工具时 请务 必使用本公司原装配件 1 清洁工具柄 2 旋转工具将其插入前帽的孔内直至 插锁插紧 图 1 3 拉工具以检查是否完全插紧 4 拆下工具时 首先请按箭头所示方向 将夹卡完全拉出 然后将钻头从夹卡 上拉下 图 2 工具 SDS plus 长柄部 前帽 夹卡 图 1 夹卡 图 2 000Book DH26PMC ChS indb 8 000Book DH26PMC ChS indb 8 2021 05 14 10 03 14 2021 05 14 10 03 14 ...

Page 9: ...时 请将集尘器 B 与夹卡上的 槽对准后插入 使集尘器 B 覆盖钻头的顶端 图 5 注意 集尘杯和集尘器 B 是专门用於混凝土的钻孔 请勿用於金属 木材的钻孔 请将集尘器 B 完全插入 直至抵住夹卡 当集尘器 B 与混凝土表面有一段距离的状态 下 打开锤钻开关进行工作时 集尘器 B 会跟 钻头同时旋转 因此 请务必将集尘杯紧压在混 凝土表面上后再打开开关进行钻孔工作 如将集 尘器 B 用於全长 190mm 以上的钻头时 集尘 器 B 便无法贴紧混凝土表面而旋转 因此 请 将集尘器 B 与全长 166mm及以下的钻头配套使 用 每钻 2 3 个孔后 请将粉尘丢掉 更换钻头时 请卸下集尘器 B 以后再进行 按钮 图 3 集尘杯 图 4 集尘器 B 图 5 000Book DH26PMC ChS indb 9 000Book DH26PMC ChS indb 9 2021 05 14 10 03...

Page 10: ...夹卡与齿条吻合 2 推入锁定夹卡 并按照锁定夹卡上显示的 箭头方向进行旋转 图 7 3 试着拉出锁定夹卡 确认已安装牢固 使用方法 注意 在进行钻头及各种零部件的安装 拆卸 中断作业时及作业之后 为防止发 生意外事故 请务必关闭开关 从插座拔出插头 1 开关的操作 钻头的转速可以靠改变触发开关的拉动量来控制 轻拉触发开关 转速低 稍用力拉开关 转速增高 拉动触发开关后再按下停止销的话 便可进行连 续作业 若想关掉触发开关 请再次拉动触发开关 以使停止销松开并使触 发开关回到其起始位置 然而 倒转时只能将触发开关拉出一半 旋转速度为正常旋转时的约一半 另外 倒转时不能使用开关止动器 图 6 图 7 000Book DH26PMC ChS indb 10 000Book DH26PMC ChS indb 10 2021 05 14 10 03 15 2021 05 14 10 03 15 ...

Page 11: ...此 必需握紧侧柄和操作柄 3 旋钻 按压按钮将选择杆顺时针方向转到标 有 号的位置 锤钻就进行单纯旋 钻 图 10 利用安装的钻头卡盘固定器于木材或 金属质材上钻洞时 注意 请务必关闭开关 并从插座拔下插头 以防止意外发生 安装或卸下钻头时 请小心不要被钻头弄伤双手 1 安装钻头 将钻头安装在钻头卡盘固定器上后 用手紧紧握住环 并顺时针旋紧轴套 图 11 如果在使用中发生松动 请紧紧旋紧轴 套 轴套越紧 则夹持力越大 2 拆卸钻头 用 手 紧 紧 握 住 环 逆 时 针 拧 松 轴 套 图 11 按钮 选择杆 图 8 图 9 按钮 选择杆 图 10 图 11 钻头 钻头卡盘固定器 000Book DH26PMC ChS indb 11 000Book DH26PMC ChS indb 11 2021 05 14 10 03 15 2021 05 14 10 03 15 ...

Page 12: ...注意不要过分加长旋螺丝的时间 否则 过大的力会损坏螺丝 旋螺丝时 锤钻要垂直对准螺丝头 否则 螺丝头或钻头会受损 或者旋转 力不能被完全传给螺丝 在装有钻头卡盘固定器和钻头时 不要在旋钻加锤击的功能下使用锤钻 旋木螺丝时 安装有钻头卡盘固定器 1 选择适当的钻头 如果可能的话 请尽量使用十字头螺丝 因为钻头很容易滑出一字头螺丝的 槽 2 旋木螺丝 在旋木螺丝之前 在木板上开适当的先导孔 然后把钻头放入螺丝头部的槽 内 缓缓地将螺丝旋进孔内 低速转动锤钻一会儿直到木螺丝被旋进木板一部分 然后更紧地握住触发开 关以便得到最佳旋转力 注意 为了避免螺丝头或钻头被损坏 旋螺丝时一定要使用与螺丝直径相配的钻头 在为木螺丝准备先导孔时 应特别注意木板的硬度 如果孔极小或极浅 用 较大的力将螺丝旋进孔的话 有时会损坏木螺丝的螺纹 000Book DH26PMC ChS indb 12 000Book D...

Page 13: ...1 旋松侧柄的手柄 把深度计插进侧柄 上的安装孔 2 按孔深调节深度计的位置 然后旋 紧侧柄 6 钻头 锥柄 和锥柄附加器的使用 安装有钻头固定器 1 把锥柄附加器安装在锤钻上 图 16 2 把钻头 锤柄 安装在锤柄附加器上 图 16 3 接通开关 按预定深度钻开一个孔口 4 拆卸钻头时 可将制销插入锥柄附加器的缝 隙 把钻头放在台座上 用锥子敲打制销头 部 图 17 图 12 选择杆 按钮 图 14 工具 选择杆 按钮 图 13 侧柄 深度计 安装孔 图 15 钻头 前帽 夹卡 锥柄附加器 图 16 锥柄附加器 制销 台座 图 17 000Book DH26PMC ChS indb 13 000Book DH26PMC ChS indb 13 2021 05 14 10 03 16 2021 05 14 10 03 16 ...

Page 14: ... 图 20 2 怎么样进行钻孔 图 21 1 把插头插接於电源插座 2 中间销里装有弹簧 垂直推压於墙壁或地 板 使取心钻具尖端成为与之全面接触的 状态 然后开动钻机 3 钻到大约 5mm 深度 钻孔位置即可确定 这时候 可存从取心钻具拆下中间销和导板 注意 拆除中间销和导板时 应先切断开关 并从 电源插座拆下插头 过度用力不仅会损坏钻头的顶端边缘并导致 工作效率低下 并且还会降低锤钻的使用寿 命 3 拆卸 图 22 亦可从锤钻拆下取心钻柄 然后拿稳取心钻 具 用锤子强力锤击取心钻柄二至三次 让 螺纹部松开 把取心钻具拆下 图 19 取心钻具 取心钻柄 螺纹 图 18 导板 中间销 取心钻具尖端 取心钻具 图 20 图 21 取心钻柄 图 22 000Book DH26PMC ChS indb 14 000Book DH26PMC ChS indb 14 2021 05 14 10 03 ...

Page 15: ...1 检查工具 使用变钝的工具 将使电动机工作失常 并降低作业效率 因此 若配件发 现明显磨损 应立刻磨快工具 或加以更换 2 检查安装螺钉 要经常检查安装螺钉是否紧固妥善 若发现螺钉松了 应立即重新扭紧 否 则会导致严重的事故 3 电动机的维护 电动机绕线是电动工具的 心脏部 应仔细检查有无损伤 是否被油液或水 沾湿 4 检查炭刷 为了保证长期的安全使用以及避免触电事故的发生 本工具的炭刷检查与更 换只能由HiKOKI授权的维修中心进行 5 更换电源线 如需更换电源线 请联系制造商代理商 以免发生危险 注意 在操作和维修电动工具时 必须遵守贵国制定的安全的有关规则和标准 000Book DH26PMC ChS indb 15 000Book DH26PMC ChS indb 15 2021 05 14 10 03 17 2021 05 14 10 03 17 ...

Page 16: ...ower tool Distractions can cause you to lose control 2 Electrical safety a Power tool plugs must match the outlet Never modify the plug in any way Do not use any adapter plugs with earthed grounded power tools Unmodified plugs and matching outlets will reduce risk of electric shock b Avoid body contact with earthed or grounded surfaces such as pipes radiators ranges and refrigerators There is an i...

Page 17: ...tentional starting Ensure the switch is in the off position before connecting to power source and or battery pack picking up or carrying the tool Carrying power tools with your finger on the switch or energising power tools that have the switch on invites accidents d Remove any adjusting key or wrench before turning the power tool on A wrench or a key left attached to a rotating part of the power t...

Page 18: ...rdous situation 5 Service a Have your power tool serviced by a qualified repair person using only identical replacement parts This will ensure that the safety of the power tool is maintained CAUTION Keep children and infirm persons away When not in use tools should be stored out of reach of children and infirm persons ROTARY HAMMER SAFETY WARNINGS 1 Wear ear protectors Exposure to noise can cause ...

Page 19: ... user must read instruction manual SPECIFICATIONS Model DH26PMC Voltage 220 V Power input 830 W No load speed 0 1100 min Full load speed rate 0 4300 min Capacity concrete steel wood 3 4 26 mm 13 mm 32 mm Weight without cord 3 0 kg STANDARD ACCESSORIES In addition to the main unit 1 unit the package contains the accessories listed in the below DH26PMC Plastic case 1 Side handle 1 Depth gauge 1 Dril...

Page 20: ...rds Driver bit Driver bit Drill bit Drill bit Taper shank Anchor setting adapter Hexagon socket Drill bit for steel Drill bit for wood Special screw Chuck adapter Drill chuck 13 VLRB D Chemical anchor adapter Bull point Round type Taper shank adapter Guideplate Core bit shank Centerpin Corebit Cotter Rotation Hammering Rotation only Dust cup Dustcollector B Groove digging and edging Cold chisel Cu...

Page 21: ...15 0 mm 160 mm 85 mm 16 0 mm 160 mm 85 mm 260 mm 186 mm 16 5 mm 160 mm 85 mm 17 0 mm 160 mm 85 mm 260 mm 185 mm 17 5 mm 160 mm 90 mm 260 mm 185 mm 18 0 mm 160 mm 90 mm SDS plus Drill bit Outer dia Overall length Effective length 19 0 mm 260 mm 185 mm 20 0 mm 260 mm 175 mm 22 0 mm 260 mm 175 mm 25 0 mm 450 mm 375 mm Drilling holes in concrete or tile Drilling anchor holes Taper shank adapter Taper m...

Page 22: ...us accident 3 Extension cord When the work area is removed from the power source use an extension cord of sufficient thickness and rated capacity The extension cord should be kept as short as practicable 4 Mounting the tool Fig 1 CAUTION To prevent accidents make sure to turn the switch off and disconnect the plug from the receptacle NOTE When using tools such as bull points drill bits etc make sure ...

Page 23: ...TION The dust cup and dust collector B are for exclusive use of concrete drilling work Do not use them for wood or metal drilling work Insert dust collector B completely all the way until it makes contact When turning the rotary hammer on while dust collector B is detached from a concrete surface dust collector B will rotate together with the drill bit Make sure to turn on the switch after pressin...

Page 24: ...to pull out the lock grip HOW TO USE CAUTION To prevent accidents make sure to turn the switch off and disconnect the plug from the receptacle when the drill bits and other various parts are installed or removed The power switch should also be turned off during a work break and after work 1 Switch operation The rotation speed of the drill bit can be controlled steplessly by varying the amount that t...

Page 25: ...h button and turning the change lever to the mark Fig 10 When drilling wood or metal material using the drill chuck holder installed CAUTION Prevent accidents make sure to turn the switch off and disconnect the plug from the receptacle When installing or removing the drill bit be careful not to hurt hands with the drill bit 1 Installation of the drill bit After inserting the drill bit in the drill ...

Page 26: ...mmer perpendicularly to the screw head when driving the screw otherwise the screw head or bit will be damaged or driving force will not be fully transferred to the screw Do not attempt to use the rotary hammer in the rotation and hammering function with the drill chuck holder and bit attached When driving wood screws with the drill chuck holder installed 1 Selecting a suitable driver bit Employ pl...

Page 27: ... depth of the hole and tighten the side handle securely 6 How to use the drill bit taper shank and the taper shank adapter with the drill bit holder installed 1 Mount the taper shank adapter to the rotary hammer Fig 16 2 Mount the drill bit taper shank to the taper shank adapter Fig 16 3 Turn the switch ON and drill a hole in prescribed depth 4 To remove the drill bit taper shank insert the cotter...

Page 28: ... lightly to the wall or the floor straight Connect the core bit tip flush to the surface and start operating 3 When boring about 5 mm in depth the position of the hole will be established Bore after that removing the center pin and the guide plate from core bit CAUTION When removing the center pin and the guide plate turn OFF the switch and disconnect the plug from the receptacle Application of ex...

Page 29: ...hen abrasion is noted 2 Inspecting the mounting screws Regularly inspect all mounting screws and ensure that they are properly tightened Should any of the screws be loose retighten them immediately Failure to do so could result in serious hazard 3 Maintenance of the motor The motor unit winding is the very heart of the power tool Exercise due care to ensure the winding does not become damaged and ...

Page 30: ...30 000Book DH26PMC ChS indb 30 000Book DH26PMC ChS indb 30 2021 05 14 10 03 19 2021 05 14 10 03 19 ...

Page 31: ...31 000Book DH26PMC ChS indb 31 000Book DH26PMC ChS indb 31 2021 05 14 10 03 19 2021 05 14 10 03 19 ...

Page 32: ...心 高壹工机商业 上海 有限公司 上海市闵行区浦江工业园区三鲁路3585号7幢3楼 制造商 福建高壹工机有限公司 福建省福州市福兴投资区湖塘路 107 编号 C99264021 F 发行日期 2021年7月 中国印刷 000Book DH26PMC ChS indb 32 000Book DH26PMC ChS indb 32 2021 05 14 10 03 19 2021 05 14 10 03 19 ...

Reviews: