13
English
1. Compacting concrete
Pull the switch trigger to start the rod vibrating. Insert
the rod perpendicularly into the concrete. (See "2. Work
tips")
When the cast concrete stops losing volume and appears
light in appearance (indicating that the ingredients have
blended homogeneously), the compacting process is
complete.
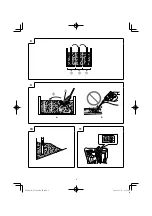
Slowly pull the rod out so that no hole is created. (
Fig. 7
)
The diameter of the area that can be e
ff
ectively
compacted using the power tool (
Fig. 8-
Ⓒ
) is 280 mm,
which is approximately 10 times the diameter of the
vibrating rod. Compact all the concrete by moving the
rod at equal distances that are smaller than the size of
the area mentioned above. (
Fig. 8
)
NOTE
Excessive vibrations may cause concrete ingredients to
separate.
Exercise care to ensure that the vibrating rod does not
touch steel bars or formwork.
2. Work tips
●
If mortar has separated
If
you
fi
nd any locations where coarse aggregate* and
mortar* have separated from each other (
Fig. 9-
Ⓓ
),
scoop up the separate coarse aggregate and bury it in
an area of concrete where there is a lot of mortar (
Fig.
9-
Ⓔ
), then compact the area appropriately. (
Fig. 9-a
)
While carrying out these procedures, do not move
the concrete inside the formwork using the vibrator.
Otherwise, only the mortar that has good
fl
uidity will
move, which will further aggravate separation of the
concrete. (
Fig. 9-b
)
* Coarse aggregate refers to sand and crushed stones
that do not pass through a 5 mm sieve.
* Mortar refers to all concrete ingredients except coarse
aggregate.
●
When casting concrete on a slope
When casting concrete on a slope, start work from the
lower end of the slope. By doing so, the concrete will
become well compacted thanks to the weight of the
concrete that is cast later and the vibrations that are
applied. (
Fig. 10
)
WARNING SIGNALS
This product features functions that are designed to protect the tool itself as well as the battery. During work, from the time
the switch is being pulled and ten seconds after its release, each of the protective functions may be activated, resulting in
the indicator lamp on the switch panel to blink as shown in
Table 3
to notify the user. When any of the safeguard functions
are triggered, immediately remove your
fi
nger from the switch trigger and follow the instructions described under corrective
action. (
Fig. 11
)
Table 3
Safeguard Function
LED Light Display
Corrective Action
Overload Protection
On 0.1 second/o
ff
0.1 second
Remove the cause of the overloading.
Temperature Protection
On 0.5 second/o
ff
0.5 second
Allow the tool and battery to thoroughly cool.
MAINTENANCE AND INSPECTION
CAUTION
Be sure to turned o
ff
the switch and remove the battery
before maintenance and inspection.
1. Inspecting the mounting screws
Regularly inspect all mounting screws and ensure that
they are properly tightened. Should any of the screws be
loose, retighten them immediately. Failure to do so could
result in serious hazard.
2. Maintenance of the motor
The motor unit winding is the very “heart” of the power
tool. Exercise due care to ensure the winding does not
become damaged and/or wet with oil or water.
3. Inspection of terminals (tool and battery)
Check to make sure that swarf and dust have not
collected on the terminals.
On occasion check prior, during and after operation.
CAUTION
Remove any swarf or dust which may have collected on
the terminals.
Failure to do so may result in malfunction.
4. Cleaning on the outside
After using the power tool, wipe the tool body (in
particular, the ventilation holes, areas around the switch
trigger, and areas near the edges of the covers require
careful wiping) to remove any concrete using a cloth that
is soaked in a soap solution and well wrung.
Do not use gasoline, thinner, benzine, or kerosene as
they can dissolve plastics.
Immediately remove any concrete that has become
attached to the
fl
exible assembly.
5. Storage
Store the power tool in a place in which the temperature
is less than 40°C and out of reach of children.
NOTE
Storing lithium-ion batteries.
Make sure the lithium-ion batteries have been fully
charged before storing them.
Prolonged storage (3 months or more) of batteries with
a low charge may result in performance deterioration,
signi
fi
cantly reducing battery usage time or rendering
the batteries incapable of holding a charge.
However,
signi
fi
cantly reduced battery usage time may
be recovered by repeatedly charging and using the
batteries two to
fi
ve times.
If the battery usage time is extremely short despite
repeated charging and use, consider the batteries dead
and purchase new batteries.
0000Book̲UV3628DA̲EU.indb 13
0000Book̲UV3628DA̲EU.indb 13
2020/01/15 13:39:09
2020/01/15 13:39:09


