10.3 Port Mapping
By setting port mapping, you can access devices through the specified port.
Before You Start
When the ports in the device are the same as those of other devices in the network, refer to Port
to modify the device ports.
Steps
1. Go to Configuration → Network → Basic Settings → NAT .
2. Select the port mapping mode.
Auto Port Mapping
Refer to Set Auto Port Mapping for detailed information.
Manual Port Mapping Refer to Set Manual Port Mapping for detailed information.
3. Click Save.
10.3.1 Set Auto Port Mapping
Steps
1. Check Enable UPnP™, and choose a friendly name for the camera, or you can use the default
name.
2. Select the port mapping mode to Auto.
3. Click Save.
Note
UPnP™ function on the router should be enabled at the same time.
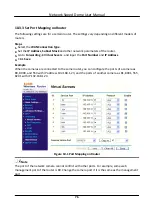
10.3.2 Set Manual Port Mapping
Steps
1. Check Enable UPnP™, and choose a friendly name for the device, or you can use the default
name.
2. Select the port mapping mode to Manual, and set the external port to be the same as the
internal port.
3. Click Save.
What to do next
Go to the router port mapping settings interface and set the port number and IP address to be the
same as those on the device. For more information, refer to the router user manual.
Network Speed Dome User Manual
75
Summary of Contents for DS-2DE7A232IW-AEB
Page 1: ...Network Speed Dome User Manual ...
Page 36: ...9 Click Save Network Speed Dome User Manual 24 ...
Page 111: ...UD23863B A ...


