108
Configuring E-Mail Settings
If you would like to have the DVR send out e-mails when certain events are detected or
exceptions have been triggered, you must first setup the e-mail settings.
To setup e-mail settings:
1.
Enter the Email Configuration menu by going to Menu > System Configuration >
Network.
2.
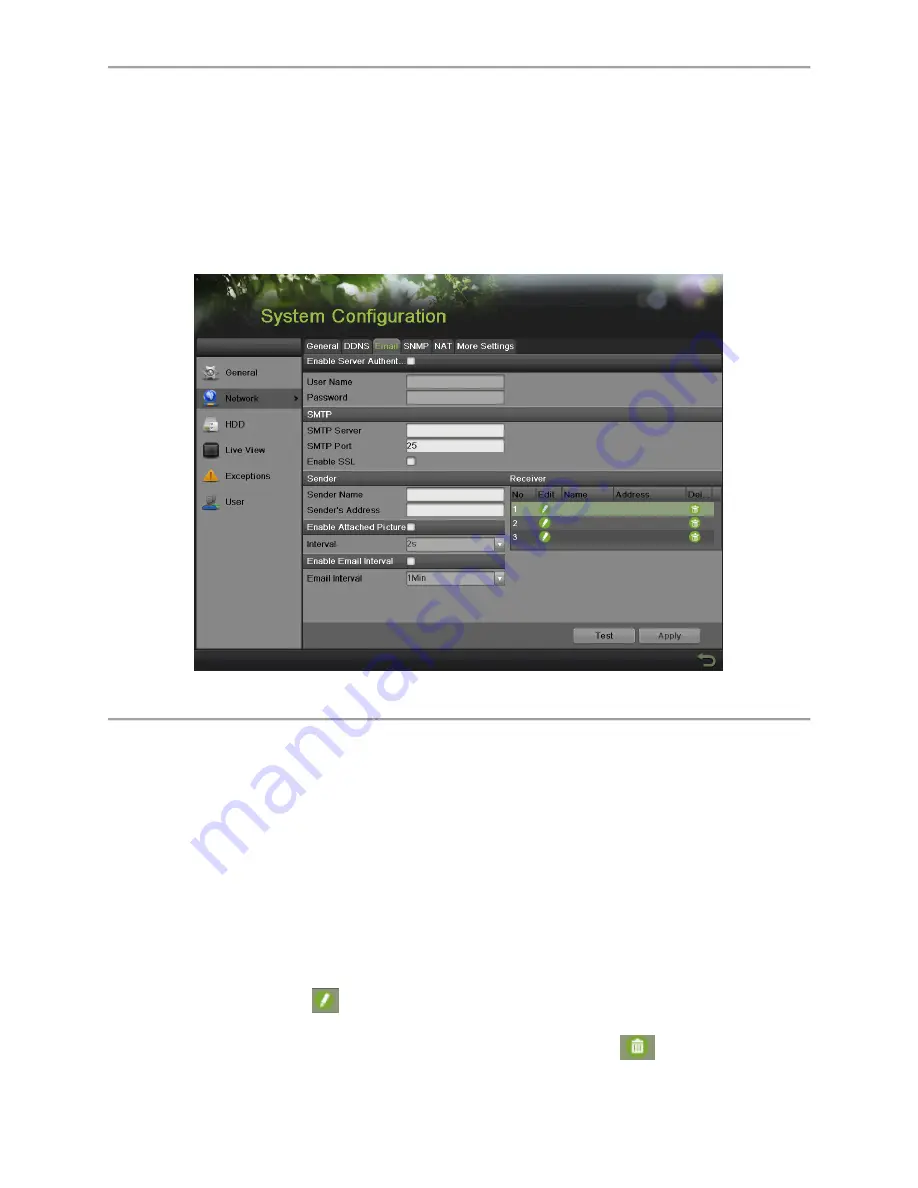
Select the Email tab, as shown in Figure 125.
Figure 125 Email Configuration Menu
3.
In this tab, enter all pertinent email information, including:
Enable Server Authentication:
Enable if email server requires authentication.
Enabling Server Authenticating will enable the User Name and Password fields.
User Name:
User name to use for server authentication.
Password:
Password to use for server authentication.
SMTP Server:
Address for SMTP server.
SMTP Port:
Port for SMTP server.
Enable SSL:
Enable Secure Sockets Layer (SSL) for out-going e-mail.
Sender Name:
The sender name to use when an e-mail is sent out from the DVR.
Sender’s Address:
The
sender’s address to use when an e-mail is sent out from
the DVR.
Enable Attached Picture:
Enabling will attach a small picture segment (Interval can
be set below the Enable Attached Picture checkbox) to the out-going e-mail.
Receiver:
Click
to edit Receiver Settings. Input the receiver’s name and
address. Click Apply to save the settings. The e-mail address will be added to the
Recipients list. You can also delete the receiver by clicking
.
Summary of Contents for DS-7200HGHI-SH Series
Page 18: ...17 Product Application Diagram Figure 7 Product Application Diagram ...
Page 28: ...27 Figure 14 Risky Inadequate Strength Password Figure 15 Invalid Password Message ...
Page 34: ...33 Figure 25 Password Field with Strong Strength Bar Figure 26 Confirmation Window ...
Page 36: ...35 Figure 27 iVMS 4200 Control Panel Figure 28 Inactive DVR NVR Status NVR Status Inactive ...
Page 38: ...37 Figure 31 Weak Adequate Password Strength Figure 32 Medium Adequate Password Strengt ...
Page 92: ...91 Figure 101 Main Menu ...


