background image

Video Intercom Villa Door Station

User Manual

Summary of Contents for DS-KV6113 Series

Page 1: ...Video Intercom Villa Door Station User Manual...

Page 2: ...kvision s trademarks and logos are the properties of Hikvision in various jurisdictions Other trademarks and logos mentioned are the properties of their respective owners Disclaimer TO THE MAXIMUM EXT...

Page 3: ...CE WITH ALL APPLICABLE LAWS AND YOU ARE SOLELY RESPONSIBLE FOR ENSURING THAT YOUR USE CONFORMS TO THE APPLICABLE LAW ESPECIALLY YOU ARE RESPONSIBLE FOR USING THIS PRODUCT IN A MANNER THAT DOES NOT INF...

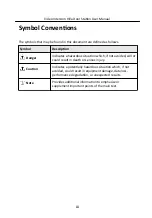
Page 4: ...ided will or could result in death or serious injury Caution Indicates a potentially hazardous situation which if not avoided could result in equipment damage data loss performance degradation or unex...

Page 5: ...r dealer or the nearest service center Never attempt to disassemble the device yourself We shall not assume any responsibility for problems caused by unauthorized repair or maintenance Caution Do not...

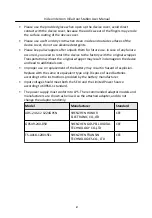
Page 6: ...lead to additional costs Improper use or replacement of the battery may result in hazard of explosion Replace with the same or equivalent type only Dispose of used batteries according to the instructi...

Page 7: ...interference will not occur in a particular installation If this equipment does cause harmful interference to radio or television reception which can be determined by turning the equipment off and on...

Page 8: ...pose of it at designated collection points For more information see www recyclethis info 2006 66 EC battery directive This product contains a battery that cannot be disposed of as unsorted municipal w...

Page 9: ...ntroduction 6 3 2 Surface Mounting without Protective Shield 7 3 3 Surface Mounting with Protective Shield 8 4 Activation 11 4 1 Activate Device via Web 11 4 2 Activate Device via Client Software 11 4...

Page 10: ...a Door Station 37 6 3 Organization Management 37 6 3 1 Add Organization 37 6 3 2 Modify and Delete Organization 38 6 4 Person Management 38 6 4 1 Add Person 38 6 4 2 Modify and Delete Person 40 6 4 3...

Page 11: ...6 5 2 Search Call Logs 45 6 5 3 Upload Armed Information 46 A Communication Matrix and Device Command 47 Video Intercom Villa Door Station User Manual x...

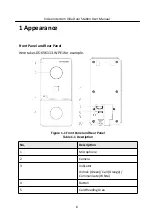
Page 12: ...KV6113 WPE1 for example Figure 1 1 Front Panel and Rear Panel Table 1 1 Description No Description 1 Microphone 2 Camera 3 Indicator Unlock Green Call Orange Communicate White 4 Button 5 Card Reading...

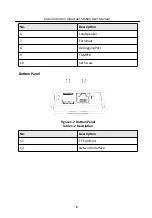
Page 13: ...udspeaker 7 Terminals 8 Debugging Port 9 TAMPER 10 Set Screw Bottom Panel Figure 1 2 Bottom Panel Table 1 2 Description No Description 11 TF Card Slot 12 Network Interface Video Intercom Villa Door St...

Page 14: ...inal and Wiring Description 2 1 Terminal Description Figure 2 1 Terminal Description 2 2 Wiring Description 2 2 1 Door Lock Wiring Figure 2 2 Door Lock Wiring Video Intercom Villa Door Station User Ma...

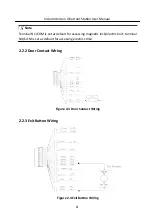
Page 15: ...magnetic lock electric bolt terminal NO COM is set as default for accessing electric strike 2 2 2 Door Contact Wiring Figure 2 3 Door Contact Wiring 2 2 3 Exit Button Wiring Figure 2 4 Exit Botton Wi...

Page 16: ...2 2 4 Alarm Input Device Wiring Figure 2 5 Alarm Input Device Wiring Video Intercom Villa Door Station User Manual 5...

Page 17: ...matches your door station Make sure all the related equipment is power off during the installation Check the product specification for the installation environment 3 1 Accessory Introduction Figure 3...

Page 18: ...k the mounting template on the wall Drill screw holes according to the mounting template Remove the template from the wall Figure 3 2 Mounting Template 2 Secure the mounting plate on the wall with 4 s...

Page 19: ...rt Tools that you need to prepare for installation Drill 2 846 and gradienter Purchase the protective shield before installation Steps 1 Stick the mounting template on the wall Drill screw holes accor...

Page 20: ...mplate 3 Secure the mounting plate and protective shield on the wall with 4 supplied screws according to the screw holes 4 Install the villa door station to the mounting plate Fix the device on the mo...

Page 21: ...Figure 3 5 Flush Mounting with Protective Shield Video Intercom Villa Door Station User Manual 10...

Page 22: ...activation page Note The computer and the device should belong to the same subnet 3 Create and enter a password into the password field 4 Confirm the password 5 Click OK to activate the device 4 2 Act...

Page 23: ...device cannot be performed You can hold the Ctrl or Shift key to select multiple devices in the online devices and click the Activate button to activate devices in batch 4 3 Edit Network Parameters T...

Page 24: ...to enter the page Figure 5 1 Live View You can start stop live view capture record audio on off two way audio etc The stream type can be set as main stream or sub stream For IE Internet Explorer users...

Page 25: ...configure the parameters of the live view record files and captured pictures The record files and captured pictures are the ones you record and capture by using the web browser You can also set and v...

Page 26: ...re information of the detected target is dynamically displayed near the target in the live image Image Size Set the image size to Auto fill 4 3 or 16 9 Auto Start Live View Check Yes to enable the fun...

Page 27: ...em Settings Basic Information to enter the settings page On the page you can edit Device Name and Device No Set the Language according to your needs Click Save to enable the settings Time Settings Cli...

Page 28: ...all the parameters except the IP parameters and user information to the default settings Default Click Default to restore all parameters to default settings Export parameters 1 Click Device Parameter...

Page 29: ...inimum of 8 characters including at least three kinds of following categories upper case letters lower case letters numbers and special characters in order to increase the security of your product And...

Page 30: ...erate the device over network The device supports IPv4 Steps 1 Click Network Basic Settings TCP IP to enter the settings page Figure 5 5 TCP IP Settings 2 Configure the network parameters Check DHCP t...

Page 31: ...5535 Server Port The default server port number is 8000 and it can be changed to any port No ranges from 2000 to 65535 3 Click Save to enable the settings Wi Fi Settings Steps 1 Click Network Basic Se...

Page 32: ...ting the Trap Address the camera can send the alarm event and exception messages to the surveillance center Steps 1 Click Network Advanced Settings SNMP to enter the settings page Figure 5 7 SNMP Sett...

Page 33: ...of information leakage you are suggested to enable SNMP v3 instead of SNMP v1 or v2 FTP Settings Steps 1 Click Network Advanced Settings FTP to enter the settings page Figure 5 8 FTP Settings 2 Check...

Page 34: ...Check the checkbox of Enable to enable the function 3 Select the Platform Access Mode Note Hik Connect is an application for mobile devices With the App you can view live image of the device receive a...

Page 35: ...tion IP SIP Server IP Address Center IP Address and Center Port No 3 Click Save to enable the settings 5 3 4 Video Audio Settings Video Parameters Steps 1 Click Video Audio Video to enter the settings...

Page 36: ...Video Audio Resolution Select the resolution of the video output Bitrate Type Select the bitrate type to constant or variable Video Quality When bitrate type is selected as Variable 6 levels of video...

Page 37: ...m 1 to 400 Audio Encoding The device support G 711ulaw 4 Click Save to enable the settings Audio Parameters Steps 1 Click Video Audio Audio to enter the settings page 2 Adjust the Input Volume Output...

Page 38: ...ich ranges from 1 to 100 Saturation Saturation describes the colorfulness of the image color which ranges from 1 to 100 Sharpness Sharpness describes the edge contrast of the image which ranges from 1...

Page 39: ...5 Configure the text overlay settings 1 Check the checkbox in front of the textbox to enable the on screen display 2 Enter the characters in the textbox Note Up to 4 text overlays are configured 6 Adj...

Page 40: ...tings Clear Area Click Clear All to clear all of the areas Adjust Sensitivity Move the slider to set the sensitivity of the detection 4 Click Arming Schedule to edit the arming schedule 5 Click on the...

Page 41: ...e 2 Select the Major Type as Device Event or Door Event 3 Select the type of the Normal Linkage for the event 5 3 7 Intercom Settings Device ID Configuration Steps 1 Click Device ID Configuration to e...

Page 42: ...ne main door station D series or V series up to 8 sub door stations can be configured Access Control and Elevator Control Before You Start Make sure your door station is in the mode of main door stati...

Page 43: ...Click Save to enable the settings Note The door unlocked duration ranges from 1s to 225s If you check Delayed Door Alarm an alarm will be triggered automatically if the door is not locked in the conf...

Page 44: ...vator controllers can be connected to one door station Up to 10 negative floors can be added Make sure the interface types of elevator controllers which are connected to the same door station are cons...

Page 45: ...t the ring tone from PC Note Available Audio Format WAV AAC Size Less than 600 KB Sample Rate 8000Hz Mono Press Button to Call Steps 1 Click Intercom Press Button to Call to enter the settings page 2...

Page 46: ...should be added to the client software for remote configuration and management 6 1 1 Add Online Device Before You Start Make sure the device to be added is in the same subnet with your computer Other...

Page 47: ...Device by IP Address Steps 1 Click Add to pop up the adding devices dialog box 2 Select IP Domain as Adding Mode 3 Enter corresponding information 4 Click Add 6 1 3 Add Device by IP Segment Video Inte...

Page 48: ...page control click and select Capture to get the picture of the live view 6 3 Organization Management On the main page of the Client Software click PersonalManagement to enter the configuration page 6...

Page 49: ...you can add person to the organization and manage the added person such as issuing cards in batch importing and exporting person s information in batch etc Note Up to 10 000 persons or cards can be a...

Page 50: ...e card for the person 1 Click Credential Card 2 Click to pop up the Add Card dialog 3 Select Normal Card as Card Type 4 Enter the Card No 5 Click Read and the card s will be issued to the person 4 Lin...

Page 51: ...n information can be imported and exported in batch Steps 1 Exporting Person You can export the added persons information in Excel format to the local PC 1 After adding the person you can click Export...

Page 52: ...be displayed 4 Click to select the device and then click Get to start getting the person information from the device Note The person information including person details person s fingerprint informati...

Page 53: ...Figure 6 2 Issue Card in Batch 2 Click Settings Video Intercom Villa Door Station User Manual 42...

Page 54: ...and card information will display in the Person s with Card Issued list 6 4 7 Permission Settings Add Permissions Steps 1 On the main page click AccessControlInfo Access Group to enter the page 2 Clic...

Page 55: ...nd managing notice via the iVMS 4200 Client Software Note For the user with access control module permissions the user can enter the Access Control module and manage video intercom and search informat...

Page 56: ...duration can be set from 15s to 60s via the Remote Configuration of the video intercom device The maximum speaking duration between indoor station and iVMS 4200 can be set from 120s to 600s via the R...

Page 57: ...lick Search and all the matched call logs will display on this page 4 Optional Check the detailed information of searched call logs such as call status ring speaking duration device name resident orga...

Page 58: ...ports of Hikvision access control and video intercom devices Figure A 1 QR Code of Communication Matrix Device Command Scan the following QR code to get the device common serial port commands Note tha...

Page 59: ...Figure A 2 Device Command Video Intercom Villa Door Station User Manual 48...

Page 60: ...UD16095B...

Reviews: