background image

Before You Start

Install the Hik-Connect APP on your phone first.

Steps

1. Hold   to show the menu of device.
2. Press   to enable hot spot function.
3. Turn on the WLAN of your phone and connect to the hot spot.

• Hot Spot Name: Wlan-IPTS Serial No.
• Hot Spot Password: the last 9 digits of serial No.

4. Open the APP and connect your phone with the device. You

can view the interface of device on your phone.

Note

The hot spot function will be turned off automatically when

power is less than 15%.

8 Maintenance

This part introduces the operation of checking device

information, upgrading device, and restoring to defaults, etc.

8.1 View Device Information

Steps

1. Hold   to show the menu of device.
2. Select   , and press   . You can view the device information

such as version, and serial No.

8.2 Upgrade Device

Before You Start

Please get the upgrade package first.

Steps

1. Connect the device to your PC with USB cable.
2. Open the detected disk, copy the upgrade file and paste it to

the root directory of the device.

3. Disconnect the device from your PC.
4. Reboot the device.
Result
The device upgrades automatically. The upgrading process will be

displayed in the main interface.

8.3 Restore Device

Steps

1. Hold   to show the menu of device.
2. Select   , and press   to restore the device to defaults

according to the prompt.

9 Frequently Asked Questions

10

Summary of Contents for UD16527N

Page 1: ...Handheld Thermal Monocular user manual UD16527N...

Page 2: ...OSS OF BUSINESS PROFITS BUSINESS INTERRUPTION OR LOSS OF DATA CORRUPTION OF SYSTEMS OR LOSS OF DOCUMENTATION WHETHER BASED ON BREACH OF CONTRACT TORT INCLUDING NEGLIGENCE PRODUCT LIABILITY OR OTHERWIS...

Page 3: ...NUCLEAR FUEL CYCLE OR IN SUPPORT OF HUMAN RIGHTS ABUSES IN THE EVENT OF ANY CONFLICTS BETWEEN THIS MANUAL AND THE APPLICABLE LAW THE LATER PREVAILS ii...

Page 4: ...This device must accept any interference received including interference that may cause undesired operation EU Conformity Statement This product and if applicable the supplied accessories too are mark...

Page 5: ...Warning This is a class A product In a domestic environment this product may cause radio inter ference in which case the user may be required to take adequate measures iv...

Page 6: ...tuation which if not avoided will or could result in death or serious injury Caution Indicates a potentially hazardous situation which if not avoided could result in equipment damage data loss perform...

Page 7: ...y overload Battery Improper use or replacement of the battery may result in explosion hazard The built in battery cannot be dismantled Please contact the manufacture for repair if necessary For long t...

Page 8: ...se the device to high electromagnetic radiation or dusty environments Do not aim the lens at the sun or any other bright light Emergency If smoke odor or noise arises from the device immediately turn...

Page 9: ...urement The device can detect the distance between the target and the observation position Highest Temperature Tracking The device can detect the highest temperature in the scene and mark the spot Ima...

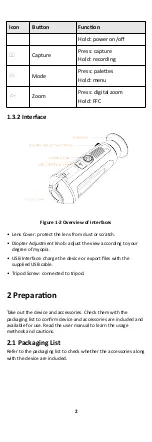
Page 10: ...according to your degree of myopia USB Interface charge the device or export files with the supplied USB cable Tripod Screw connected to tripod 2 Preparation Take out the device and accessories Check...

Page 11: ...rging temperature should be from 0 C to 45 C 32 F to 113 F Charge the device with the delivered USB cable Steps 1 Lift the USB cover 2 Plug in the USB cable and charge the device Figure 2 1 USB Interf...

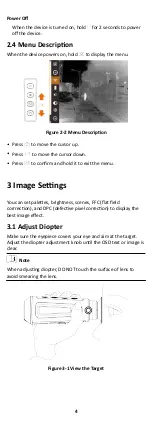
Page 12: ...irm and hold it to exit the menu 3 Image Settings You can set palettes brightness scenes FFC flat field corrrection and DPC defective pixel correction to display the best image effect 3 1 Adjust Diopt...

Page 13: ...4 Select Scene You can select proper scene according to environment temperature to improve the display effect Steps 1 Hold to go to the menu 2 Select and press to switch scene refers to summer mode an...

Page 14: ...e to low temperature the image is colored in from white yellow red pink to purple 3 6 Adjust Digital Zoom You can zoom the image by using this function Press in the view mode the live view switches be...

Page 15: ...ffset The offset refers to the moving length of cursor 4 Press or to select the moving direction 5 Press to move the cursor to the position of dead pixel Hold to correct the dead pixel Note If the men...

Page 16: ...bottom Press Figure 4 2 Set the Edge of Target Bottom Result The left top of the image displays the distance measurement result and the height of the target Figure 4 3 Measurement Result Note Go to d...

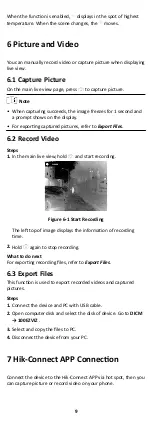
Page 17: ...main live view hold and start recording Figure 6 1 Start Recording The left top of image displays the information of recording time 2 Hold again to stop recording What to do next For exporting recordi...

Page 18: ...ion upgrading device and restoring to defaults etc 8 1 View Device Information Steps 1 Hold to show the menu of device 2 Select and press You can view the device information such as version and serial...

Page 19: ...ear how to adjust it Adjust the diopter adjustment knob until the image is clear Refer to section Adjust Diopter 9 4 Capturing or recording fails What s the problem Check the following items Whether t...

Reviews: