3
Step 1
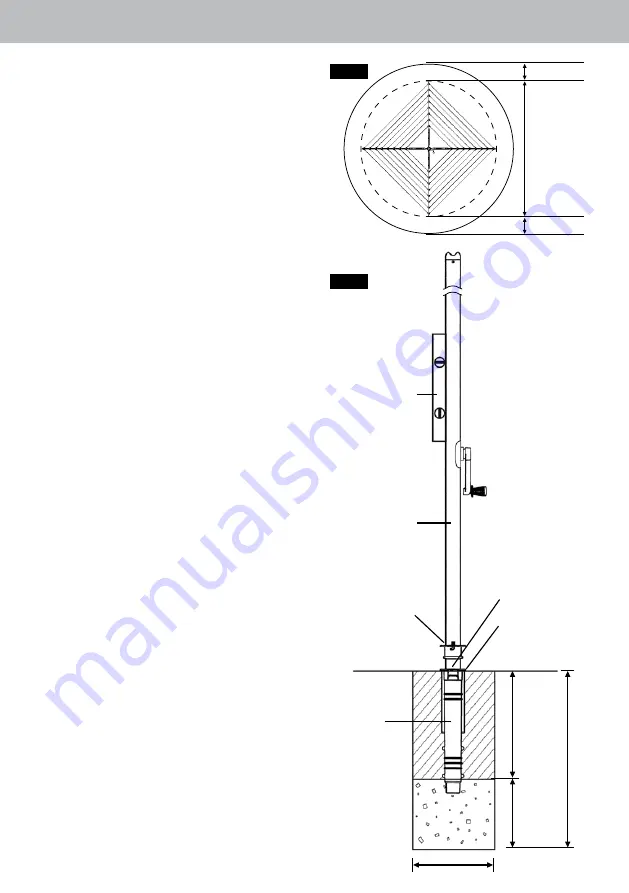
Select a Suitable Location
1.1
Select a suitable area for installation.
1.2
Allow a minimum of 500mm (1'7")
clearance around your Rotary Hoist (
Fig. 1
).
Step 2
Install the Ground Socket
2.1
Dig a hole 250mm (10") diameter by
approximately 650mm (26") deep (
Fig. 2
).
2.2
Place approximately 200mm (8")
of coarse gravel into the hole.
2.3
Insert the main standard into the ground
socket. Engage the locking collar and
lock into position.
Make sure
the tabs are closed to prevent
concrete entering the locking recess.
2.4
Place the ground socket and main
standard into the hole.
Push the base of the ground socket into
the gravel.
Check level vertically.
The top of the ground socket must sit
approximately 6-12mm (1/4"-1/2")
above ground level.
2.5
Support the main standard and
concrete into position.
Concrete should be damp enough
to ‘hold together’ when squeezed
in your hand.
Settle concrete by pushing a thin stick
into the mix several times.
Leave the main standard in the
ground socket until the concrete
has set.
Keep concrete out of the locking
recess in the ground socket.
2.6
Allow 24 hours for the concrete to set
before final assembly and use of your
Rotary Hoist.
Check for level
Main standard
Locking collar
Engage into
ground socket.
Rotate to lock.
Close tabs to
prevent entry
of concrete
Ground
socket
450mm
(18")
concr
ete
200mm
(8")
gravel
650mm
(26")
Fig. 1
Fig. 2
Installation
Top of socket
approximately
6-12mm (1/4"-1/2")
above ground level
250mm (10")
500mm (1'7")
500mm (1'7")
3.2m (10'6")
Rotary 37
3.6m (11' 9")
Rotary 47


