background image


ASSEMBLY AND PARTS LIST 


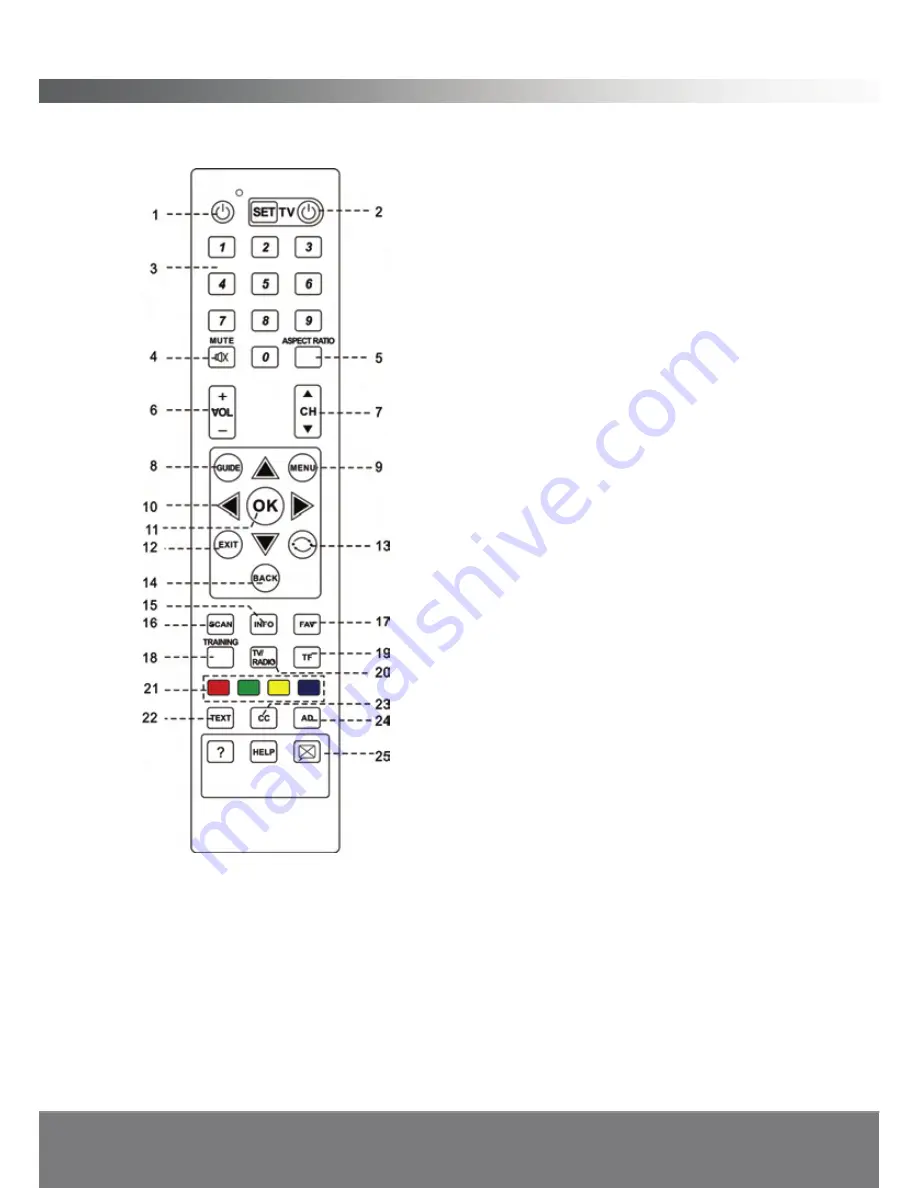
Remote Control Unit   

All features of the STB can be controlled with the remote control. 

1. POWER:

 Press to switch between operation 

and standby mode. 

2. TV:

 Used to set this remote control to turn your 

TV ON or OFF. 

3. NUMERIC KEYS:

 Press to input Channel 

Numbers, Passwords or Letters. 

4. MUTE:

 Press to mute the TV audio (does not 

mute TF). 

5. ASPECT RATIO:

 Press to select aspect ratio 

mode. 

6. VOL-/+:

    Adjusts the volume. 

7. CH

/

:

 Changes the channel. 

8. GUIDE:

 Displays the Electronic Program 

Guide. 

9. MENU:

 Press to display the Main Menu. 

10. Left

/Right

/Up

/Down

:

 Moves the 

cursor in the menu. 

11. OK:

 Press to select the item in the menu or to 

display the TV/Radio channel List. 

12. EXIT:

 Press to exit from the current mode. 

13. RECALL:

 Press to return the previous 

channel. 

14. BACK:

 Press to return to the previous menu 

or to exit from the current mode. 

15. INFO:

 Displays the information of the NOW & 

NEXT program on the current channel. 

16. SCAN:

 Auto Scan for digital channels. 

17. FAV:

 Press to display Favorite Channel List. 

18. TRAINING:

 Places the remote control in 

training mode. 

19. TF:

 Turn Talking Function ON or OFF. 

20. TV/RADIO:

 Switch between TV or RADIO mode. 

21. RED / GREEN / YELLOW / BLUE:

 Special keys in the menu, please refer to the   

on screen prompts. 

22. TEXT:

 Displays Teletext information (where available).   

23. CC:

 Press to view subtitles (Closed Captioning).   

24. AD:

 Activates Audio Description (AD) where available from the broadcaster. 


Summary of Contents for HD94003G

Page 1: ......

Page 2: ......

Page 3: ...EATURES 15 Basic operation 15 Commonly used features 15 Programme Guide EPG 17 On screen help pages 18 Single button functions 18 Fav 18 TF talking features 18 AD audio description 18 CC subtitles 19 Training 19 Information where am I 19 Advanced features 20 Main Menu 20 Preferences 20 Speaker and headphone output 24 Favourites 24 Reminders list 25 Parental control 25 MHEG 5 settings 28 Technical ...

Page 4: ...lectrical shock do not expose the appliance to water Ensure that objects filled with liquids such as vases are not placed on the apparatus If an object or liquid gets into the unit disconnect the plug and ask an approved technician to check the unit Never place the unit in a confined space such as a bookcase or built in cabinet unless proper ventilation is provided Leave a 10cm gap around the unit...

Page 5: ...st Please make sure the following accessories are supplied with the STB 1 High Definition Digital Set Top Box 2 Remote Control 3 RCA Video Audio Cable 4 YPbPr Component Video Cable 5 Batteries AAA Size 6 User Manual 7 Quick Set Up Guide ...

Page 6: ...in the menu or adjust the volume level in the normal state 5 CH Up Down Button CH CH Moves the cursor up down when in the menu or changes the current program to the previous next channel in the normal state 6 Front Panel Display Front panel window displays information concerning current operation such as the channel number The red LED illuminates when power is on and turns yellow when the unit is ...

Page 7: ...ect High Definition Multimedia output to HD Monitors HDMI Type Provides both digital video and digital audio connection in one cable 7 YPbPr Connect component video to HD Monitors YPbPr Type This is a video only connection you will need to use Red and White RCA for Left and Right audio or Digital Audio output connection 8 VIDEO Yellow RCA Connect to a TV with yellow video input to obtain picture 9...

Page 8: ...select the item in the menu or to display the TV Radio channel List 12 EXIT Press to exit from the current mode 13 RECALL Press to return the previous channel 14 BACK Press to return to the previous menu or to exit from the current mode 15 INFO Displays the information of the NOW NEXT program on the current channel 16 SCAN Auto Scan for digital channels 17 FAV Press to display Favorite Channel Lis...

Page 9: ...of the SET button NOTE If another key is not pressed within 15 seconds the Set Top Box Remote Control will exit Learning Mode 3 Lay both the HD94003G Remote Control and the TV Remote control on a flat surface Orientate both remotes so that the infrared receivers are facing one another within a distance of 1cm to 4cms Press the blue power key on the HD94003G remote control until the red light is bl...

Page 10: ...ntrol 2 While still holding down the MUTE button press and hold down the ASPECT RATIO button 3 Hold both buttons down until a beep is heard release the two buttons the beep is now turned off To turn the beep feature back on follow the above procedure You are now ready to use the Set Top Box remote Control to turn the TV ON and OFF by pressing the power button in the TV section of the Set Top Box r...

Page 11: ... or batteries of a different type 4 If you don t intend to use the remote control for an extended period remove the batteries to prevent possible leakage and corrosion 5 Do not drop apply shock or step on the remote control 6 Do not spill water on the remote control Note If the receiver does not respond when operating the remote control from a close range you will need to replace the batteries Usi...

Page 12: ...s green blue and red cable and AUDIO L R output connectors white and red cable on the back of the HD94003G to the COMPONENT input green blue and red and audio input white and red on your television using RCA type cables Option 2 HDMI High Definition connection 3 Connect the HDMI output connector on the HD94003G to the HDTV using HDMI cable This cable carries both digital video and audio in the one...

Page 13: ...onnect Optical S PDIF output connector on the HD94003G to an Audio Amplifier using optical cable Option 4 RF connection Standard Definition connection 5 Connect the RF out connectors on the back of the HD94003G to the RF IN on your television using RF cable Using this connection you will need to tune your TV to the correct channel to receive signal from the Set Top Box Note Please ensure that your...

Page 14: ...me installation screen will appear on you TV Ensure the antenna is connected Talking Function is set to ON Use the keys on the remote control to select audio prompts for set up to either On or Off Press OK to continue to the next menu item in the set up process The next section in the Set up process is Set up Technical settings use the keys on the remote control to select one of the menu options 1...

Page 15: ...emote control to change from 7MHz to 8MHz frequency bandwidth The default setting for Australia at the time of publication is 7MHz Press OK to continue to the Automatic tuning window A scanning window will open and the HD94003G will automatically begin to search for TV and radio channels in your region Progress will be shown by a yellow bar along the bottom of the screen and will be announced if t...

Page 16: ...watch TV regularly it is recommended that you leave the HD94003G connected to the mains and turn to standby mode when you wish to turn it off You will only need to disconnect from the mains when you are away or do not wish to use the TV for a long period of time one month for example The HD94003G will automatically update the stored channels whilst it is in standby mode It can also receive updates...

Page 17: ... functions will require the use of the navigation buttons which are in the centre of the remote control please see remote control section for a description of the layout of these buttons or refer to the remote control diagram on your Quick Start Guide Changing the volume When you want to change the volume of the set top box use the volume control button on the remote control This is a vertically o...

Page 18: ...ss the FAV button on the remote control Your favourite channel list will be displayed Use the buttons to scroll up or down through the list Press OK to select the channel you wish to watch Your selected channel will be displayed Using the channel list Press the OK or the TV Radio button on your remote control A list of all channels will be displayed on the screen Press to move to the channel you w...

Page 19: ...evious channel Keep pressing it until the channel you want is displayed and also spoken if the Talking TV function is active If you wish to permanently set one layout this can be done by using the menu function which is described later in this user guide To see information about a programme press the Info button A programme information window will appear on the screen and will also be spoken You c...

Page 20: ...t set your favourite channels Please refer to the section titled Favourite for information on how to do this TF talking features This button allows you to hear spoken actions on your system With talking features turned on the system will speak any visual displays out to you For example when you are in the programme guide as you scroll through the programmes anything that is highlighted will be spo...

Page 21: ...nformation bar Subtitles are turned off as default The CC button allows you to instantly turn subtitles on or off if they are provided for the program you are watching Training This button will place the remote control in training mode When in training mode and when the Talking Features are turned ON the system will announce the name and description of the action for any button on the remote contr...

Page 22: ...ntrol Training Mode Manufacture information Preferences This option allows you to change audio and visual settings according to your preferences and the requirements of your TV set Press the menu button Preferences is the first option and will be highlighted press OK Use the buttons to choose from the following Set top box volume This is the first option in the preferences menu Use the buttons to ...

Page 23: ...ecrease the talking features volume Visual preferences Visual preferences is the fourth option when this option is highlighted press OK to display the list of options in this sub menu environment Use the buttons to choose from the following Colour scheme Here you can select the colour scheme of the visual displays choose from white on blue white on black or black on white Use the buttons to select...

Page 24: ...r list view The list view will only display one channel at a time whereas the grid view will show you a range of channels and the programmes next to them Use the buttons to select the view you wish to have and Press OK Audio description preferences Use the buttons to select from the following Turn AD on off Use the buttons to select either Turn AD on or Turn AD off Turn AD notification on off Use ...

Page 25: ...unction allows you to set the level of information provided as part of the talking feature The HD94003G will be set to beginner when you start to use it This means that all information that appears on screen will be spoken to you In expert mode some of the text is not announced For example when the information bar appears across the bottom of the screen beginner mode will read all the details wher...

Page 26: ...sing this list it will make it easier and quicker for you to change to your favourite channels Press the Menu button on the remote control Press down on the navigational button once until favourites is highlighted and press OK There are two options Set up favourites and View current favourites Set up favourites Press OK when the Set up Favourites option is highlighted The set up favourite s window...

Page 27: ... highlight Reminders list and press OK Your reminders list will be displayed on screen To delete a reminder highlight the programme you wish to delete by using the buttons then press OK A delete reminders window will open Use the buttons to highlight yes to delete or no not to delete and press OK The reminders list will be updated and saved Press exit to return to the programme you were watching P...

Page 28: ...ing Change PIN You can change the PIN code from the default setting if you plan to use parental control The default setting is 0 0 0 0 Choose a number you can easily remember as restoring defaults will not reset the new PIN code back to the default setting To change the PIN enter parental control and then use the buttons to choose option 1 Press the OK button The Change PIN window will be displaye...

Page 29: ... to the previous menu Set Parental Guidance Rating In this sub menu you can select a Parental Guidance rating to block programs that have the selected parental rating or above To view a program with the rating at the level you have set or above you will need to enter the PIN Code Do the following to activate Parental Guidance rating Press OK when the Set Parental Guidance Rating is highlighted Use...

Page 30: ... to set up the following items Channel tuning Restore factory defaults Set aspect ratio Set aspect conversion Set time Software upgrade Over The Air update Select HD Resolution Channel Tuning Retuning your set top box is similar to installing it for the first time where the set top box scans for TV and radio channels and stores them When retuning is started all existing channel are deleted as are ...

Page 31: ... the set top box on Manual Retune In this menu environment you can manually enter the channel number from the Australian Channel Plan to individually scan channels in your region First you will need to select the bandwidth and press OK then use the navigation buttons to select a channel number from the channel plan Press OK to scan for that channel Turn automatic tuning on off Turning automatic tu...

Page 32: ...k to return to the menu Set aspect ratio In this menu you can set the aspect ratio screen shape of the TV your HD94003G connects to Also you can set the aspect conversion how you want the HD94003G to deal with programmes created for a TV with a different screen shape wide 16 9 or square 4 3 for example You can also give details of the video connection format you want to use from the HD94003G to th...

Page 33: ...ime Zone setting Summer time Use buttons you can set the Summer Time mode to ON OFF Software upgrade An upgrade can be performed using the USB port Only to be advised by service technicians Over The Air update An over the air upgrade is a software upgrade that is carried in the broadcast stream If an over the air upgrade is ever made available your system will notify you that the upgrade is availa...

Page 34: ...r various topics for you to refer to at any time To get help press the Help button at any time The contents for the help pages are shown below and can be accessed by pressing 0 whilst in a help screen 1 Remote Control 2 Programme guide 3 Menus 4 Preferences 5 Favourites 6 Reminders 7 Parental control 8 Tuning 9 Watching TV To read a particular help topic use the buttons to select the topic you req...

Page 35: ...ge To enter training mode use the buttons to highlight Remote Control training Mode in the Main Menu then press OK Training mode will now be active any key press of the remote control will announce the keys title and basic functions To exit this mode and return to normal remote control operational mode press EXIT EXIT EXIT twice Manufacturer information This option allows you to display informatio...

Page 36: ...icture quality will vary compared to HD ready TV s however accessing the additional HD stations is still applicable What are the added benefits of a HD STB The added benefits of a HD STB include y Sharper Pictures y Clearer Sound y Widescreen viewing y Extra Channels Do I require an antenna in association with this STB Yes a professionally installed antenna is recommended What aspect ratio does hi...

Page 37: ...on Check the Signal Strength Indictor and check the antenna cable and that the antenna has been inserted correctly No Sound Volume may be set to low or audio muted Check the audio cable connection No Video Change video output port or video display type Check that you have selected the correct Input on your TV Check the video cable connection The remote control is in operation but the STB is not re...

Page 38: ...or QPSK QAM16 QAM64 Data Interface USB Port USB 2 0 LAN Ethernet port RS 232 Serial Port 9 Pin D Female AV Connector YPbPr 3xRCA Green Blue Red CVBS Audio 3xRCA Yellow White Red Digital Audio SPDIF 1xOptical Fibre Digital HD 1xHDMI Headphone Jack 3 5mm input Power Supply Input Voltage 90 250V Frequency 50 60Hz Power Consumption Max 15W Remote Control Battery 2x1 5V AAA Operating Distance UP To 8M ...

Page 39: ......

Page 40: ......

Reviews: