background image

G

Examine all packaging material for small parts that may have come loose during shipment. Periodic checks are recommended to insure that all

components are in proper position, tight and free from damage. Keep this assembly instruction for future reference. Adult assembly is required.

The product of Hillsdale Furniture, LLC is designed for residential use only. Customer Service Phone Number: 502-562-0000

CARE & MAINTENANCE:

The touch of a soft cloth is all the maintenance the finish will ever need. Please do not use harsh or abrasive cleaners for polishing,

as they may cause damage to the finish. Periodic checks are recommended to make sure that all bolts, screws and nuts are securely tightened.

 Date: 04-13-2015

Page 1 of 1

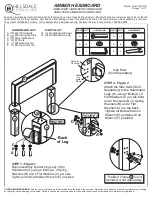
FIGURE 1

Back

of Leg

G

A

H

B

IC

H

H

H

G

HARDWARE LIST

A (10) M8*50mm Bolts

B

M8 Spring Washers

C

M8 Flat Washers

D (4) M8 Nuts 

E (1)

F (1) Ø5 Open Wrench

Ø5 Allen Wrench

PARTS LIST

G

H

(1)

(2)

Headboard Panel

Headboard Legs

(10)

(14)

QTY

PART

HARDWARE

QTY

PART

HARDWARE

1

E

1

F

14

C

4

D

10

A

10

B

STEP 1 - Figure 1

Begin assembly by attaching Legs (H) to 

Headboard (G) using 2 Bolts (A), 2 Spring 

Washers (B) and 2 Flat Washers (C) per side. 

Tighten all bolts with Allen Wrench (E) provided.

The Bed Frame      is not

included. Sold Separately.

* *

(Sold Separately)

Side Rails

Holes for

Cal-King

Holes

for

Metal

Frame

H

FIGURE 2

A

C

D B

C

H

AMBER HEADBOARD

AMBR-BQHB / AMBR-BKHB / AMBR-CQHB

AMBR-CKHB / AMBR-JQHB / AMBR-JKHB

STEP 2 - Figure 2

Attach the 

Side Rails


(Sold 

Separately) 

to the Headboard  

Legs (H) using 2 Bolts (A), 2 

Flat Washers (C) on the front 

and 2 Hex Nuts (D), 2 Spring 

Washers (B) and 2 Flat 

Washers (C) on the back.    

Tighten all bolts with Allen 

Wrench (E) and Open End 

Wrench  (F) provided.  

Summary of Contents for AMBR-JQFB

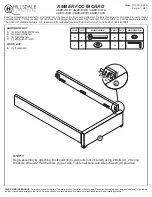
Page 1: ...BR JKFB AMBR BKFB AMBR CKFB STEP 1 Begin assembly by attaching Footboard E to side rails not included using 2 Bolts A 2 Spring Washers B and 2 Flat Washers C per side Tighten all bolts with Allen Wrench D provided HARDWARE LIST A 4 Short Bolts M8 50mm B 4 Spring Washers C 4 Flat Washers D 1 Ø5 Allen Wrench PARTS LIST E 1 Footboard QTY PART 4 A 4 C HARDWARE QTY PART HARDWARE 4 1 B D CARE MAINTENANC...

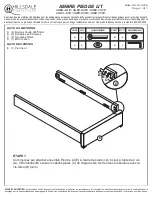
Page 2: ...KFB ÉTAPE 1 Commencez par attacher ensemble Pied de Lit E à l autre des rails non inclus à l aide de 2 vis A 2 Rondelles B et deux rondelles plates C de chaque côté Serrez tous les boulons avec la clé Allen D fourni LISTE DU MATÉRIEL A 4 Boulons Courts M8 50mm B 4 Rondelles de Printemps C 4 Rondelles Plates D 1 Ø5 Clé Allen LISTE DES PIÈCES E 1 Pied de Lit QTY PART 4 A 4 C HARDWARE QTY PART HARDWA...

Page 3: ... Back of Leg G A H B I C H H H G HARDWARE LIST A 10 M8 50mm Bolts B M8 Spring Washers C M8 Flat Washers D 4 M8 Nuts E 1 F 1 Ø5 Open Wrench Ø5 Allen Wrench PARTS LIST G H 1 2 Headboard Panel Headboard Legs 10 14 QTY PART HARDWARE QTY PART HARDWARE 1 E 1 F 14 C 4 D 10 A 10 B STEP 1 Figure 1 Begin assembly by attaching Legs H to Headboard G using 2 Bolts A 2 Spring Washers B and 2 Flat Washers C per ...

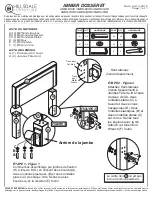
Page 4: ...contrôles périodiques sont recommandées afin de s assurerquetous les boulons vis et écrous sont bien serrés LISTE DU MATÉRIEL A 10 M8 50mm Boulons B 10 M8 Rondelles Ressort C 14 M8 Rondelles Plates D 4 M8 Noix E 1 Ø5 Clé Allen F 1 Ø5 Ouvrir Clé LISTE DES PIÈCES G 1 Panneau de Chevet H 2 Jambes Tête de lit ÉTAPE 1 Figure 1 Commencez assemblage par jambes de fixation H à tête de lit G en utilisant d...

Reviews: